RyoFin User Manual
Table of Contents
- Welcome & Overview
- Getting Started
- Core Concepts
- User Roles & Permissions
- Company & Store Management
- Master Data Setup
- Product Management
- Customer & Supplier Management (CRM)
- Purchases
- Sales
- Quotations
- Bundle Products
- Stock Adjustments
- Batch / Lot Tracking
- Warehouses & Stock Transfers
- Double-Entry Accounting
- Reports
- User Management
- Settings & Branding
- Activity Logs & Audit Trail
- Notifications (Email & SMS)
- End-to-End Workflow Recipes
- Troubleshooting & FAQ
- Glossary
- Appendix A — Permission Reference
1. Welcome & Overview
What is RyoFin?
RyoFin is a multi-store, multi-tenant Inventory Management + Double-Entry Accounting system built for retail and wholesale businesses. It combines day-to-day operations (purchases, sales, quotations, stock) with proper book-keeping (journals, ledgers, balance sheet, profit & loss) so the business owner sees both operational and financial truth in one place.
Who is it for?
- Shop owners / business owners who want one system for inventory and accounting.
- Store managers who handle daily sales, purchases, and stock.
- Cashiers / sales staff who create invoices and take payments.
- Accountants who manage the chart of accounts, journals, and reports.
- Multi-branch businesses where each branch (store) has its own stock but shares the same company books.
Key benefits
- One source of truth — every sale, purchase, payment, and adjustment automatically posts the correct accounting journal entries.
- Real-time stock per store, including average cost (COGS).
- Multi-tenant — each company runs in its own isolated database.
- Multi-store — one company can have many shops, each with its own stock and users.
- Soft delete with reversal — deleting a sale or purchase automatically reverses the accounting impact, preserving audit history.
- Permission-based — every action is gated by a granular permission, assigned through roles.
- PDF reports — every report can be exported as a print-ready PDF.
What this manual covers
This manual is task-oriented. For each module you will find:
- What it does (in plain English)
- Where to find it in the menu
- Field-by-field guide for create/edit forms
- Numbered step-by-step instructions for common tasks
- Which permissions gate which actions
- What journal entries are created (where applicable)
- Tips, warnings, and screenshot placeholders
2. Getting Started
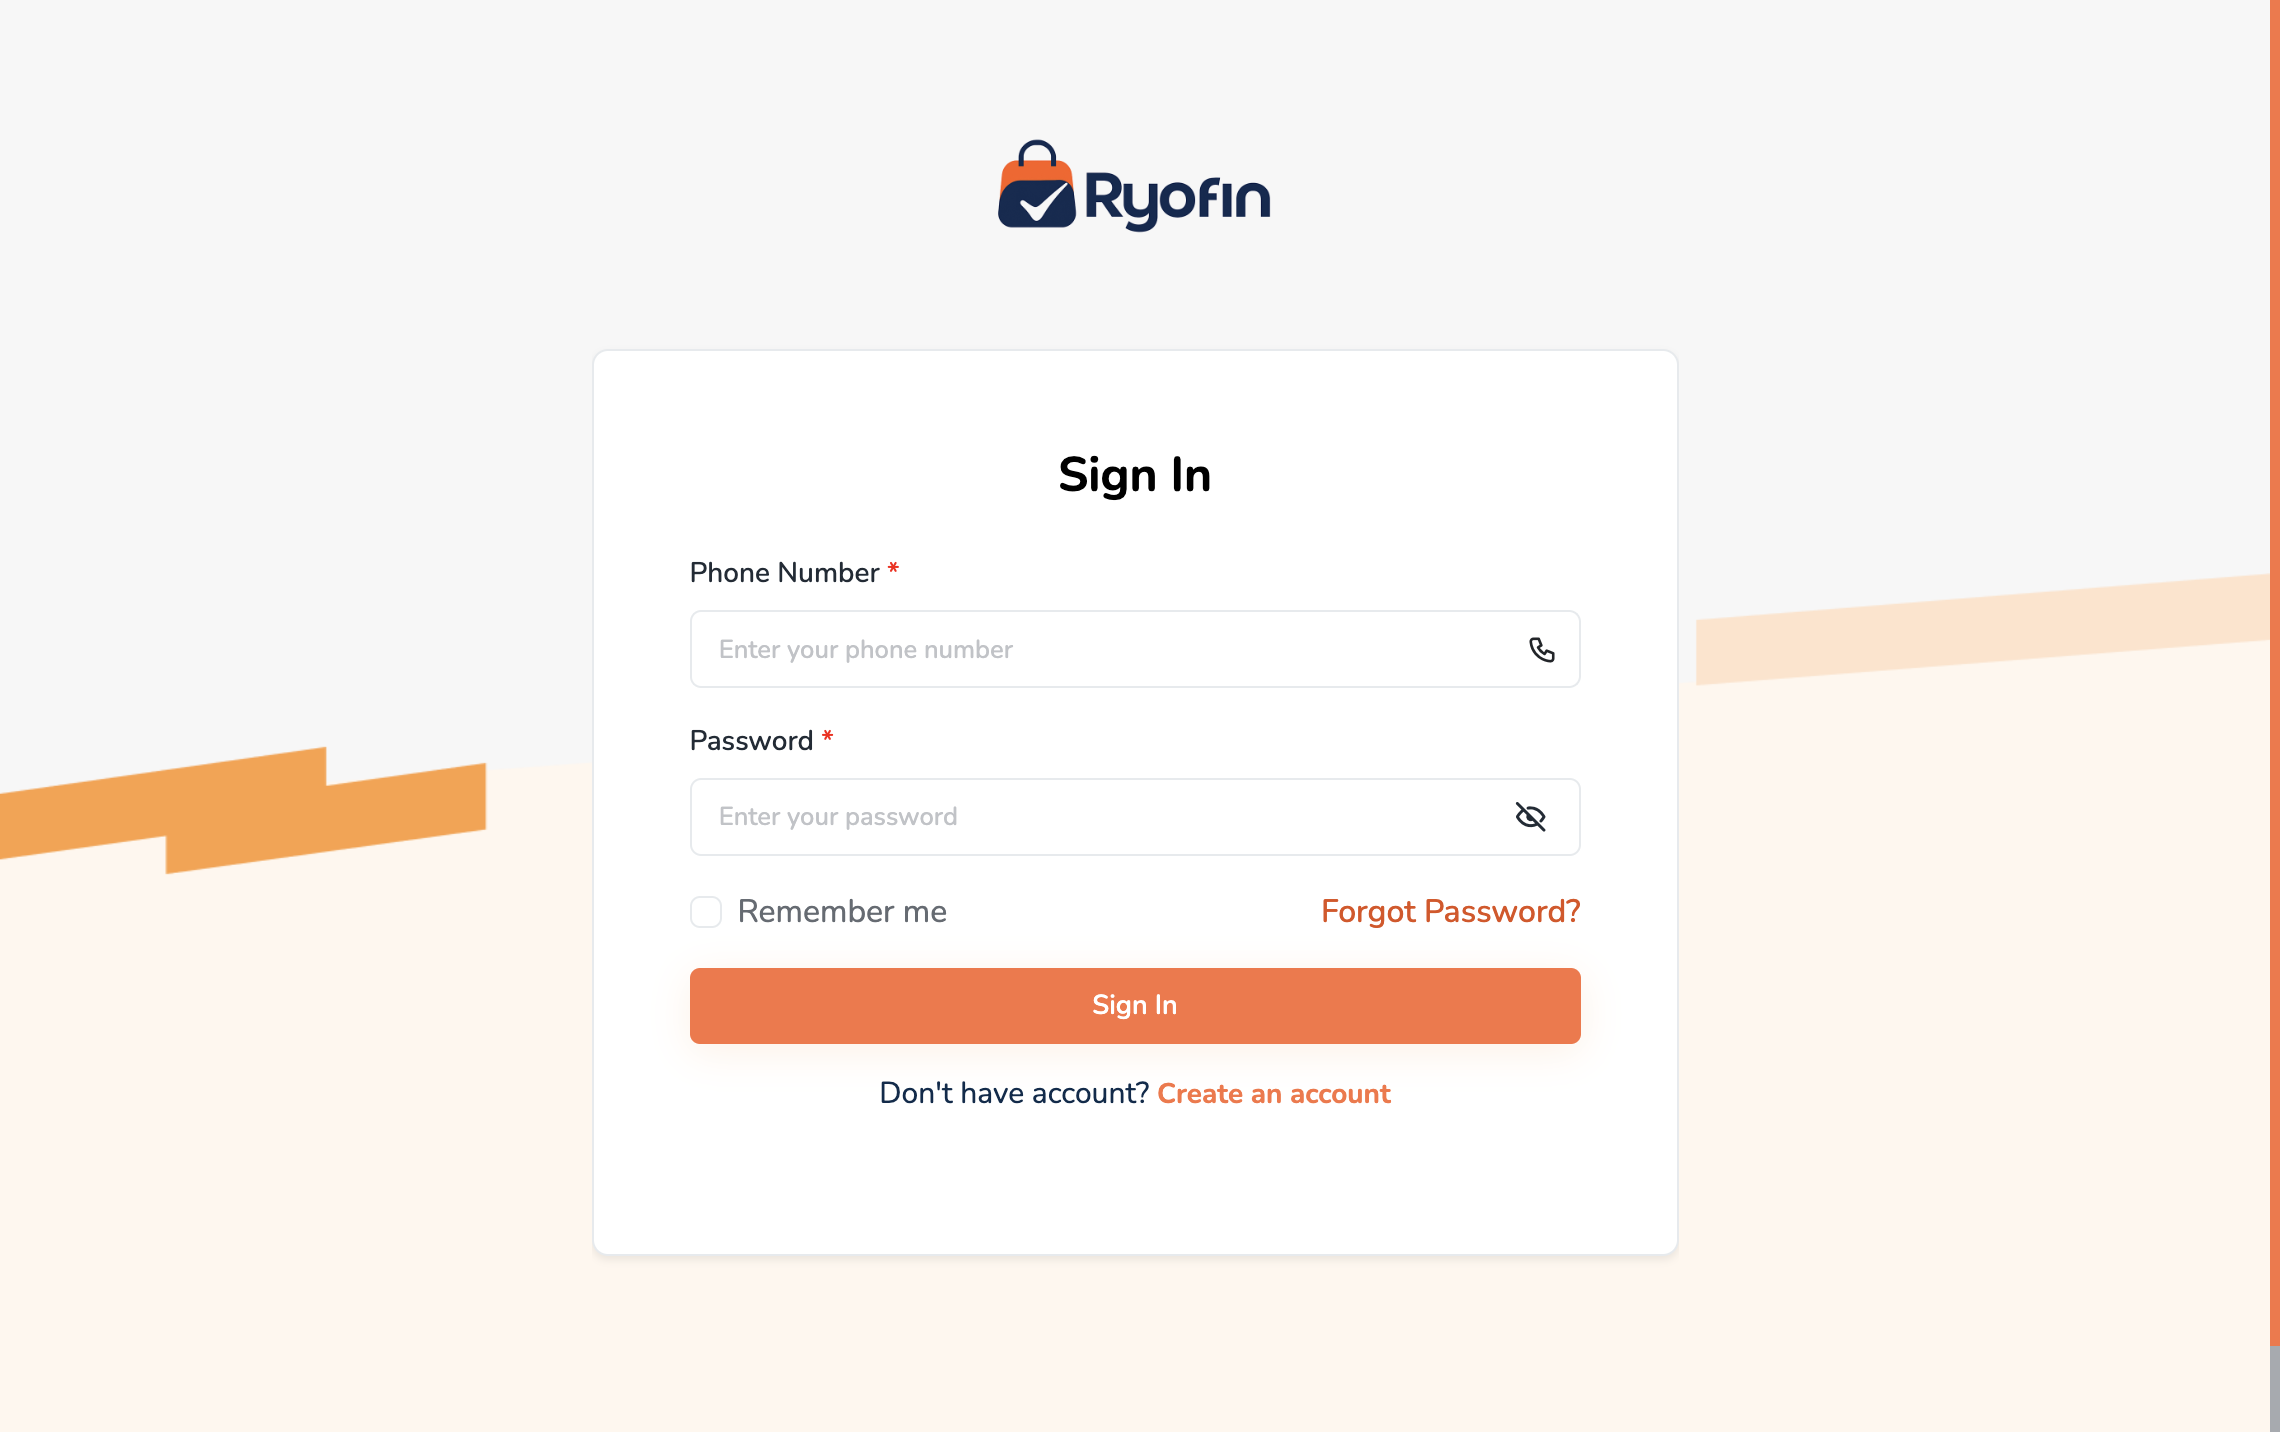
2.1 Logging In
- Open the application URL provided by your administrator (for example:
https://yourshop.ryofin.com). - Enter your phone number and password.
- (Optional) Tick Remember me to stay signed in on this device.
- Click Log In.
NOTE: Your URL contains your company's tenant subdomain (e.g.
sopno.ryofin.com). Make sure you use the URL your administrator gave you — not a generic one.
2.2 First-Time Login
If your account is brand new:
- Log in with the credentials provided by your administrator.
- You can start using the system immediately based on your assigned role and store access.
- If your account is blocked, contact your administrator to activate or update your access.
2.3 Forgot Password (OTP via SMS)
RyoFin uses phone-based password reset:
- On the login page, click Forgot Password.
- Enter your registered phone number.
- Enter the 6-digit OTP you receive by SMS.
- Set a new password.
NOTE: Email may exist in your profile as optional contact info, but login and reset are phone number based.
2.4 The Dashboard
After logging in you land on the Dashboard. Depending on your role you will see:
- Quick links to common actions (Create Sale, Create Purchase, Create Quotation)
- Today's totals (sales, purchases, payments)
- Stock alerts (low stock, out-of-stock)
- Recent activity
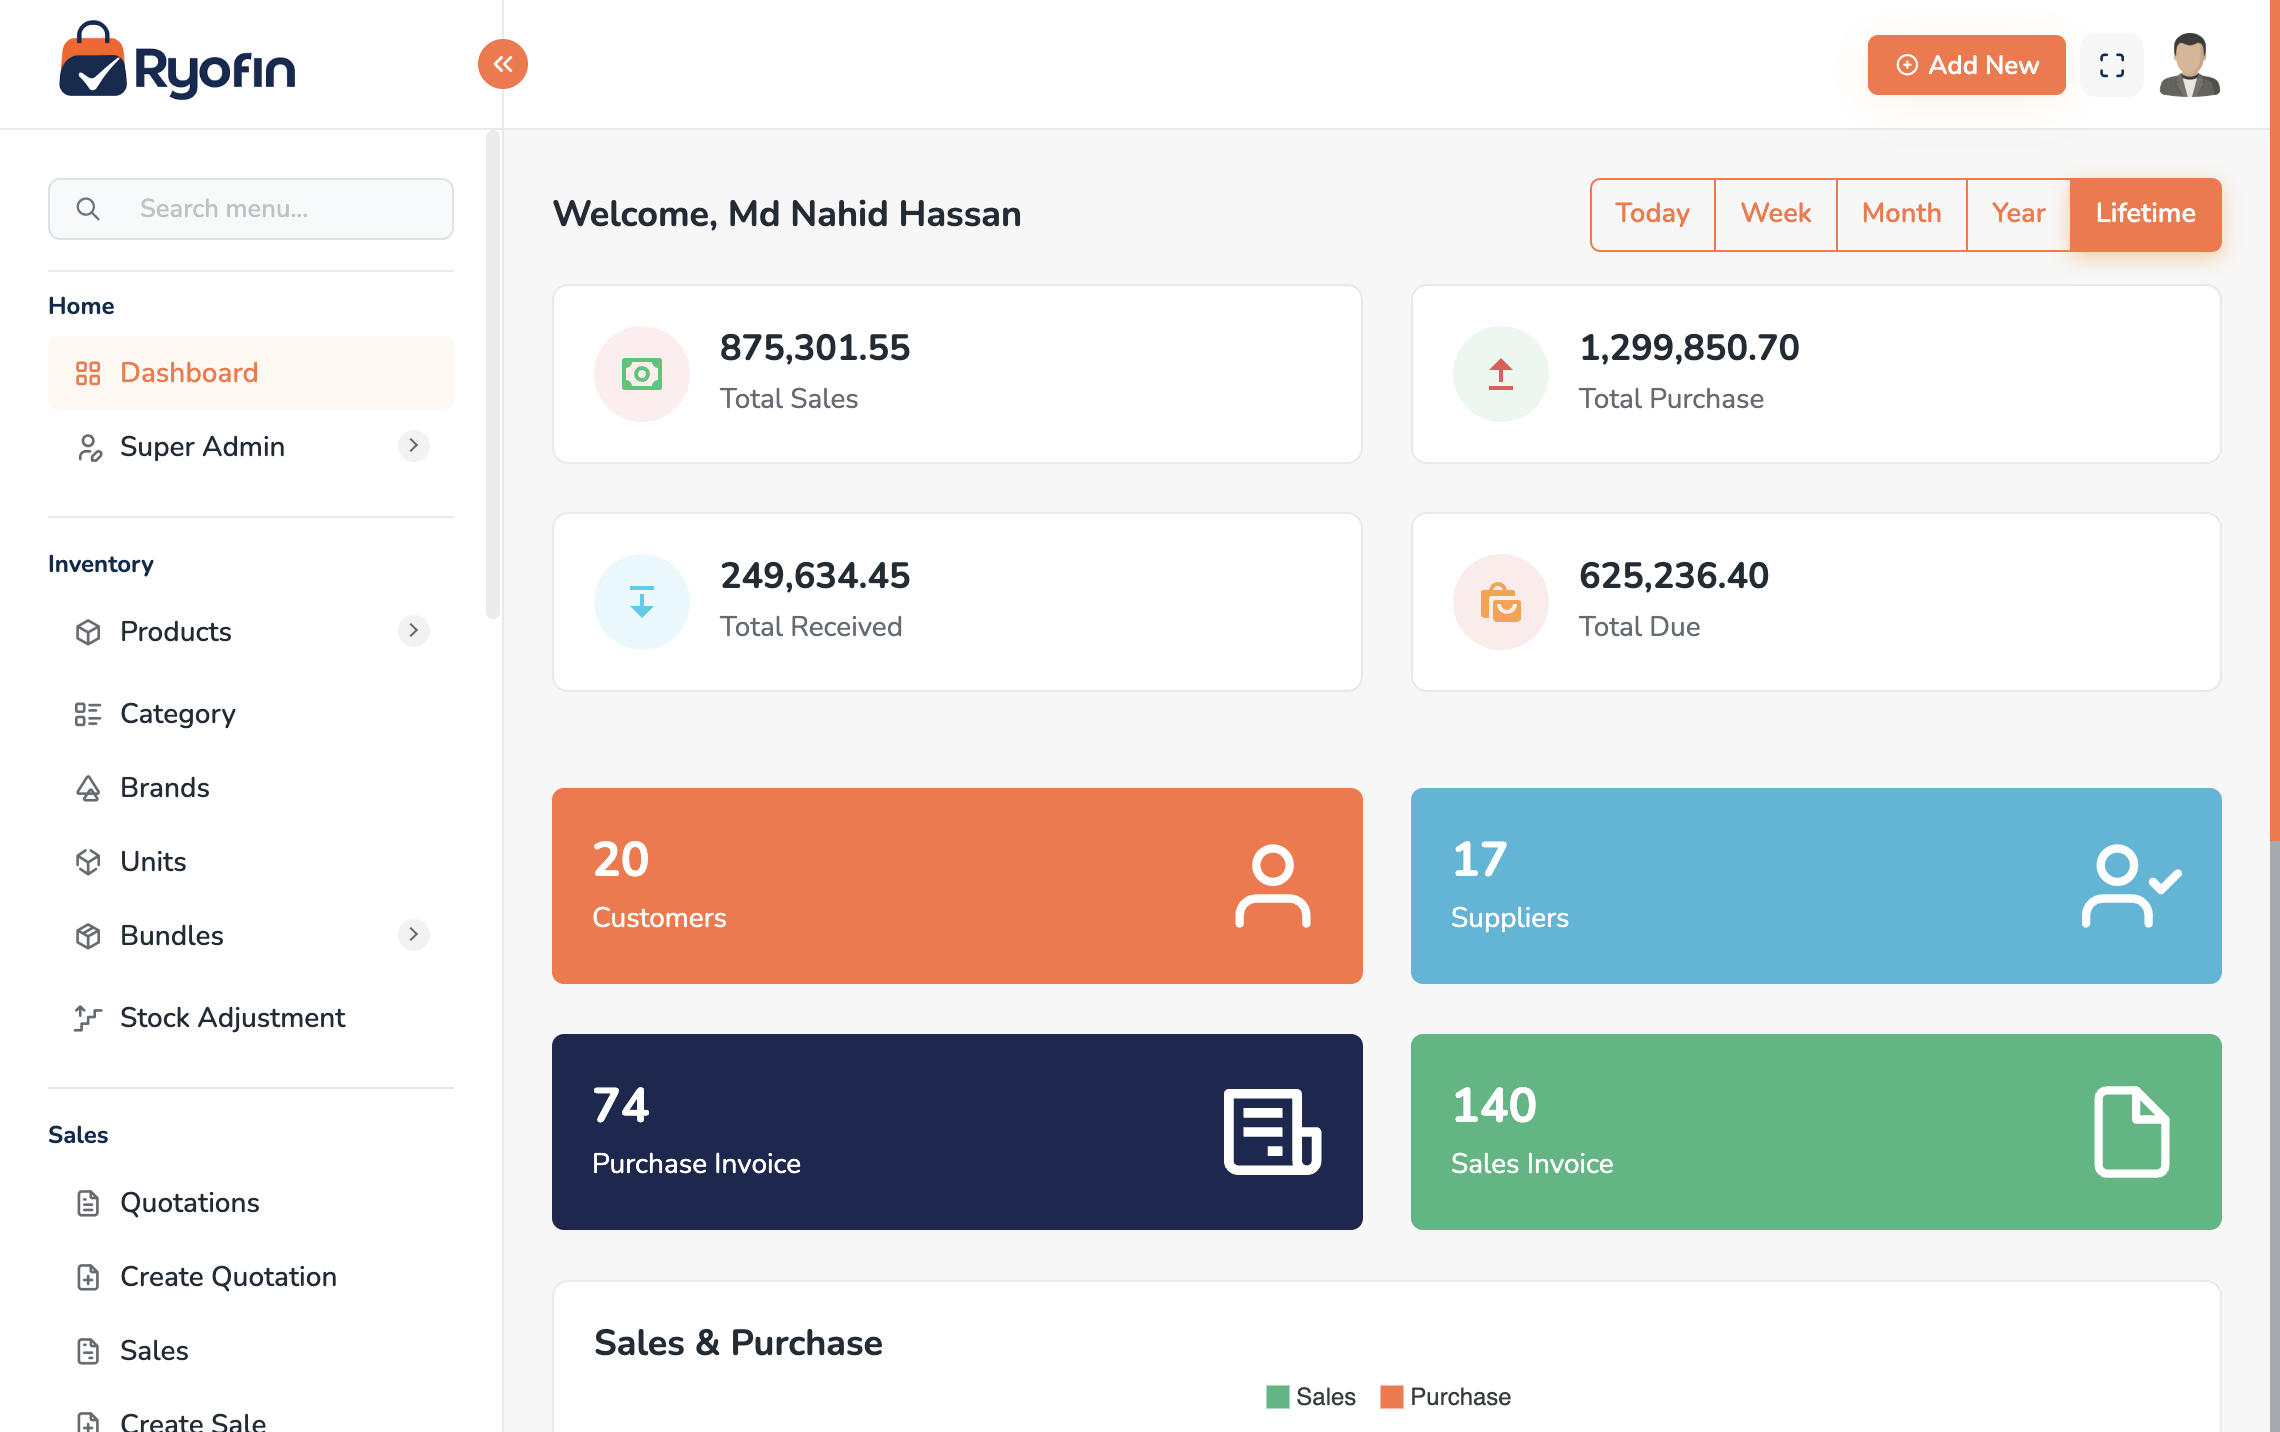
2.5 Navigation Basics
- Sidebar — main module list (Sales, Purchases, Products, Reports, Accounts, etc.).
- Top bar — store switcher, profile menu, language, logout.
- Breadcrumbs — show where you are; click to go up one level.
- Action buttons — primary actions (e.g. "Create Sale") are usually at the top right of a list page.
2.6 Switching Stores
If you have access to more than one store:
- Click the store dropdown in the top bar.
- Select the store you want to work in.
- The list views (Products, Sales, etc.) reload to show that store's data.
NOTE: Some users are restricted to a single store. If you do not see a dropdown, your access is limited to one store by your administrator.
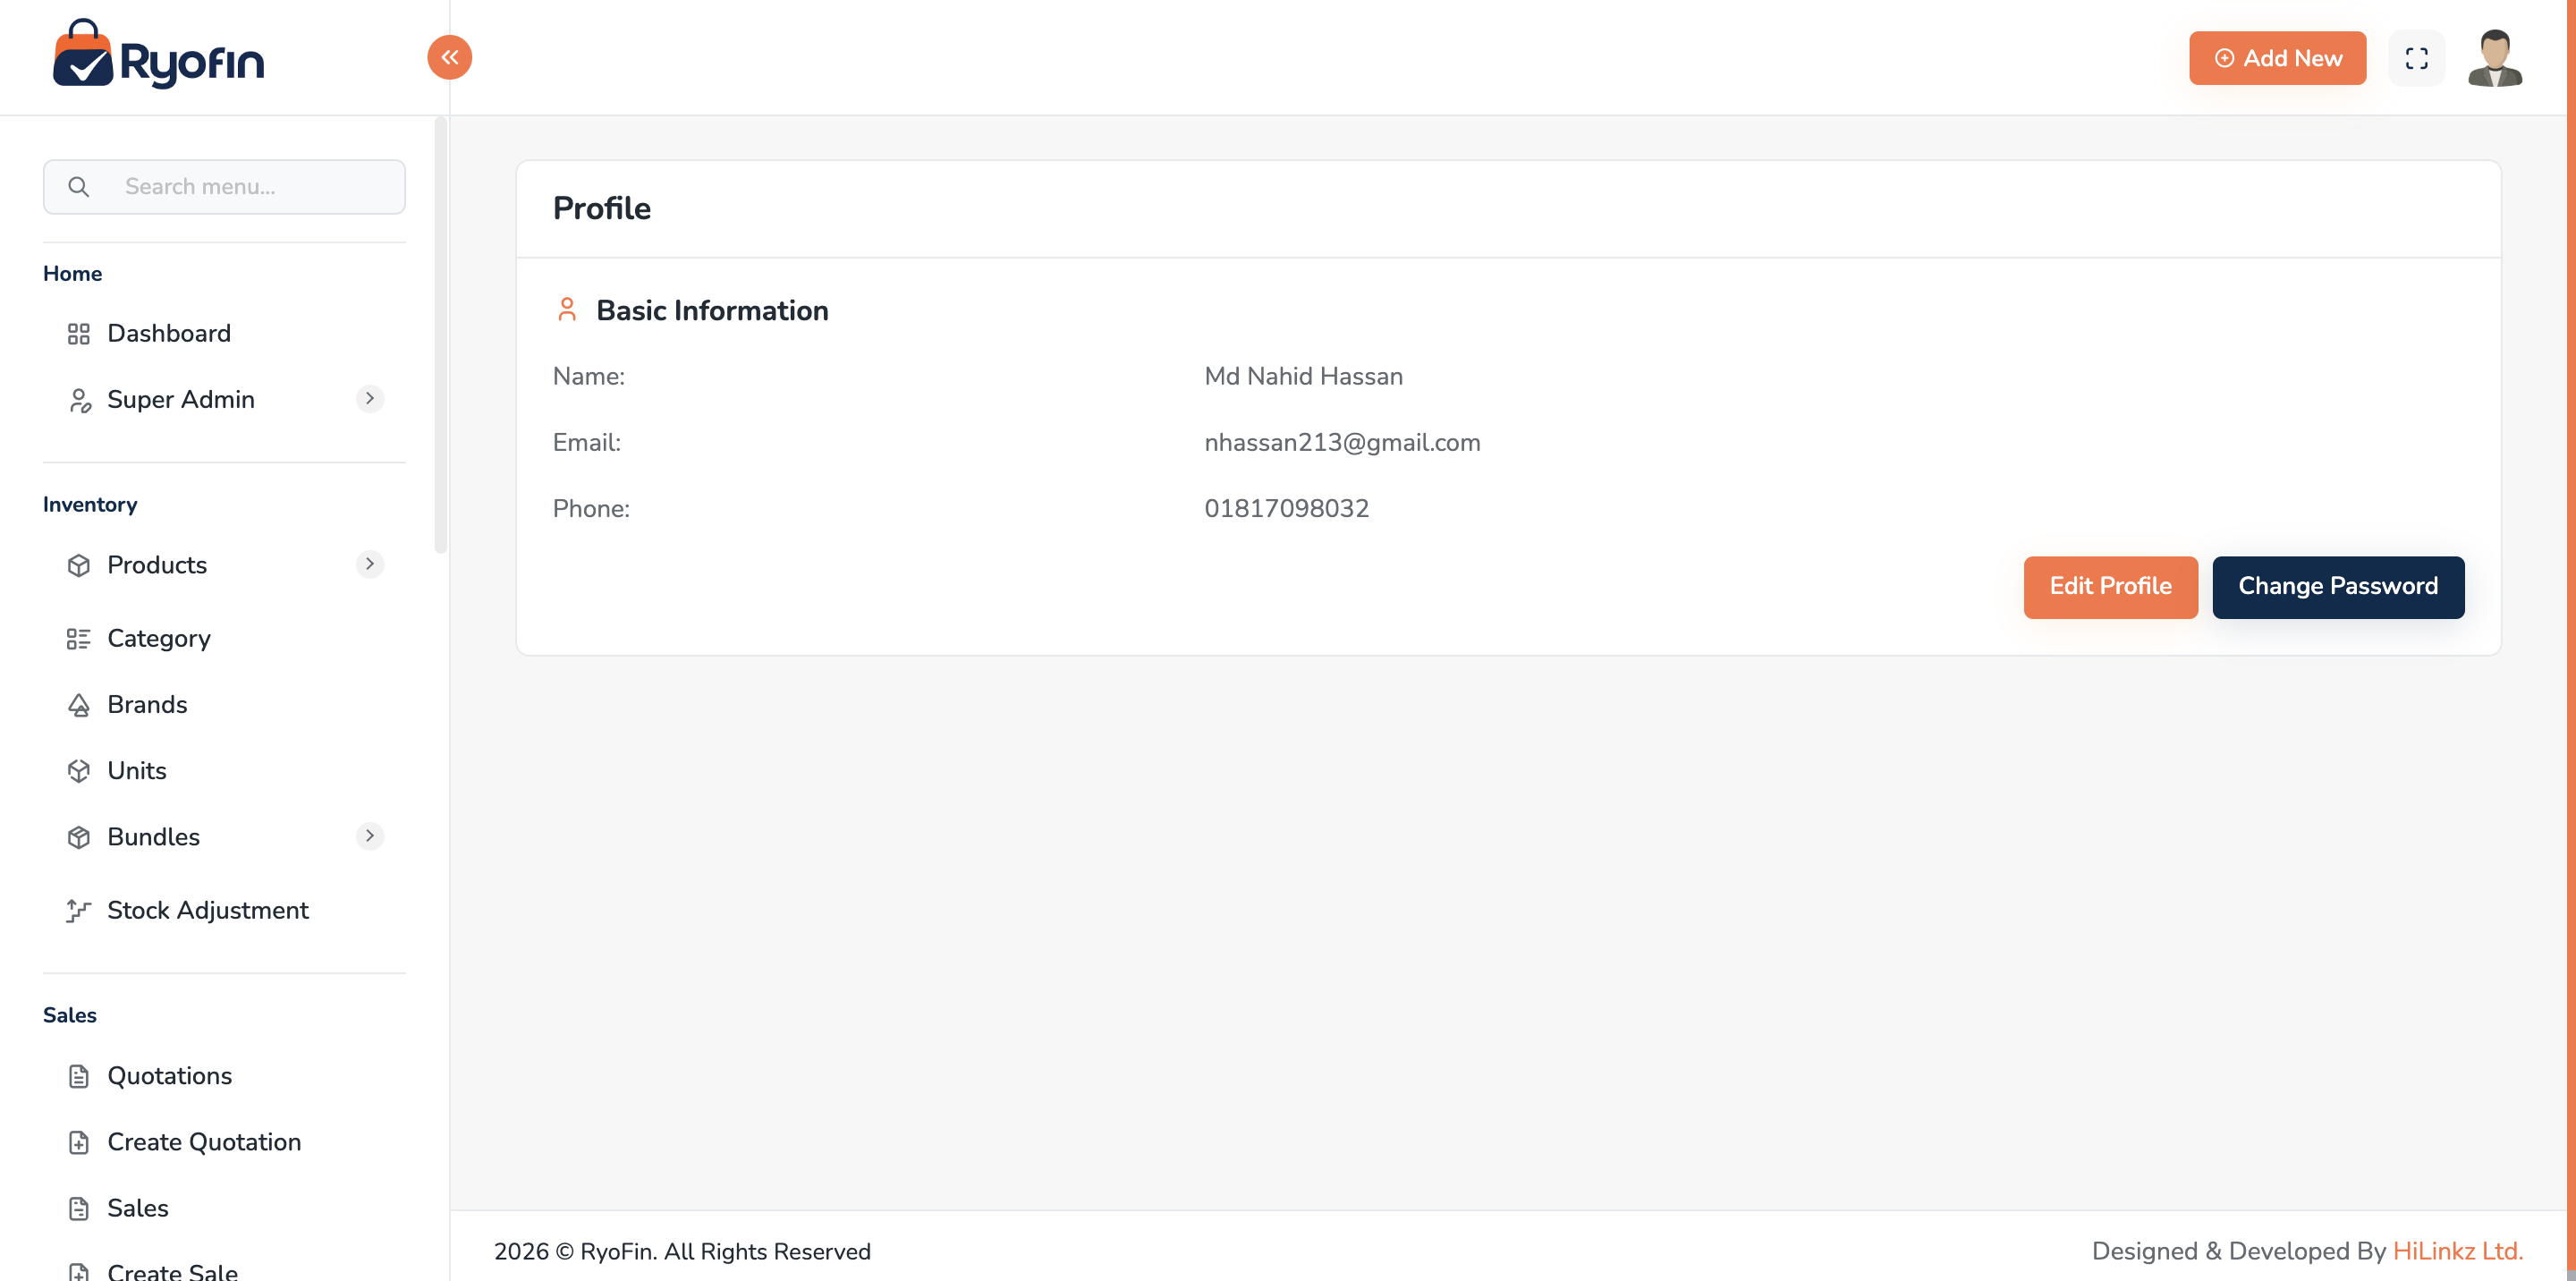
2.7 Editing Your Profile
- Click your avatar / name in the top bar → Profile.
- Update name, phone, email as needed.
- Click Save.
To change your password:
- Profile → Change Password.
- Enter current password, then new password twice.
- Click Update Password.
3. Core Concepts
These are the ideas that make the rest of the manual easier to understand. A user can ignore the technical names; what matters is what they mean for daily work.
3.1 Companies and Tenants
A Company (also called a Tenant) is the top-level business in RyoFin. Each tenant has its own isolated data — its own products, customers, accounts, and reports. If you run two unrelated businesses, each one is a separate tenant.
3.2 Stores (Branches)
Inside a company you can have many Stores (also called branches or shops). Each store:
- Has its own stock (a product can have 5 in Store A and 0 in Store B).
- Has its own users assigned to it.
- Shares the same company-wide chart of accounts and reports.
3.3 Multi-Store Stock
Stock is tracked per product, per store. Selling, purchasing, adjusting, or transferring stock always happens in the context of a specific store.
3.4 Units (Base / Purchase / Sales)
A product can have three different units:
- Base unit — the smallest unit you actually count (e.g. piece).
- Purchase unit — what you buy from supplier (e.g. carton of 12).
- Sales unit — what you sell to customer (e.g. pack of 6).
Conversion factors connect them so the system always knows true stock in the base unit.
EXAMPLE: You buy a carton (24 pieces) for $240, sell as packs of 6 for $80. The system tracks all 24 pieces and adjusts stock automatically when you sell packs.
3.5 Tax Methods (Inclusive vs Exclusive)
- Inclusive tax — the price you see already contains tax. Example: price $115 includes 15% VAT, so net is $100.
- Exclusive tax — tax is added on top of the price. Example: $100 + 15% VAT = $115 charged.
Each transaction (sale, purchase, quotation) chooses one method.
3.6 COGS (Cost of Goods Sold)
COGS is what the inventory you sold actually cost you to buy. RyoFin tracks an average COGS per product per store, so when you sell, the matching cost is automatically removed from inventory and posted to the COGS expense account.
3.7 Double-Entry Accounting (in plain English)
Every business event has two sides: where money came from (credit) and where it went (debit). Both sides must be equal.
Examples:
- You sell something for cash → Cash increases (debit) AND Sales Revenue increases (credit).
- You buy stock on credit → Inventory increases (debit) AND Supplier Payable increases (credit).
- A customer pays their invoice → Cash increases (debit) AND Customer Receivable decreases (credit).
You don't have to write these journal entries by hand — RyoFin creates them automatically for sales, purchases, payments, fund transfers, expenses, and so on. You only write manual journals for unusual events.
3.8 Soft Delete (Safe Delete)
When you delete a record (sale, purchase, etc.), it is not erased — it is marked as deleted but kept for the audit trail. Reports and lists hide deleted records by default. The matching accounting entries are also automatically reversed, so the books stay correct.
3.9 Permissions and Roles
Every action (view, create, edit, delete, send email, accept quotation, etc.) is controlled by a permission. Permissions are grouped into Roles (e.g. Admin, Manager, Sales). A user is assigned one or more roles. For the full picture, See: User Roles & Permissions.
3.10 Audit Trail
Most important records (sales, purchases, accounting transactions) automatically record who changed what and when. This is visible in the Activity Log.
4. User Roles & Permissions
4.1 Default Roles
RyoFin ships with a typical set of roles. Your administrator can rename, edit, or add new roles.
| Role | Typical responsibilities |
|---|---|
| Super Admin | Full access across all companies (system-level). |
| Tenant Owner / Admin | Full access within their company: users, settings, accounts, all transactions. |
| Manager | All operational modules (sales, purchases, stock) + most reports. |
| Accountant | Chart of accounts, journals, ledgers, reports. Limited or no access to product master. |
| Sales / Cashier | Create sales, receive payments, view own store's products and customers. |
| Stock Keeper | Stock adjustments, view products and inventory reports. |
4.2 What "Permission-Based" Means
A button or menu item only appears for a user if their role has the required permission. If you cannot see a button that the manual says should be there, your role does not have that permission.
4.3 Permission Categories
Permissions are organized by module. For each module you will typically see:
view <module>create <module>edit <module>delete <module>- Plus module-specific actions, e.g.
send quotation email,accept quotation,convert quotation to sale,record payment, etc.
See: Appendix A — Permission Reference.
4.4 Assigning Roles to Users
- Go to Users → Roles (or User Management).
- Open the user.
- Tick the role(s) you want to assign.
- Click Save.

4.5 Store-Based Access
In addition to roles, a user can be scoped to specific stores. A user with view sales permission still only sees sales for the stores they are assigned to.
WARNING: Always assign at least one store to a non-admin user, otherwise list views will appear empty.
5. Company & Store Management
5.1 Companies (Tenants)
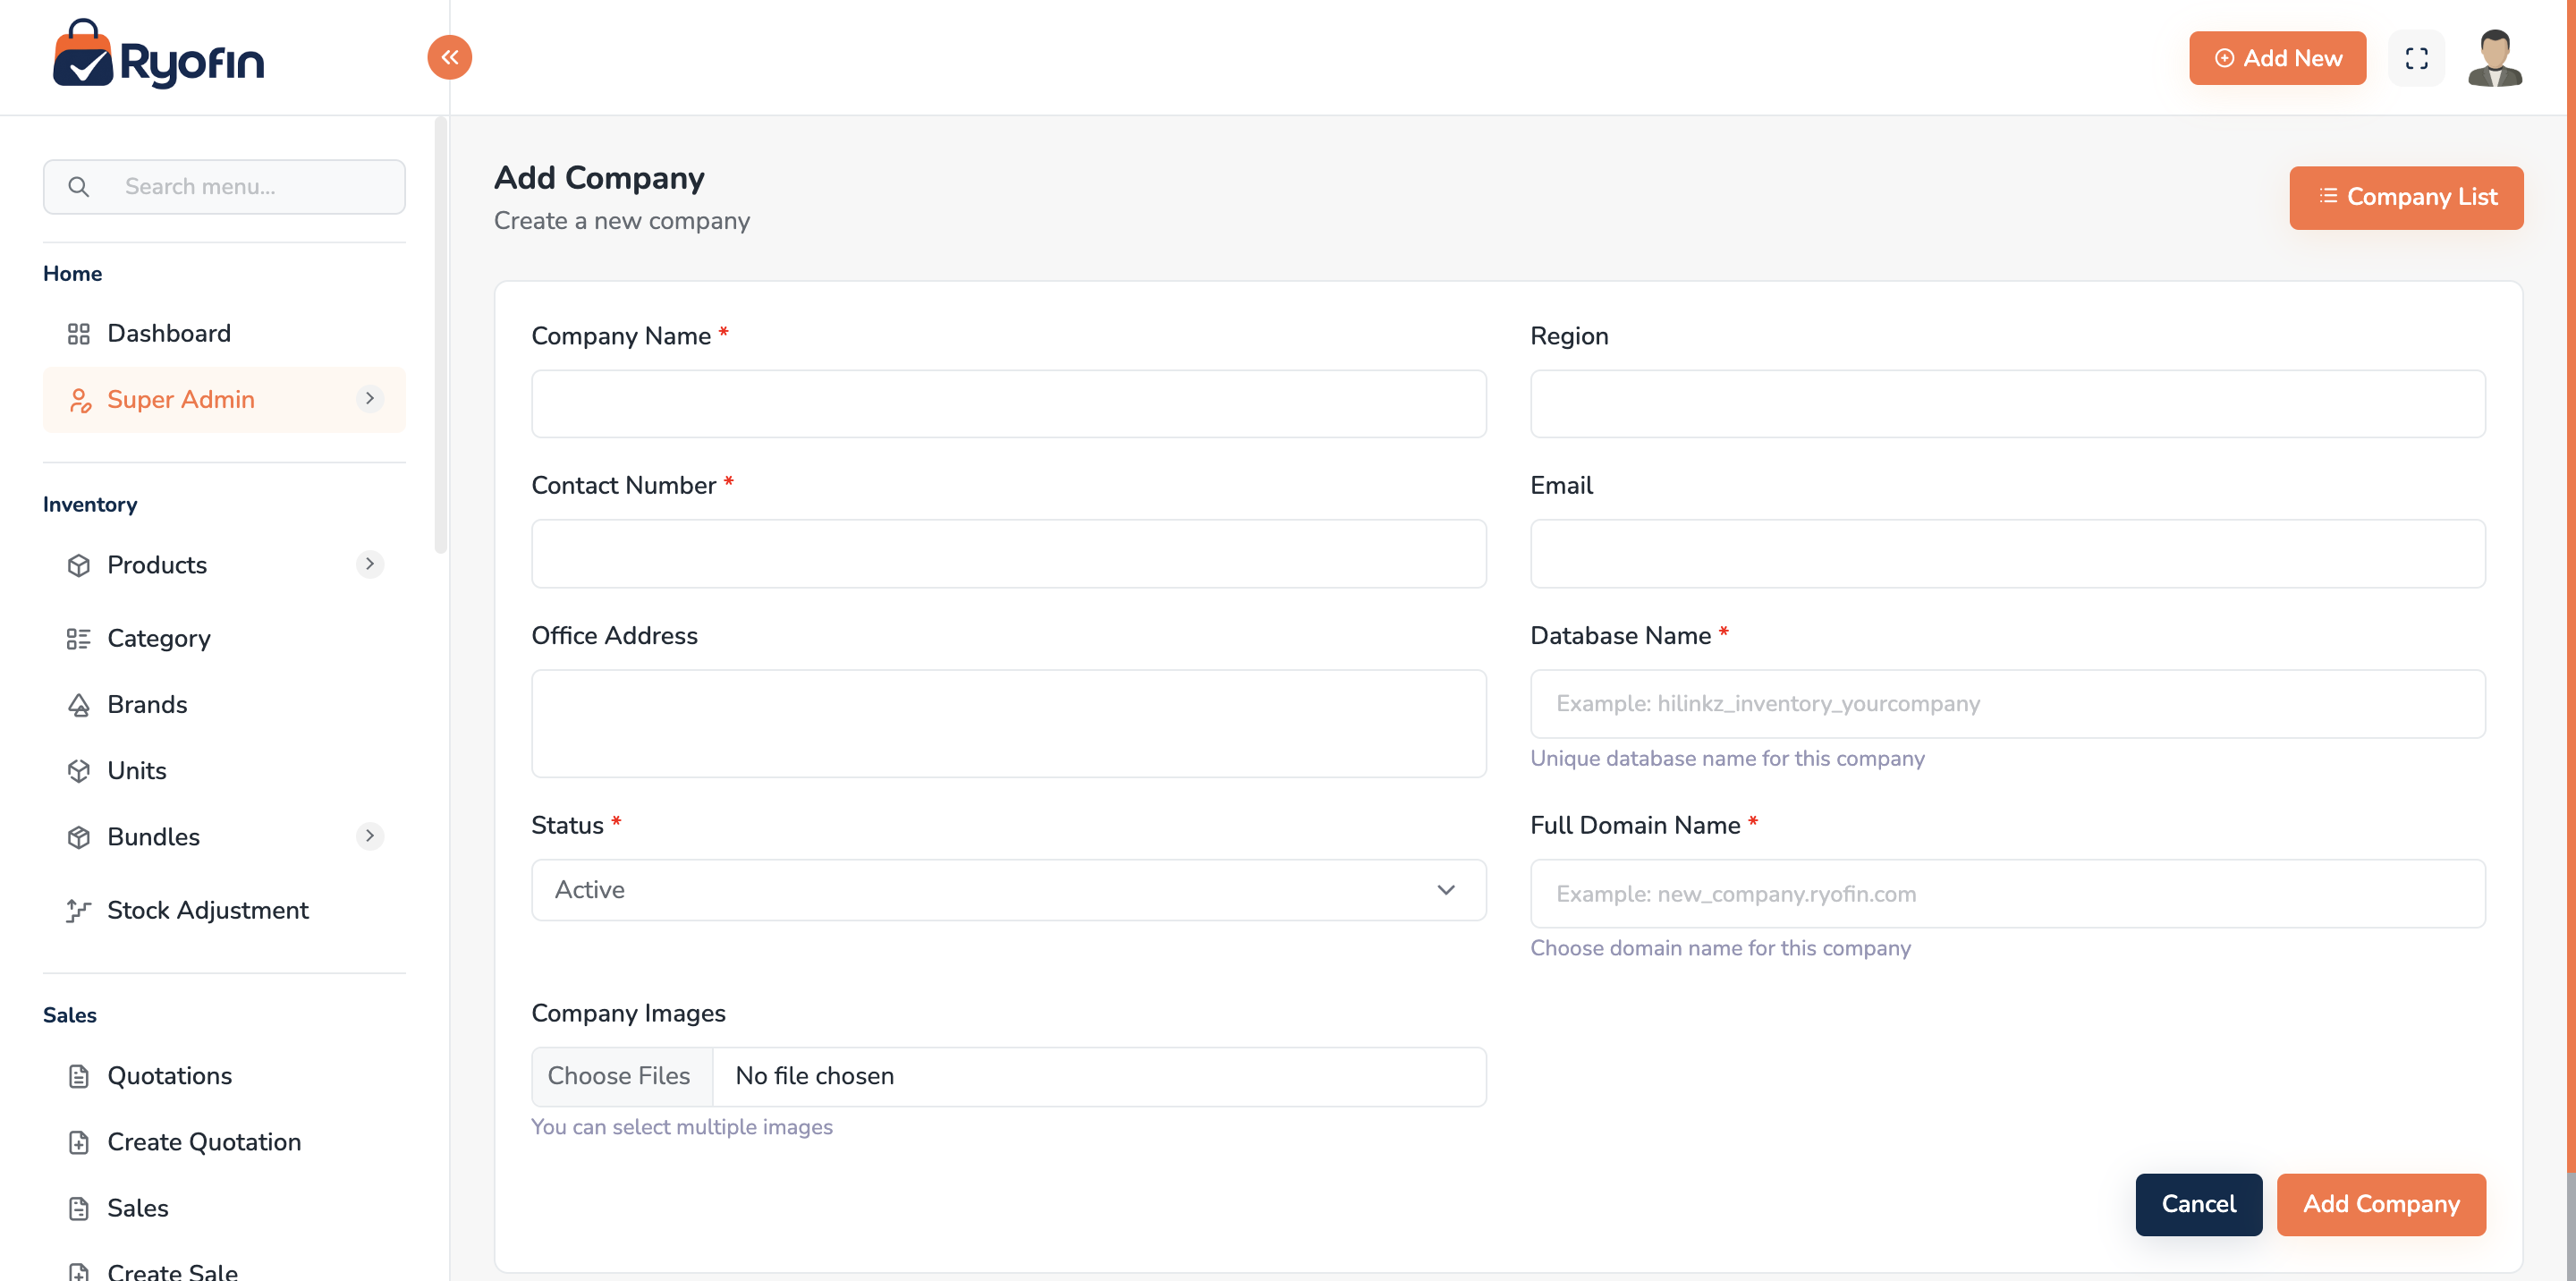
Where: Sidebar → Companies (Super Admin only). Who uses it: Super Admin who onboards new businesses.
Create a new company
- Click Create Company.
- Fill in company name, contact email, phone, address, currency.
- Upload company logo (used on invoices and reports).
- Click Save.
- The system creates the company's tenant database and seeds the default chart of accounts (Assets, Liabilities, Equity, Income, Expenses).
NOTE: Each company gets its own subdomain or URL slug. The tenant system isolates data — Company A cannot see Company B's data.
5.2 Stores (Branches)
Where: Sidebar → Stores. Who uses it: Tenant Owner / Admin.
Create a store
- Click Create Store.
- Enter:
- Name (e.g. "Downtown Branch")
- Address, Phone, Email
- Currency (defaults to company currency)
- Logo (optional, falls back to company logo)
- Click Save.
- The system creates the store and adds default sub-accounts under the company chart of accounts (Cash, Bank, Inventory, Customers Receivable, Sales Revenue, COGS, Suppliers Payable).
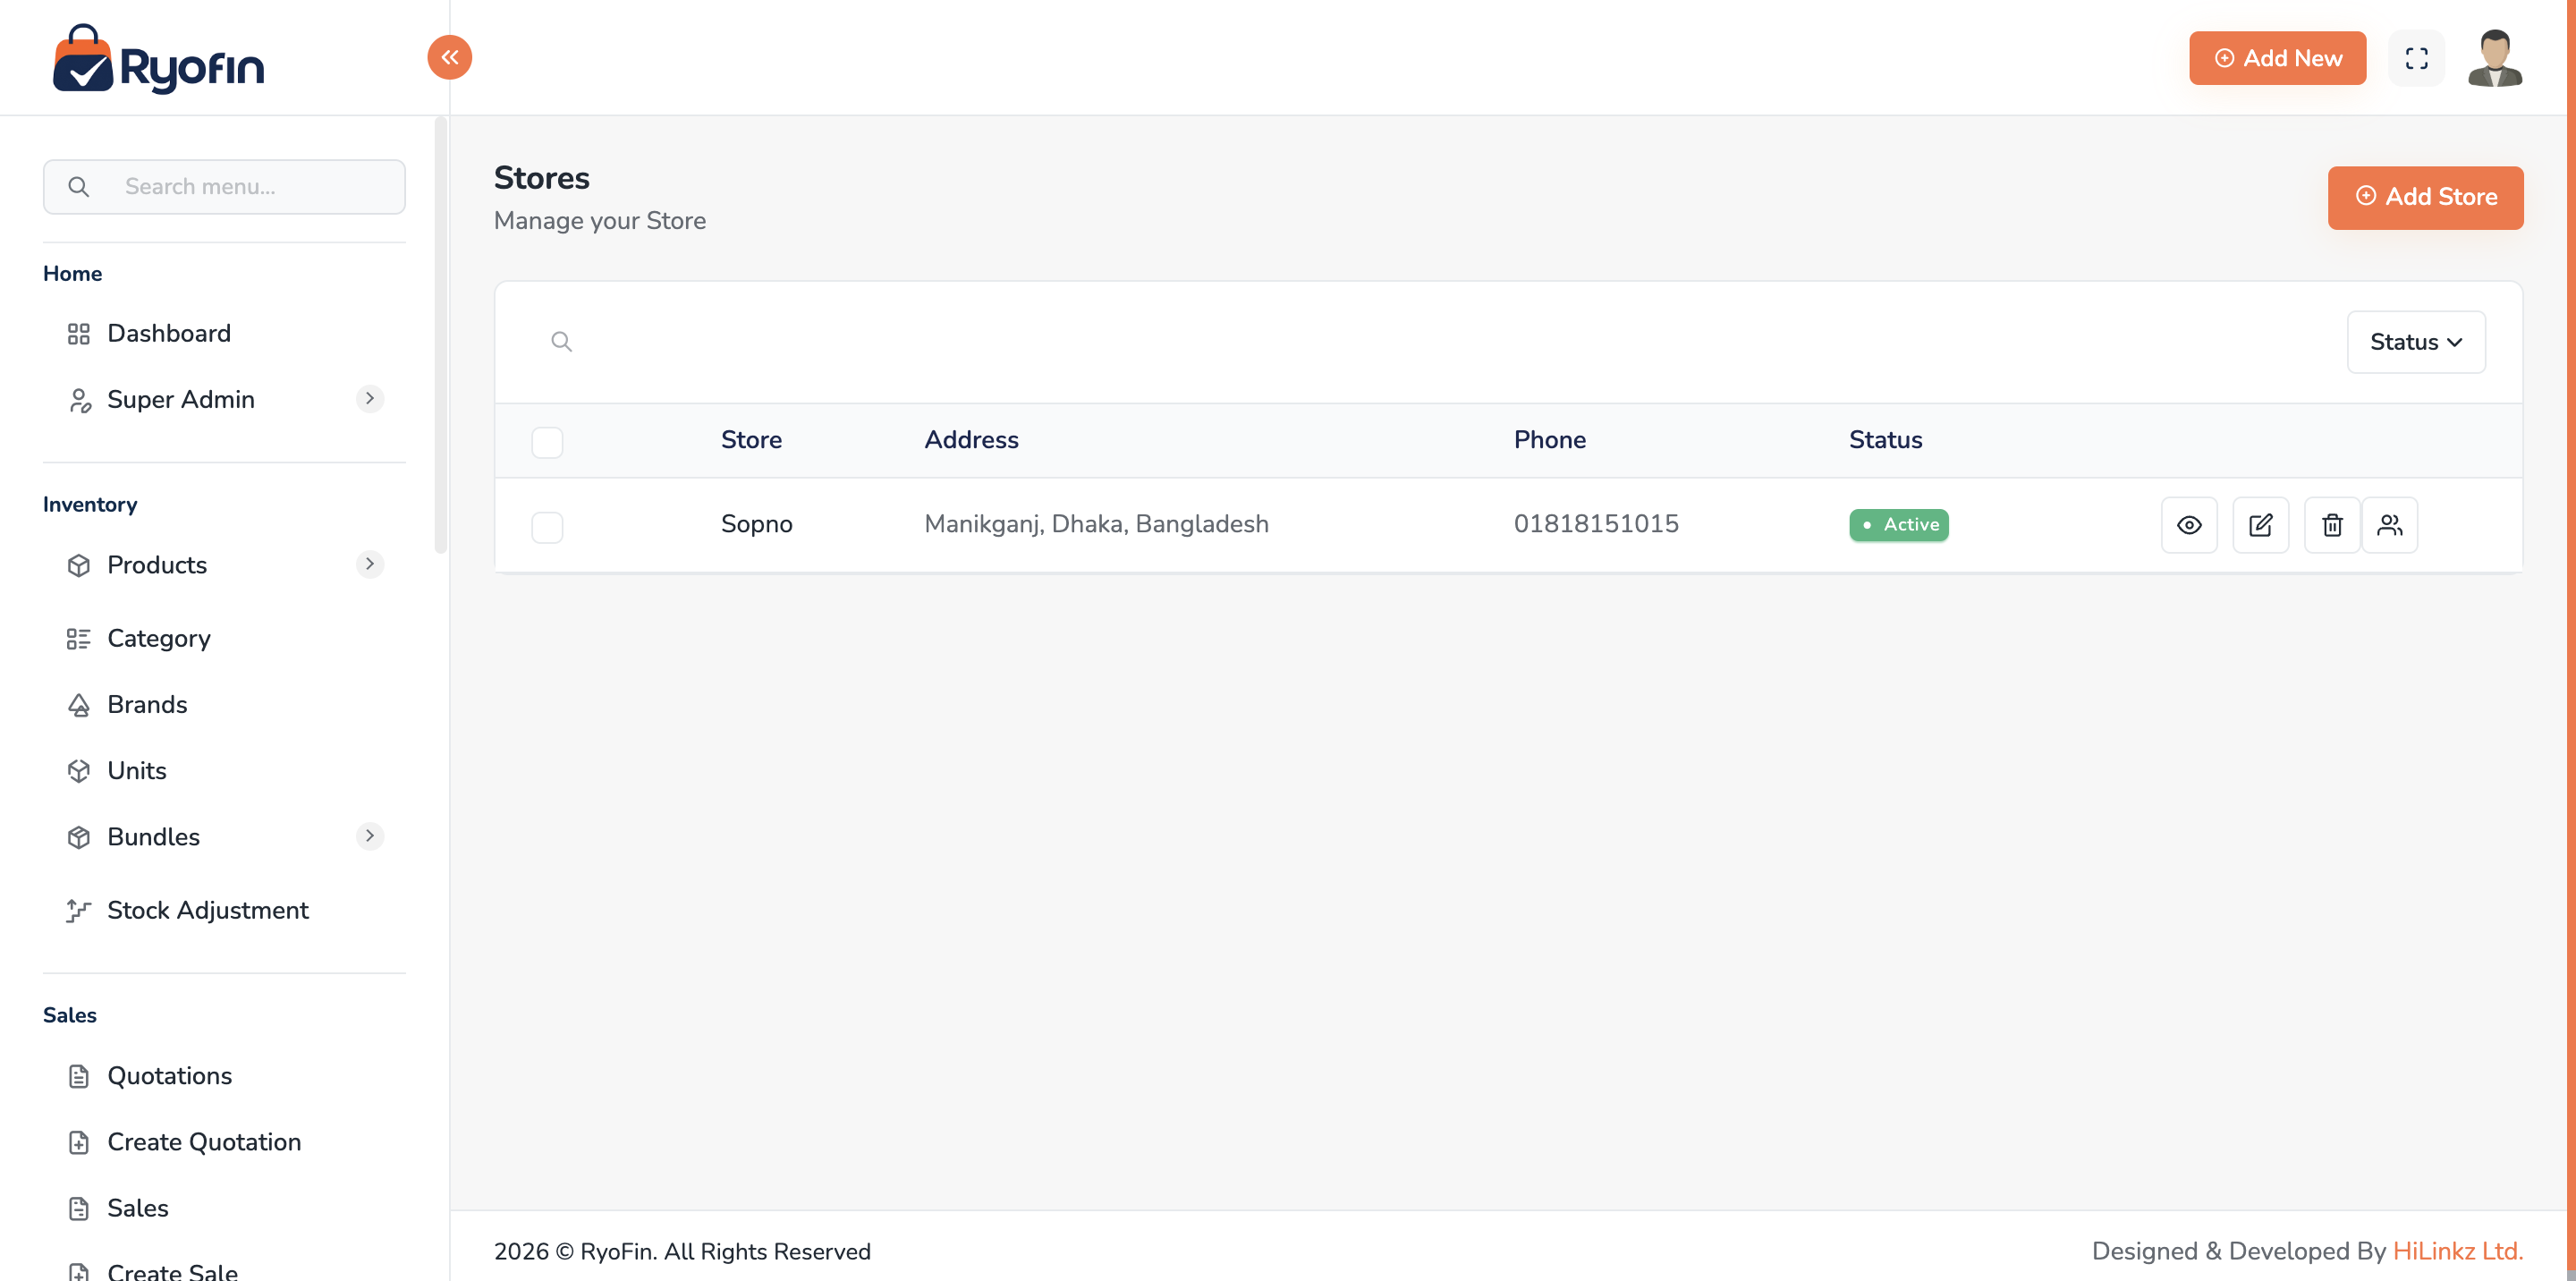
Edit / Delete a store
- Edit — change name, contact details, logo.
- Delete — only allowed if the store has no transactions; otherwise you can deactivate it.
5.3 Assigning Users to Stores
- Open the store → Users tab.
- Click Add User.
- Pick existing users from the list.
- Click Save.
A user can be assigned to multiple stores; they will then see the store switcher in the top bar.
5.4 Branding
Set on the Company record:
- Logo (PNG/JPG, square recommended)
- Color (used in PDF headers)
- Address & contact (printed on invoices)
TIP: A clean square logo on a transparent background looks best on PDF invoices.
6. Master Data Setup
Master data are the building blocks you set up before you start daily transactions. Setting them up correctly saves a lot of time later.
6.1 Brands
Where: Sidebar → Products → Brands.
Create a brand
- Click Create Brand.
- Enter Name (e.g. "Samsung").
- (Optional) Upload a brand logo.
- Click Save.
Edit / Delete
- Editing is straightforward.
- A brand can only be deleted if no product uses it.
6.2 Categories
Where: Sidebar → Products → Categories.
Create a category
- Click Create Category.
- Enter Name (e.g. "Mobile Phones").
- (Optional) Pick a parent category to build a hierarchy.
- Click Save.
TIP: A 2-level hierarchy (Department → Category) is enough for most shops. Deeper trees become hard to navigate.
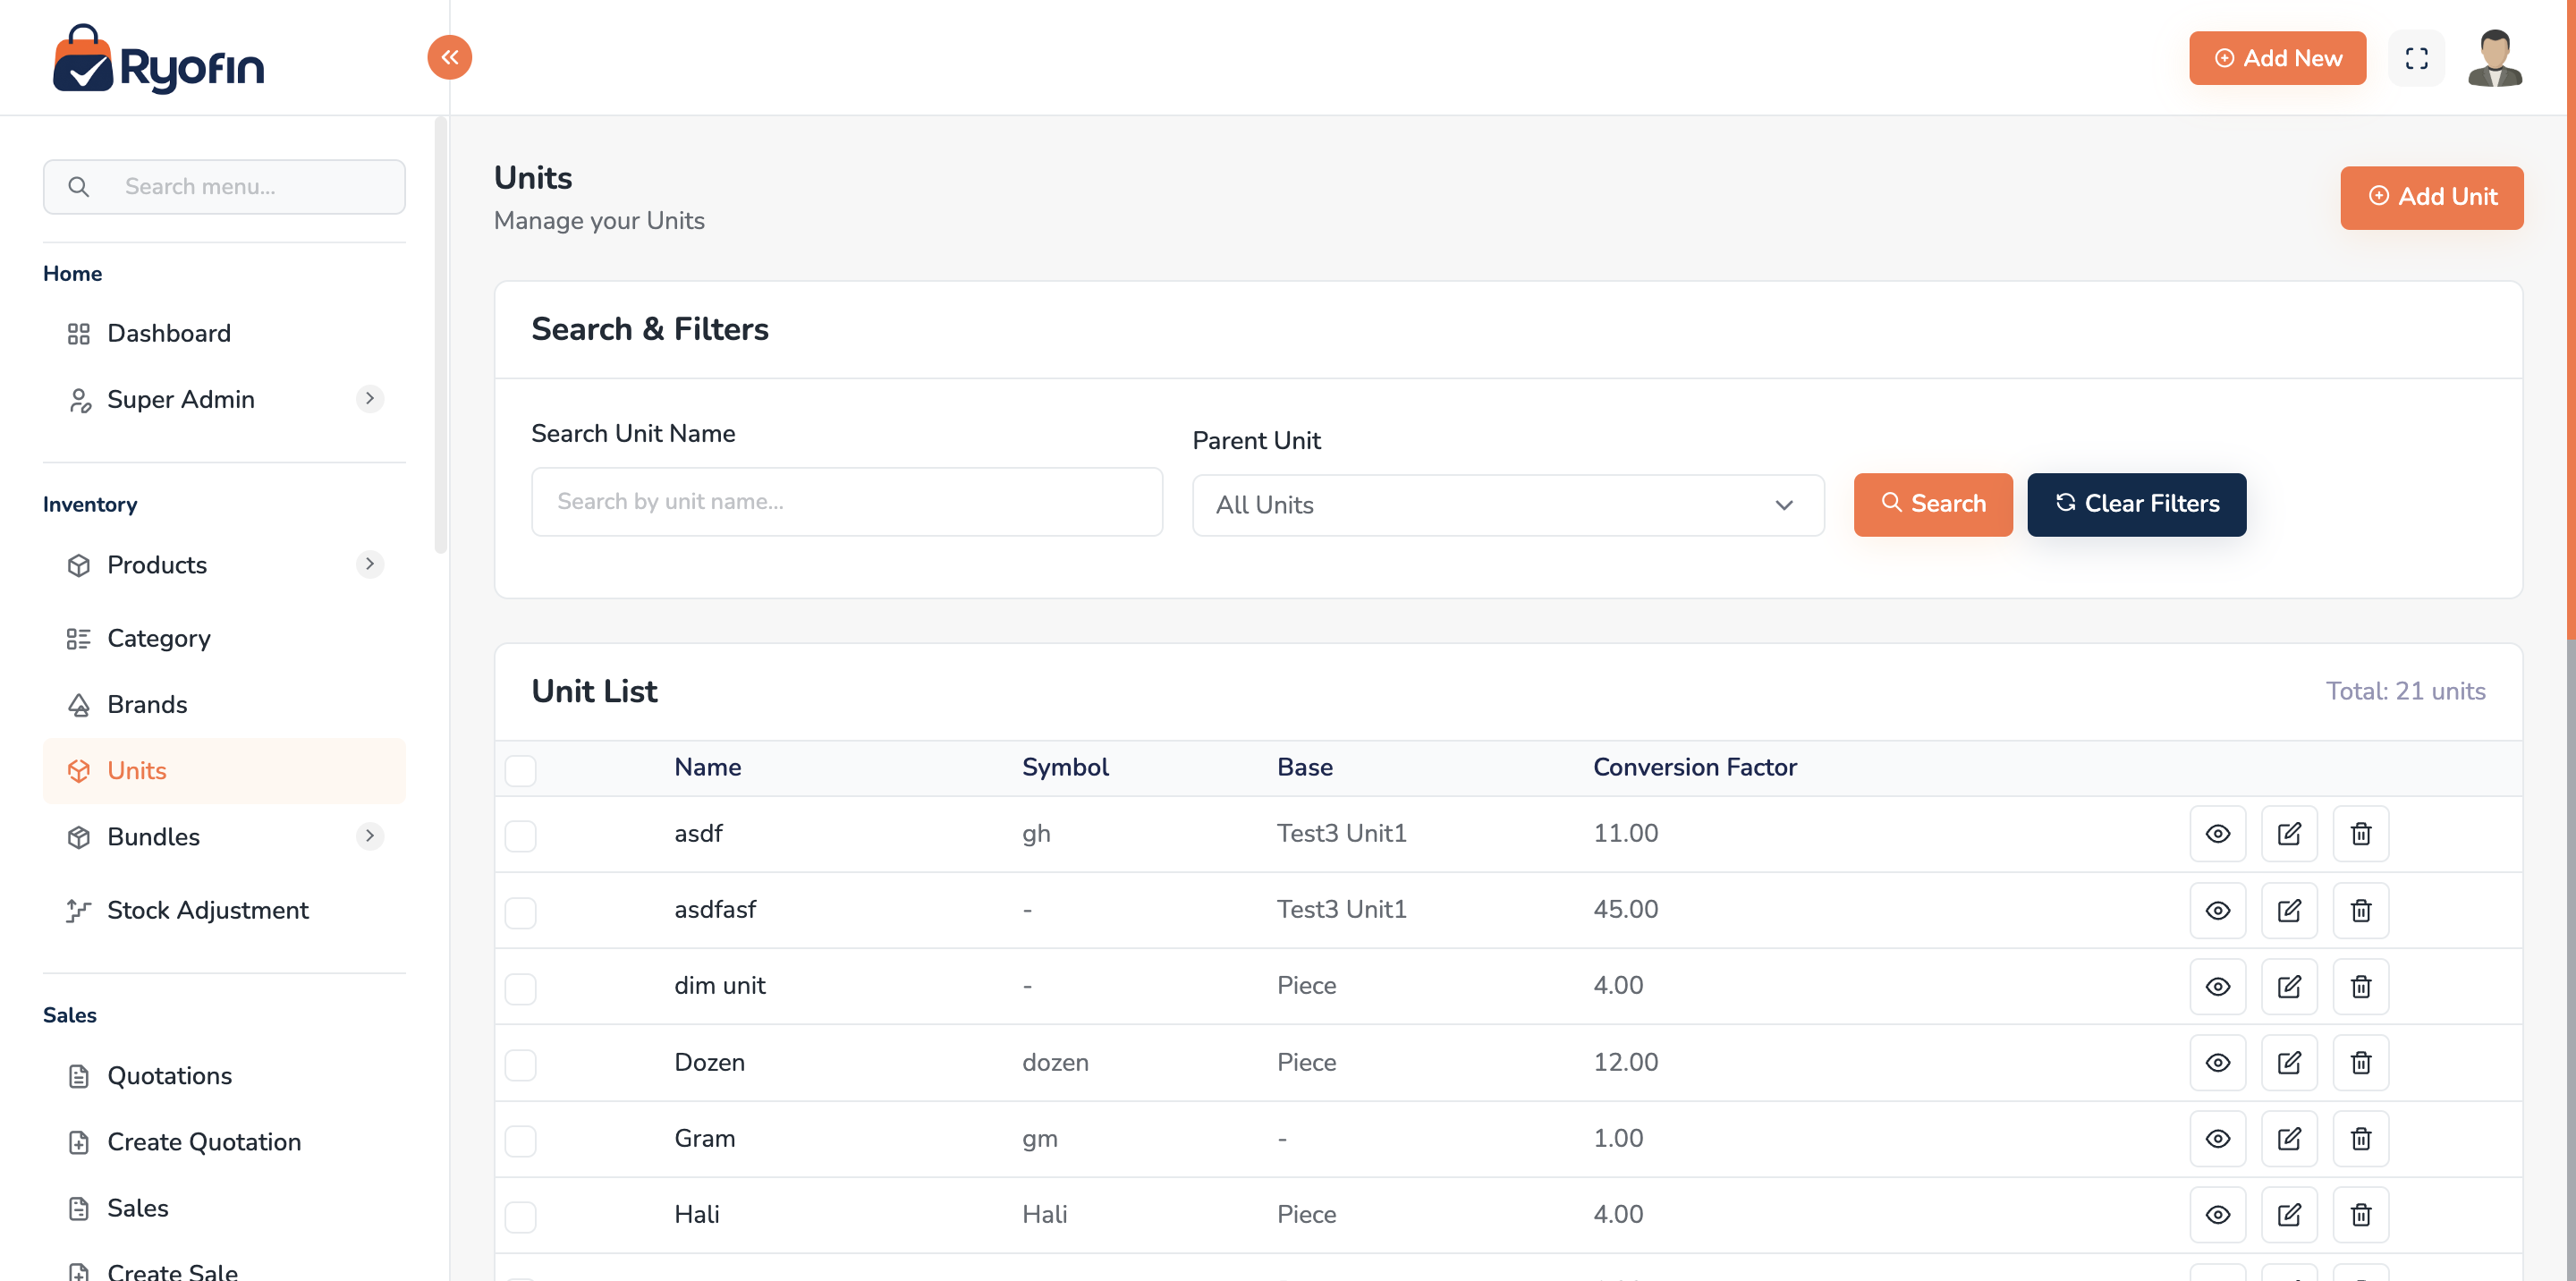
6.3 Units (with conversions)
Where: Sidebar → Products → Units.
Create a unit
- Click Create Unit.
- Enter Name (e.g. "Carton"), Short Name (e.g. "ctn").
- Choose Base Unit if this is a derived unit (e.g. Carton's base is Piece).
- Enter Operator (
*or/) and Operation Value (e.g.*and12means 1 carton = 12 pieces). - Click Save.
Now in a product you can pick "Carton" as purchase unit and "Piece" as sales unit, and the system will translate automatically.
6.4 Taxes
Where: Sidebar → Settings → Taxes (or Products → Taxes).
Create a tax
- Click Create Tax.
- Enter Name (e.g. "VAT 15%"), Rate (e.g.
15). - Click Save.
You can later assign a tax to a product (default tax) or pick a tax on each transaction line.
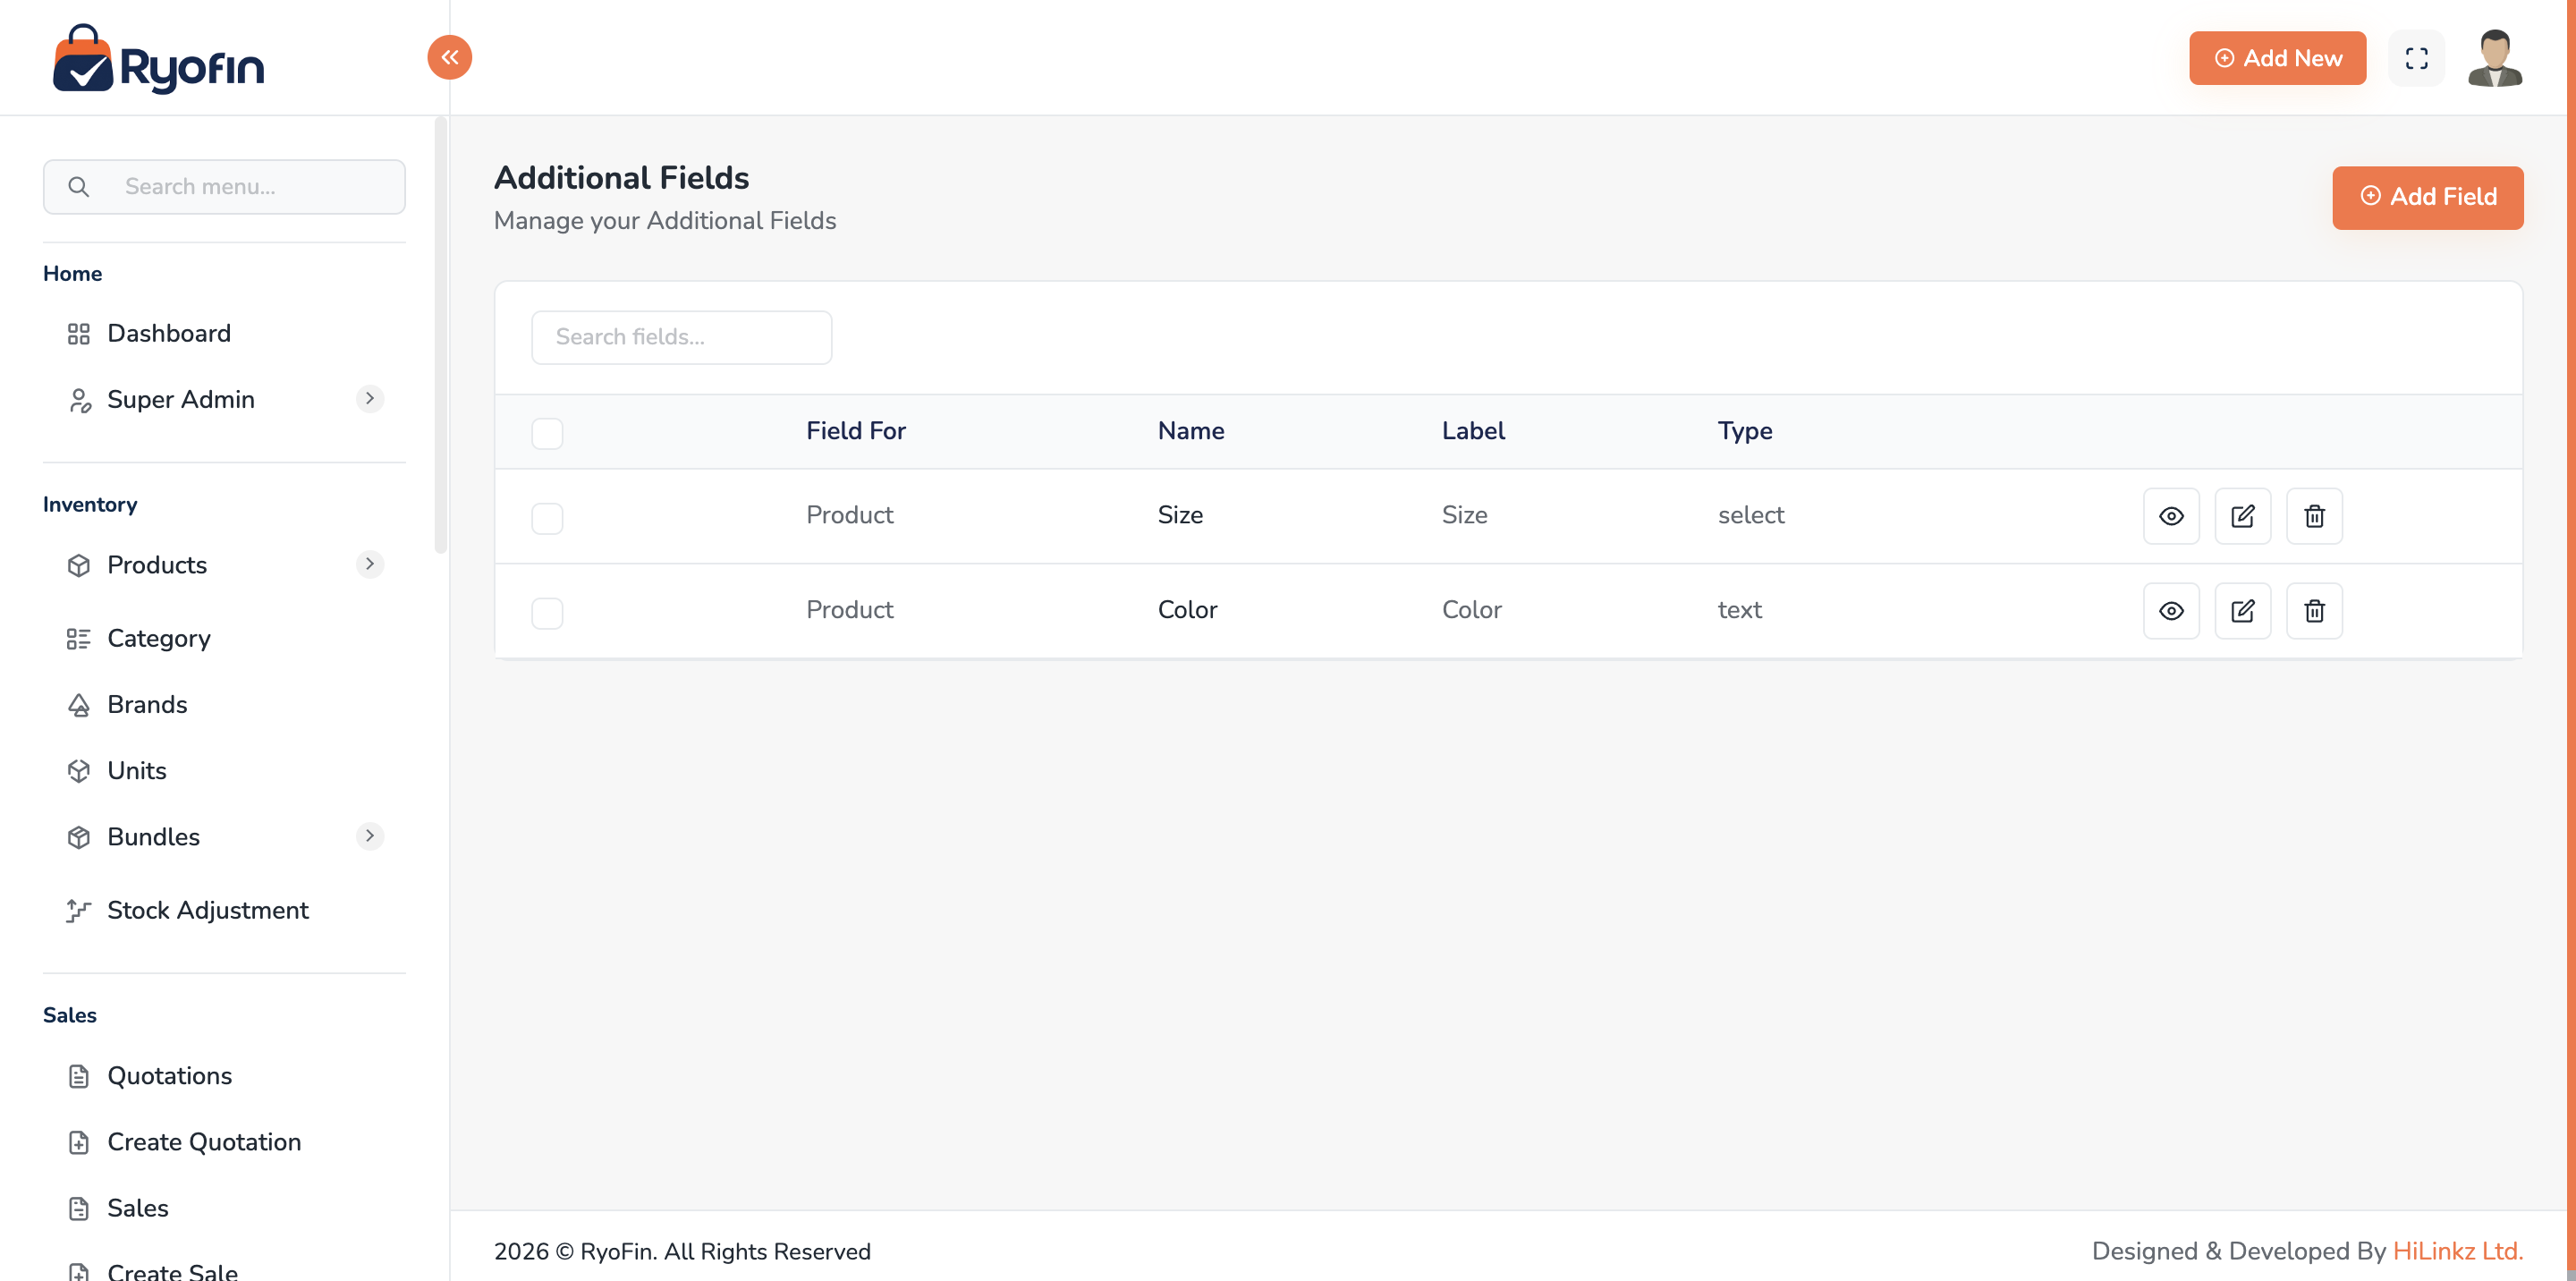
6.5 Additional / Custom Fields
Where: Sidebar → Settings → Additional Fields.
Custom fields let you add extra information to records without code changes. For example: "Warranty months" on Products, "Date of Birth" on Customers, "PO Number" on Sales.
Create a custom field
- Click Create Field.
- Choose the Model (Product, Customer, Supplier, Sale, Purchase).
- Enter:
- Field Name (technical name, e.g.
warranty_months) - Label (what the user sees)
- Type (text, number, select, textarea, date)
- Options (only for select type — comma-separated)
- Required (yes/no)
- Field Name (technical name, e.g.
- Click Save.
The field now appears automatically in the create/edit form for that model.
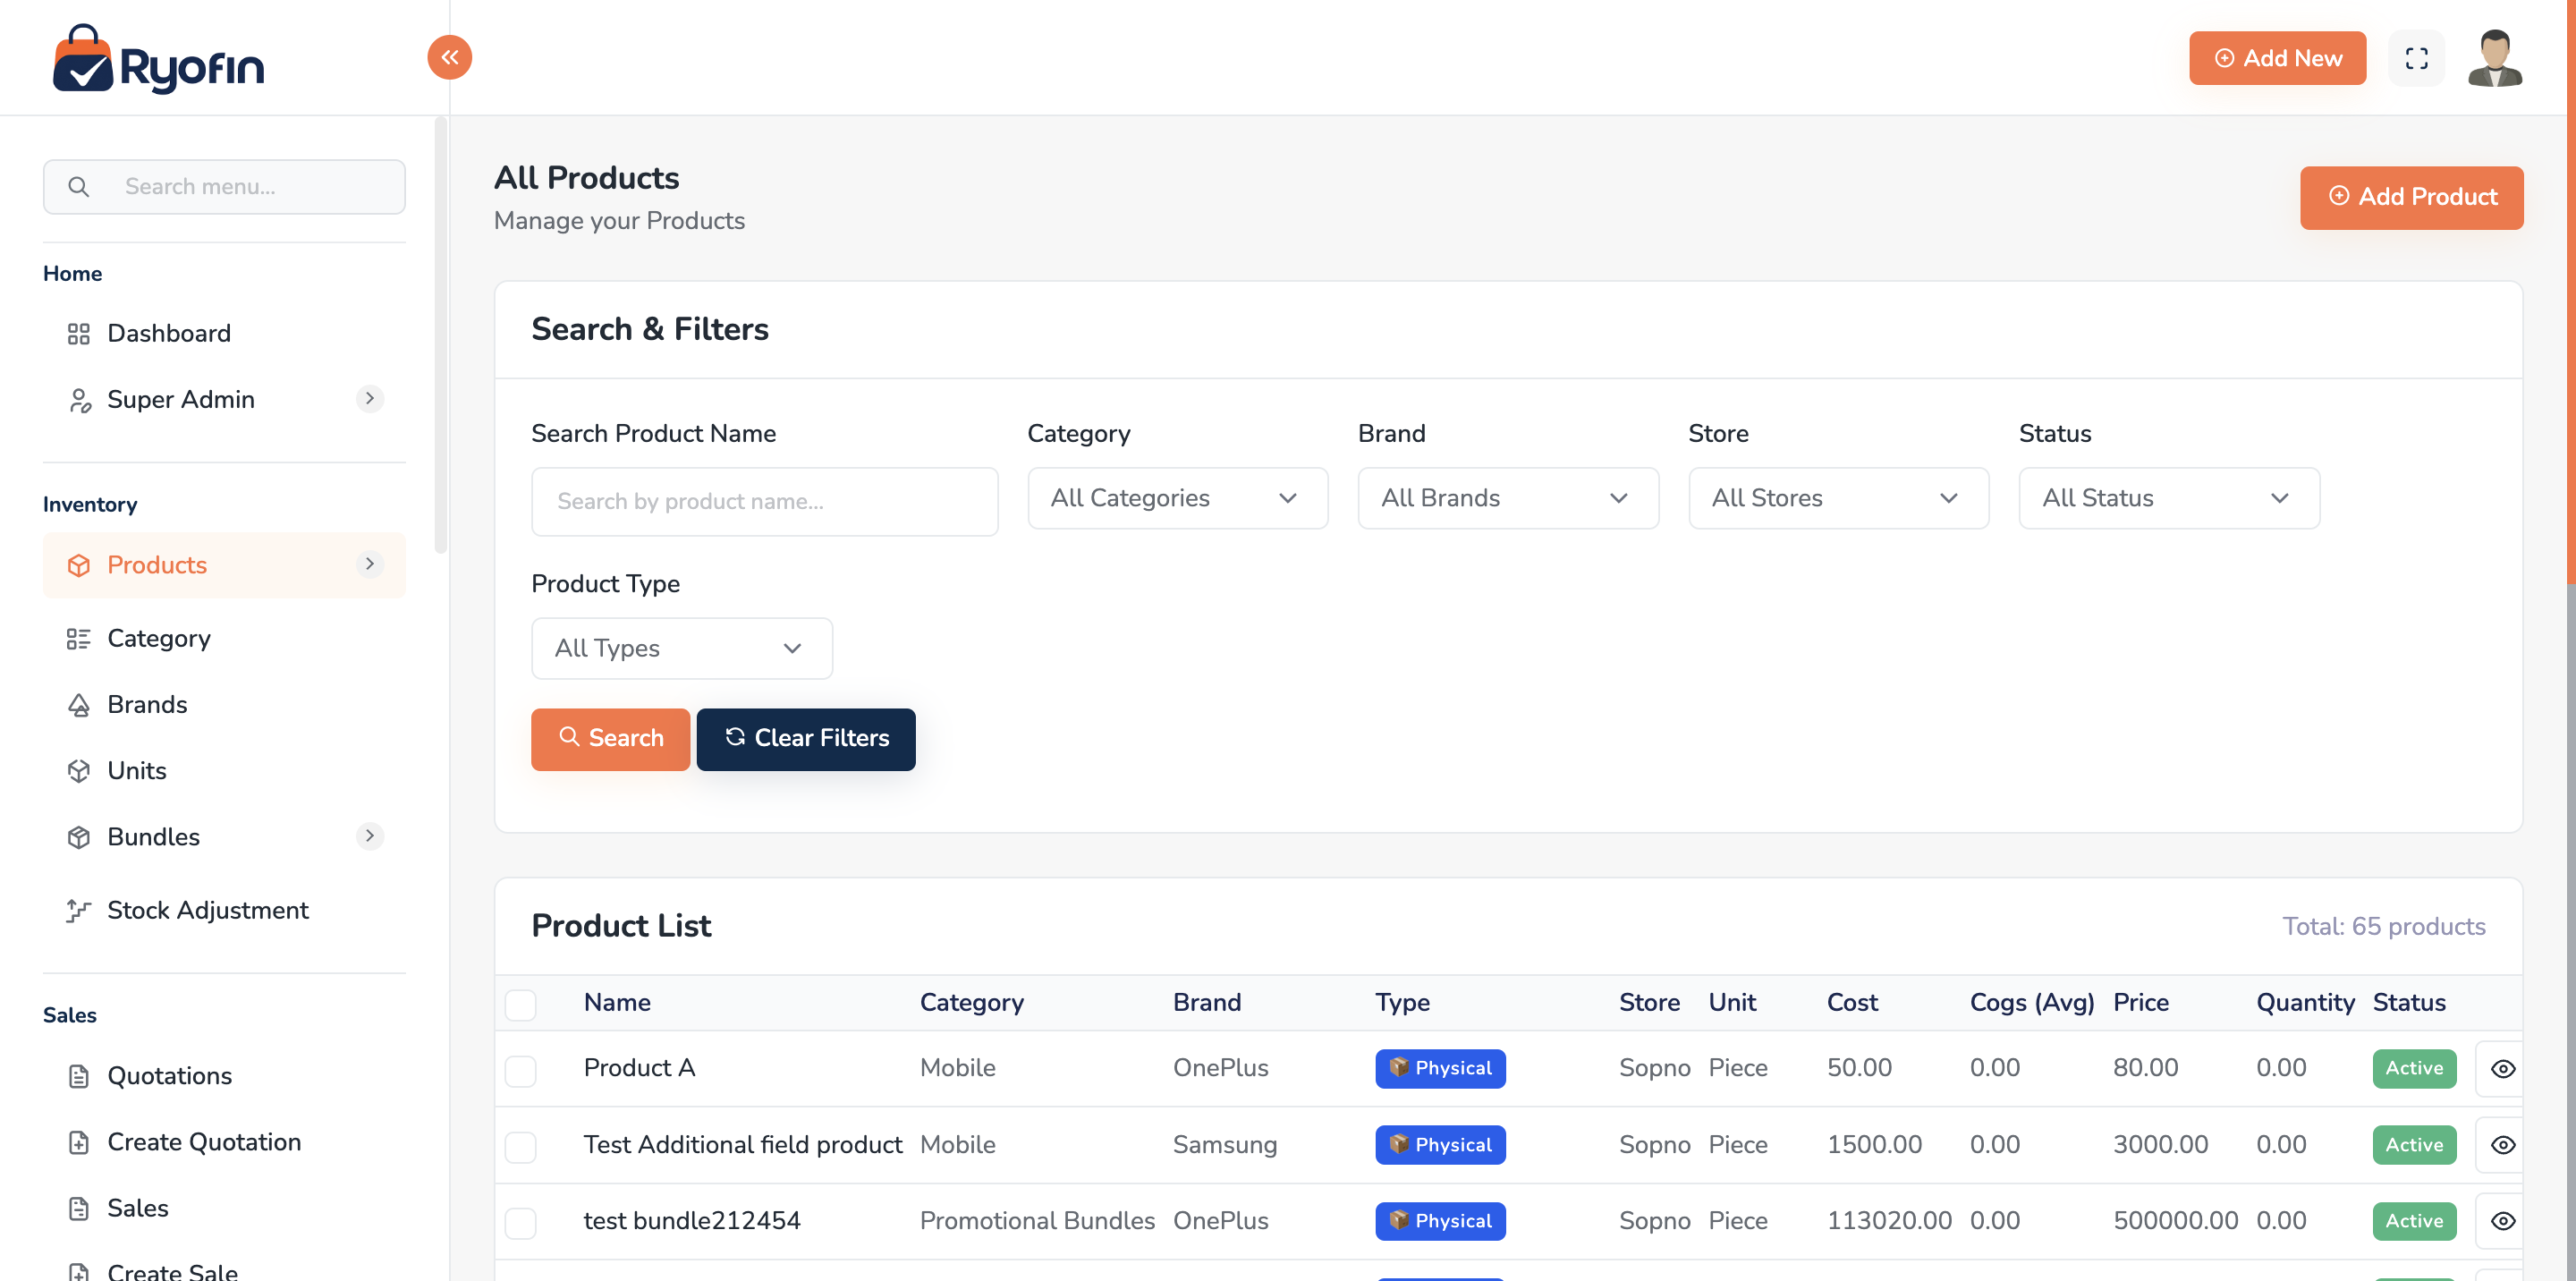
7. Product Management
Where: Sidebar → Products → Products.
7.1 Product List
The list shows: image, name, SKU, barcode, brand, category, current stock per active store, status.
Filters: brand, category, status, store, search by name/SKU/barcode. Actions: view, edit, delete (soft), adjust stock.
7.2 Create a Product
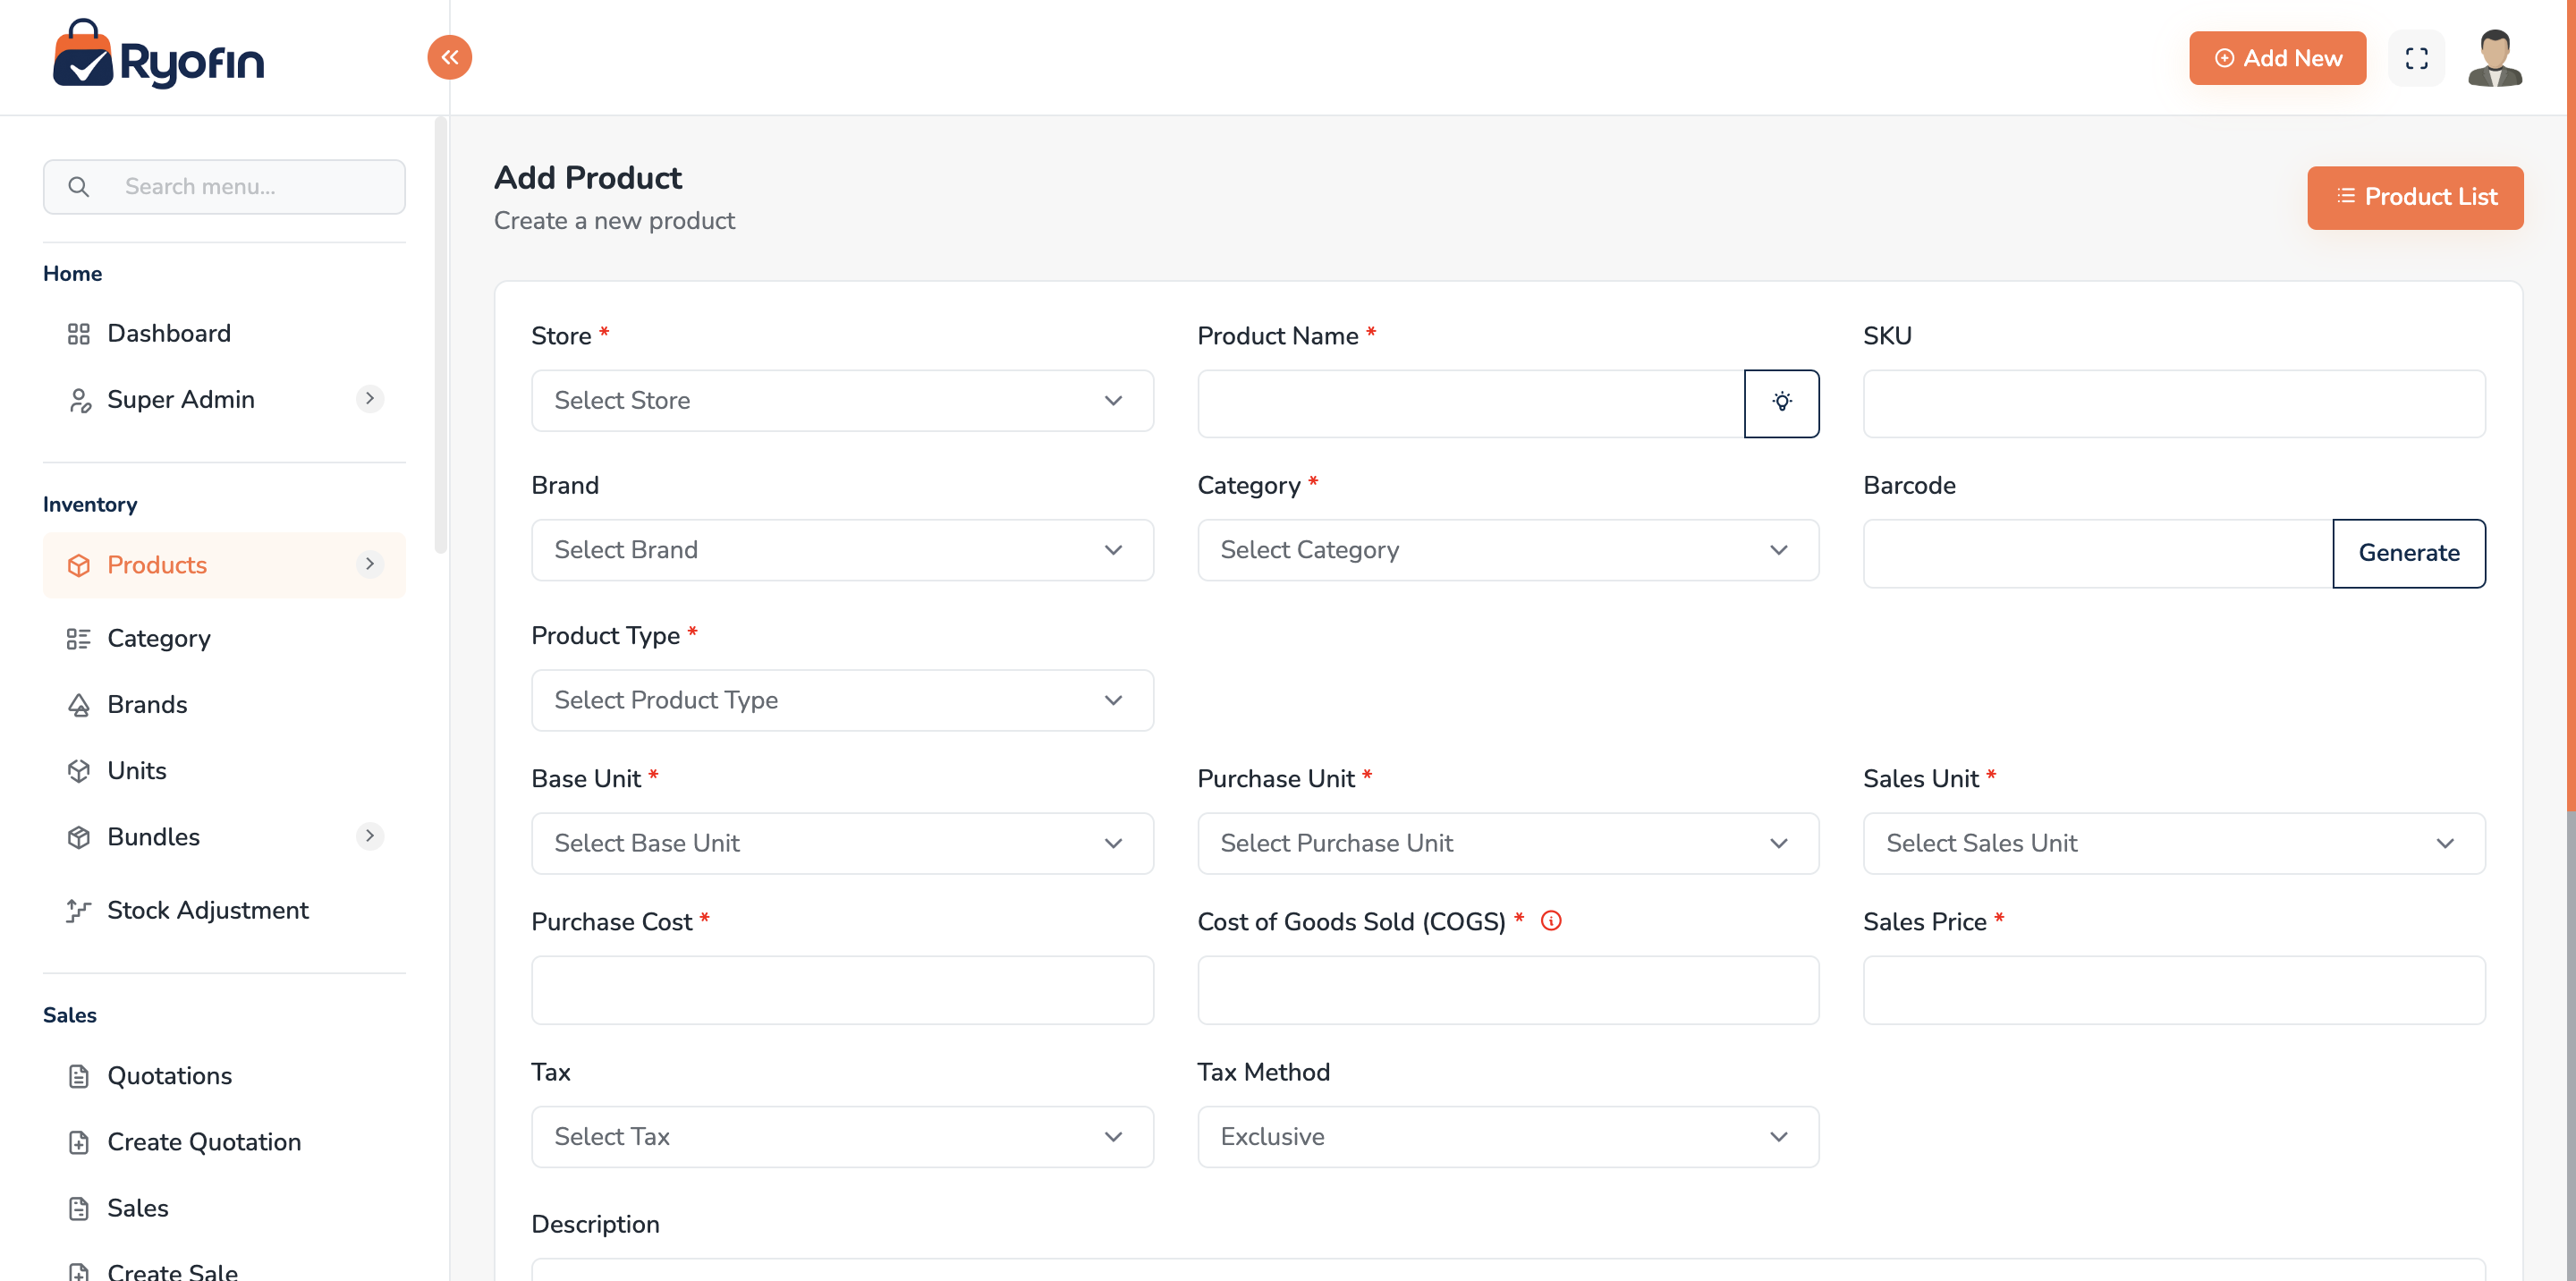
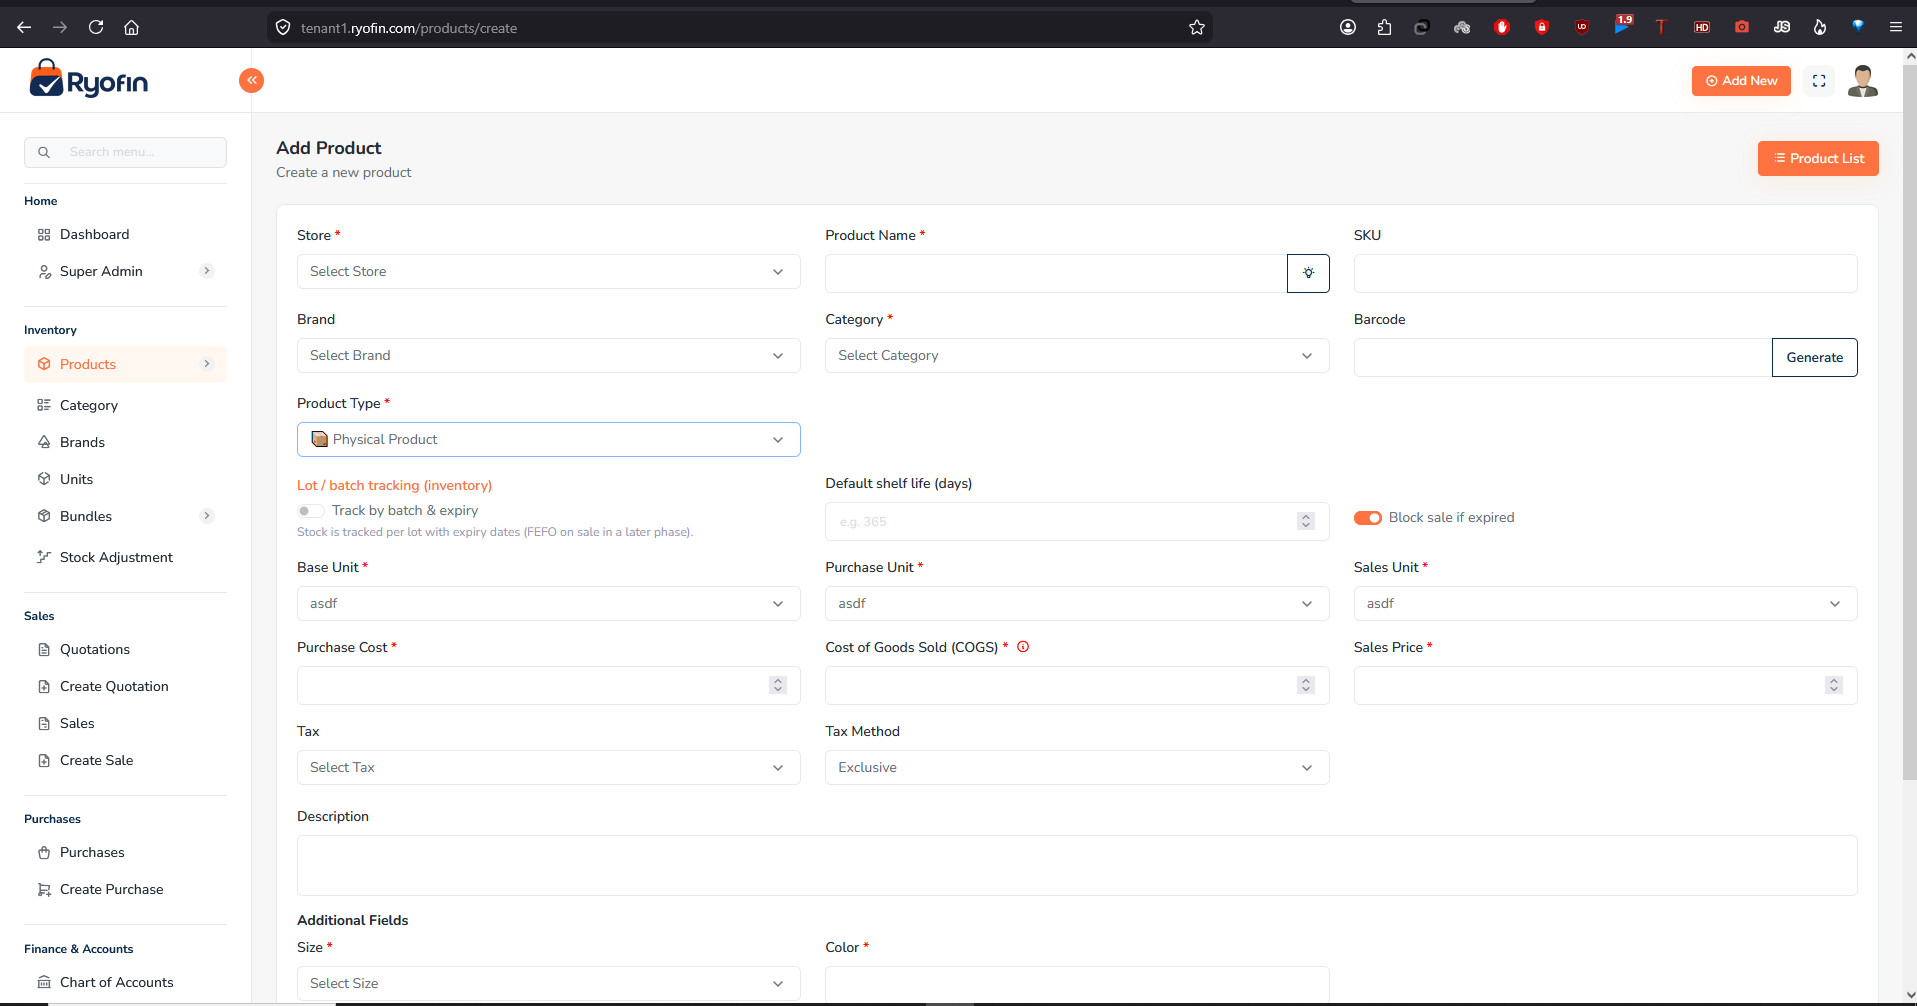
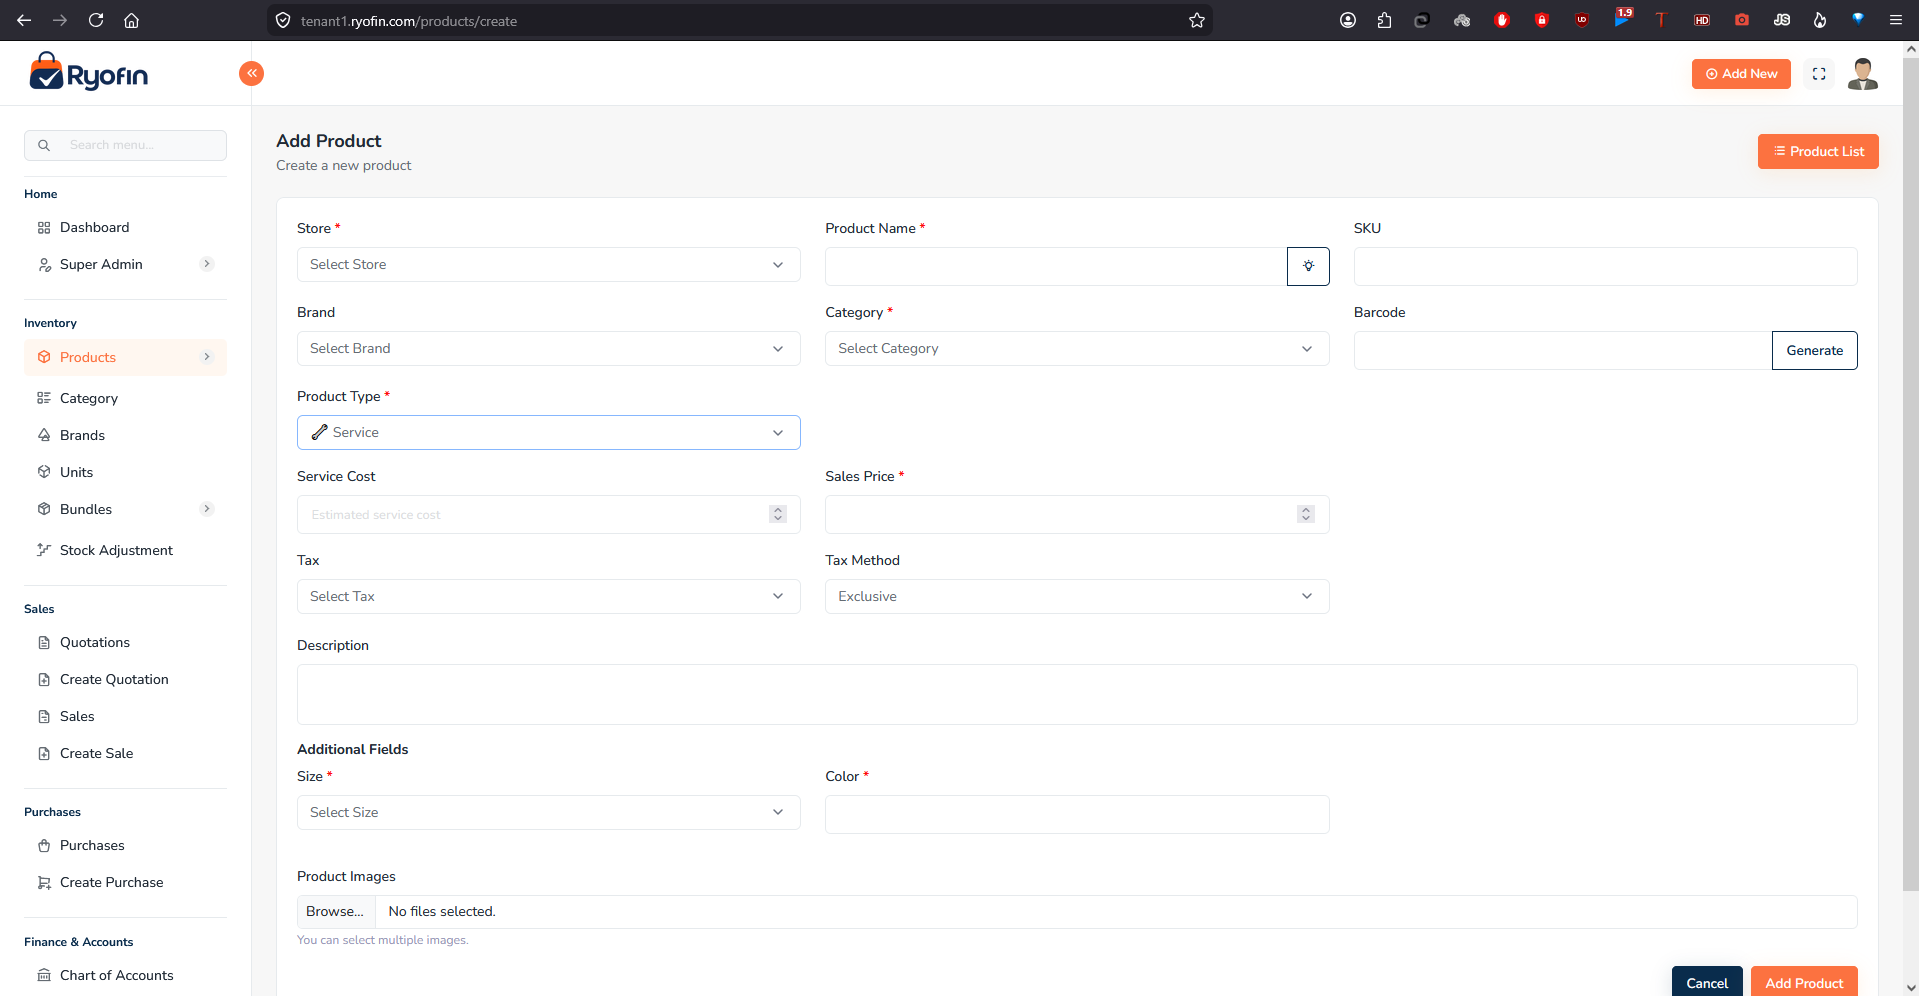
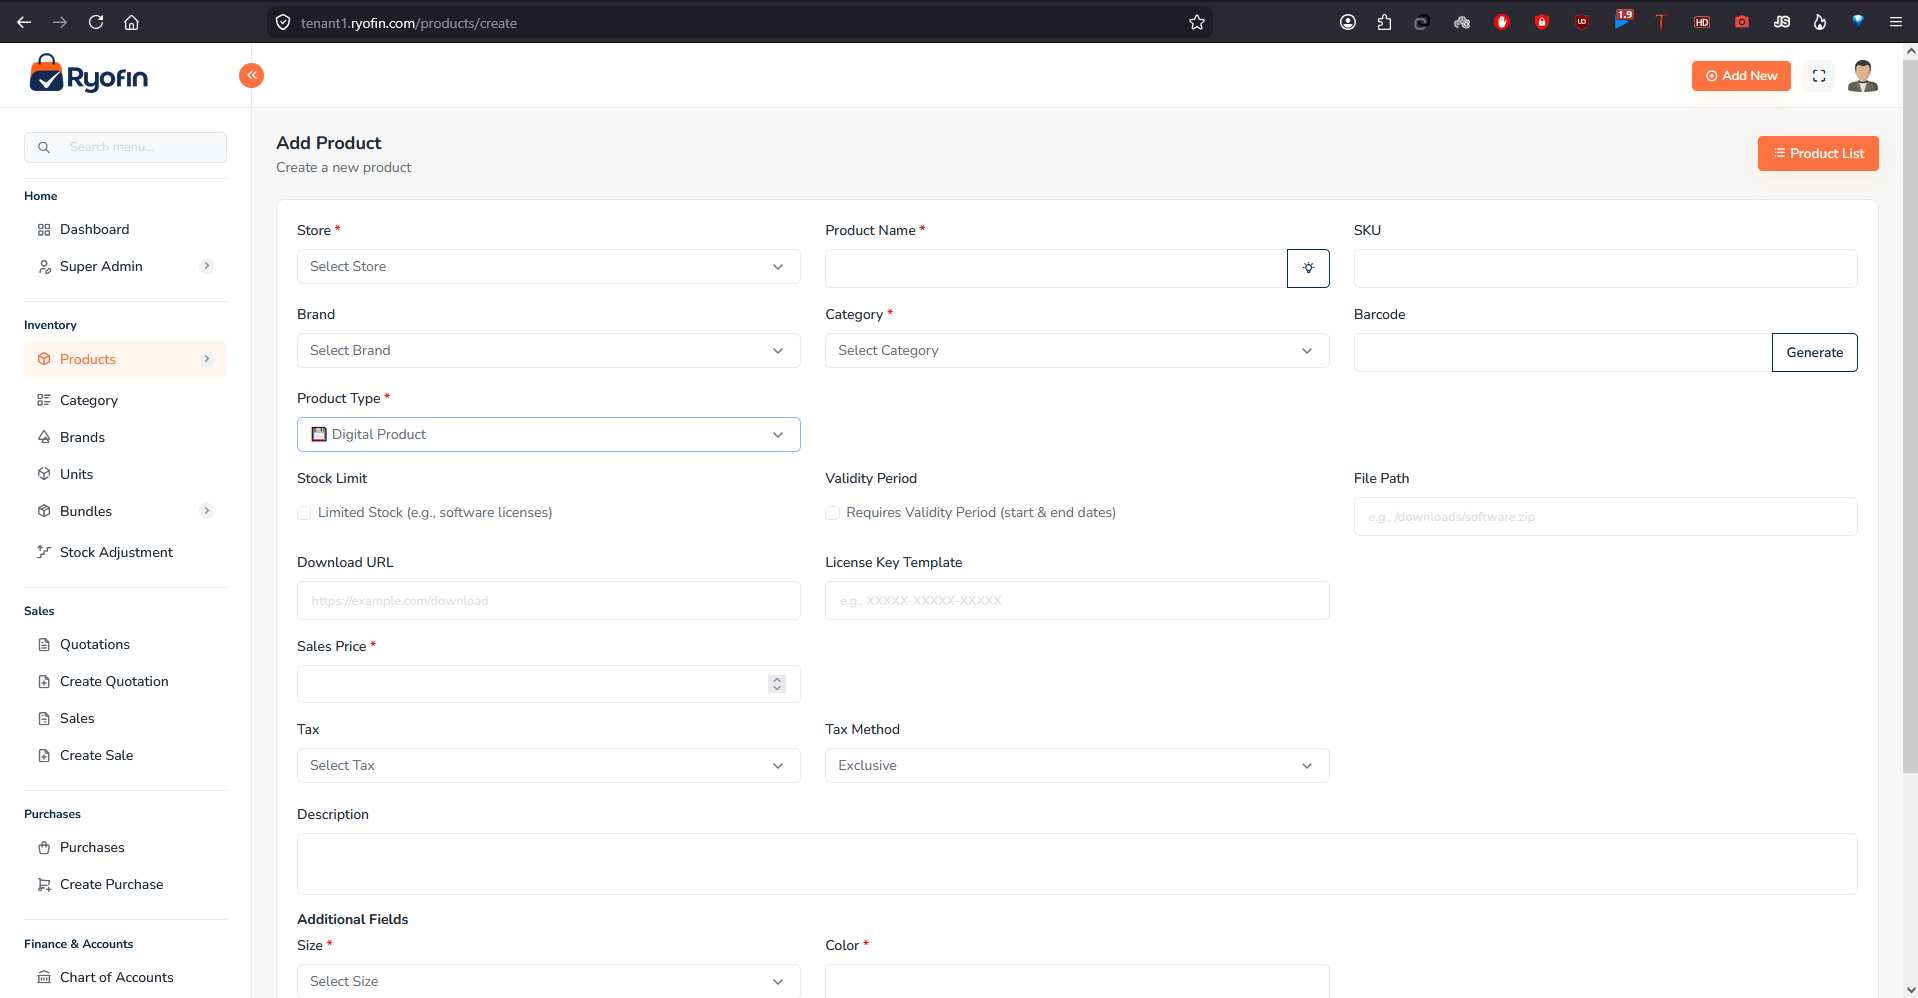
Step 1 — Choose a Product Type:
| Type | What it means |
|---|---|
| Physical | A tangible item with stock tracking, units, and COGS. Supports batch/lot tracking. |
| Service | Labour or consulting — no stock, no units. Has a Service Cost field instead of COGS. |
| Digital | Software, e-books, licences. Optional stock limit, validity periods (start/end dates), download URL, and licence key template. |
The form shows only the fields relevant to the chosen type. The steps below apply to Physical products unless noted.
- Click Create Product.
- Fill in the basics:
- Name
- SKU (must be unique)
- Barcode (optional but recommended)
- Brand, Category (optional)
- Status (Active / Inactive)
- Units:
- Base unit (required)
- Purchase unit (defaults to base)
- Sales unit (defaults to base)
- Pricing & tax:
- Default purchase price
- Default sales price
- Default tax + tax method (inclusive/exclusive)
- Images: drag & drop one or more product images.
- (Optional) Custom fields configured for Products.
- Click Save.
NOTE: A product is created globally for the company. Stock is added per store separately via Purchases or Stock Adjustments.
7.3 Edit a Product
- Open the product → Edit.
- Update fields as needed.
- Click Save.
WARNING: Changing the base unit after the product has stock or transactions can cause inconsistent reporting. Avoid it. Create a new product instead.
7.4 Delete a Product
- Soft delete — the product is hidden but kept for historical reports.
- Re-using the same SKU later may be blocked because it still exists in the soft-deleted set.
7.5 Stock per Store (View)
Open a product → Stock tab. You see a table:
- Store name
- Current stock (in base unit)
- Average COGS per unit
NOTE: A bundle product always shows 0 stock here — bundles are virtual; stock is held by the underlying components. See Section 12 — Bundle Products.
7.6 Permissions
view product,create product,edit product,delete productadjust stock(for Stock Adjustments)
7.7 Batch / Lot Tracking Settings
Applies to Physical products only. Controls whether individual lots/batches of this product are tracked separately.
| Field | Purpose |
|---|---|
| Track Batches | Toggle on to enable lot tracking. When on, every purchase receipt must include a batch/lot number. |
| Require Expiry Date | If on, the expiry date is mandatory when receiving a new batch. Recommended for perishables and pharmaceuticals. |
| Default Shelf Life (days) | Auto-fills expiry date = manufacture date + this many days. Leave blank to enter expiry date manually each time. |
| Block Sale if Expired | If on, the system refuses to sell stock from an expired batch. |
TIP: Enable batch tracking on any product where you need lot traceability or expiry management — medicine, food, chemicals, cosmetics.
⚠️ WARNING: Once a product has been received in batches, do not turn off Track Batches. Existing records remain but new receipts would be untracked, causing stock inconsistencies.
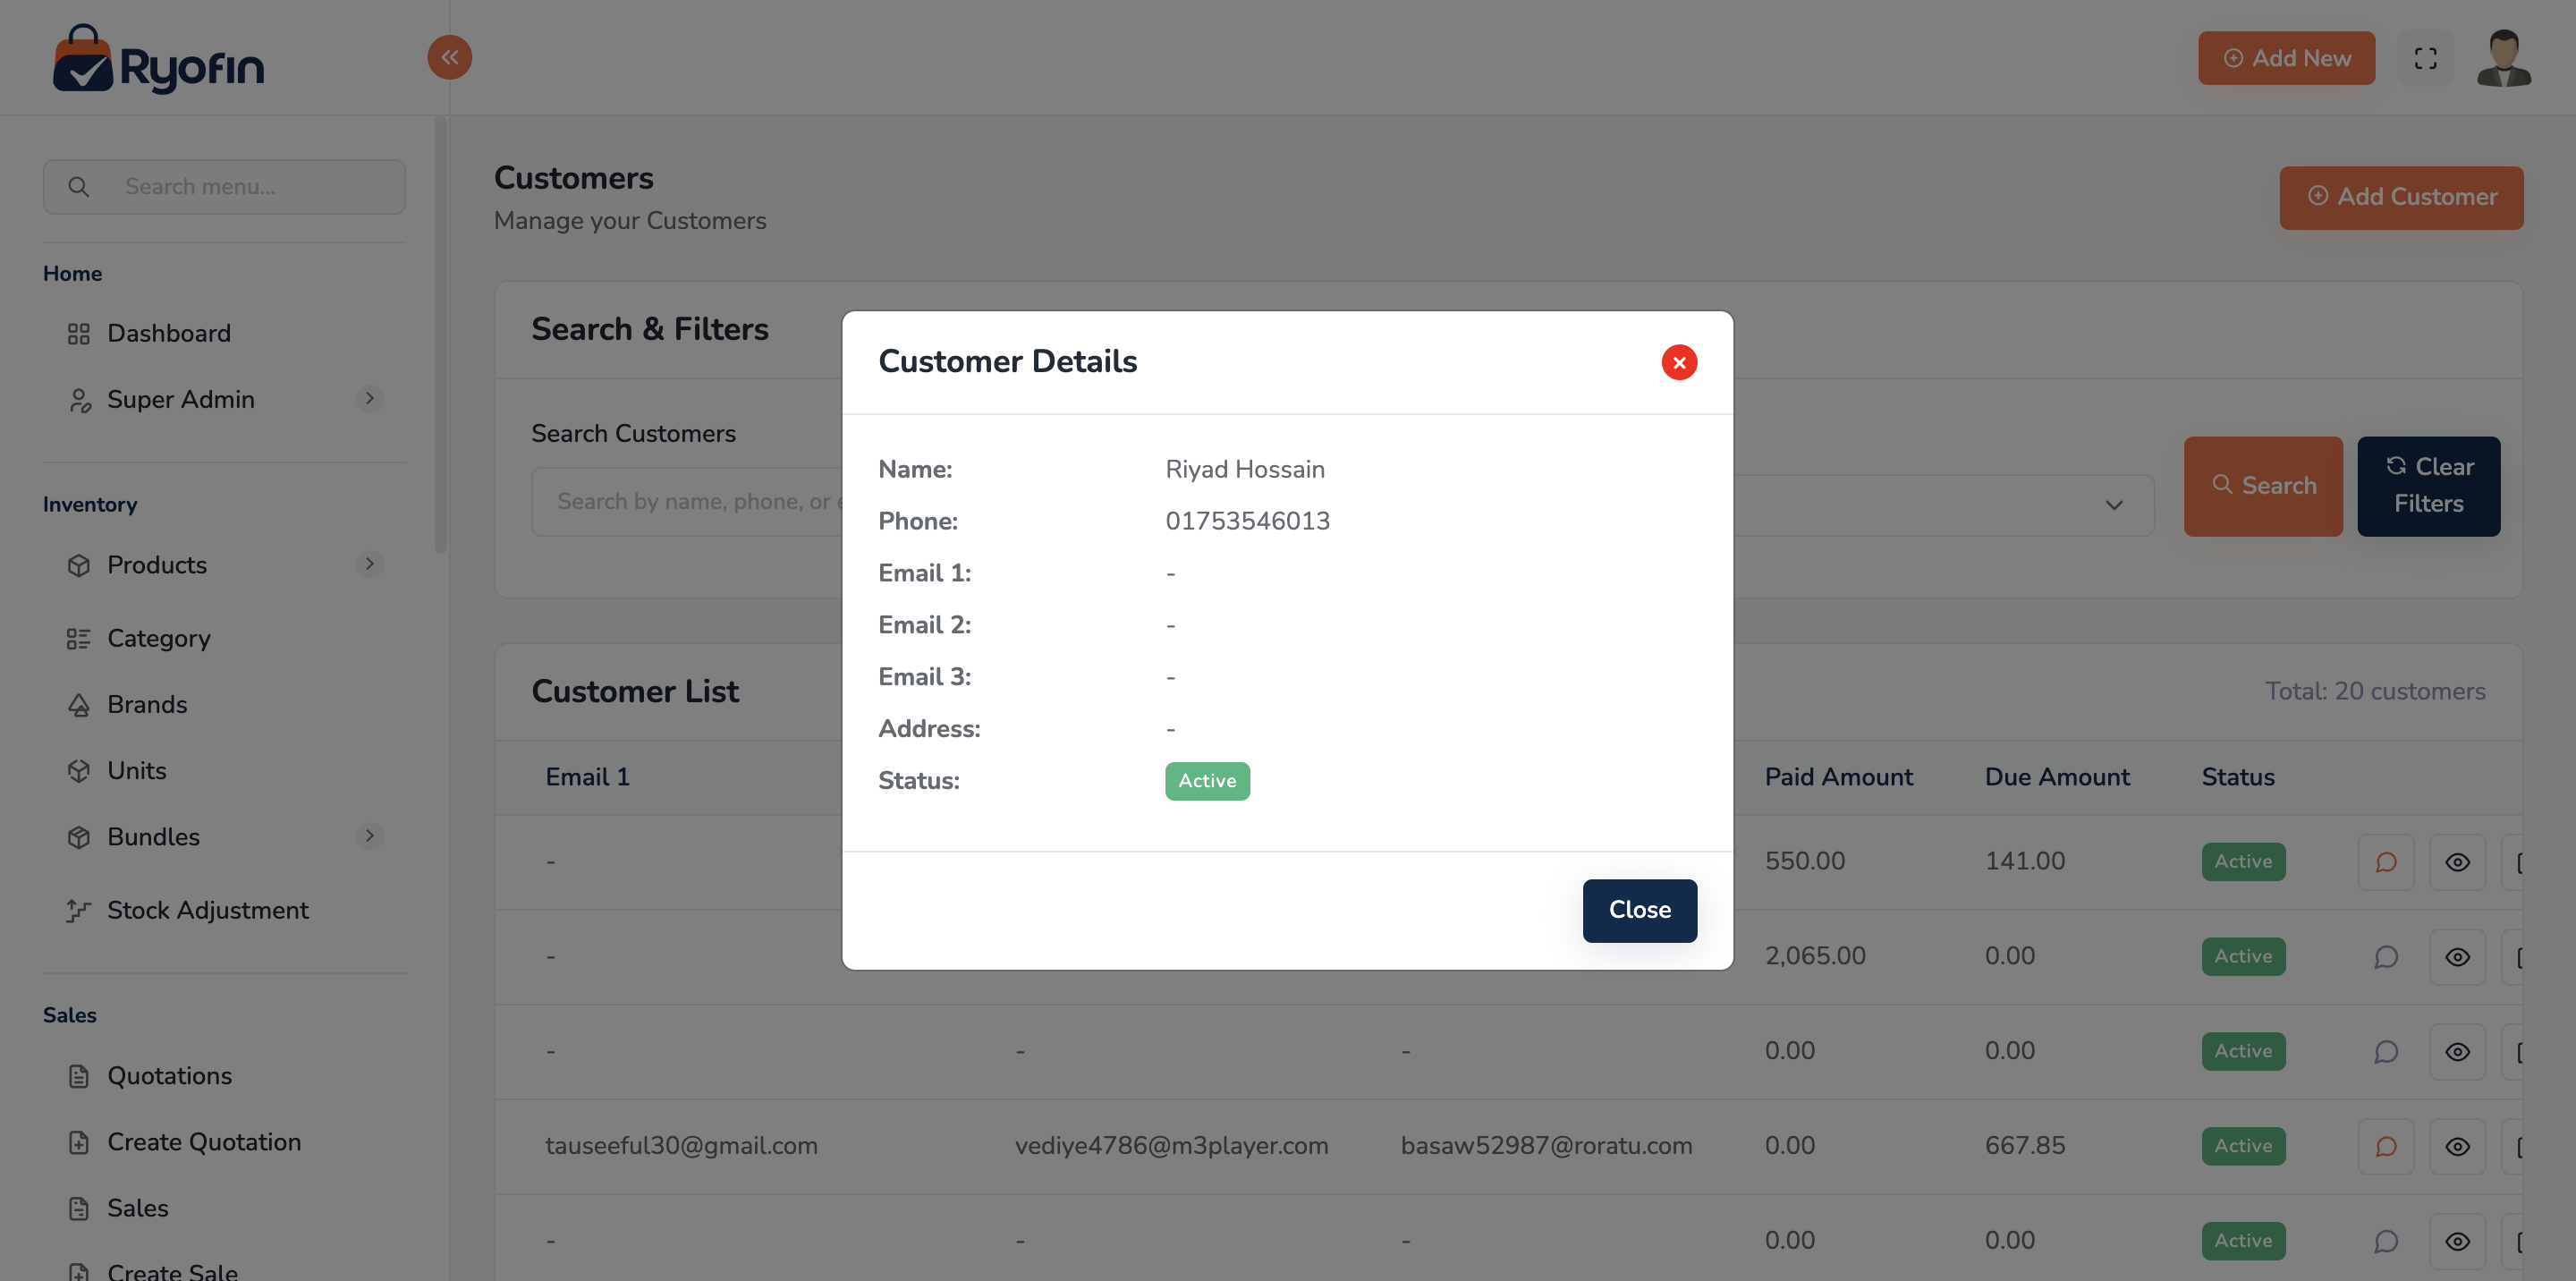
8. Customer & Supplier Management (CRM)
8.1 Customers
Where: Sidebar → Customers.
Create a customer
- Click Create Customer.
- Enter Name, Phone, Email, Address.
- Optional: company name, tax ID, opening balance.
- Custom fields configured for Customers.
- Click Save.
Customer detail
- Profile information.
- Sales history (linked sales).
- Receivable ledger (running balance of money the customer owes you).
- Quotations.
Edit / Delete
- Edit any field except — usually — the opening balance once transactions exist.
- Soft-deletes a customer; cannot fully remove if linked transactions exist.
8.2 Suppliers
Where: Sidebar → Suppliers. The fields and workflow mirror Customers. Suppliers have:
- Purchase history
- Payable ledger (money you owe them)
8.3 Custom Fields
Both Customers and Suppliers support custom fields. See Section 6.5 — Additional / Custom Fields.
8.4 Permissions
view customer,create customer,edit customer,delete customerview supplier,create supplier,edit supplier,delete supplier
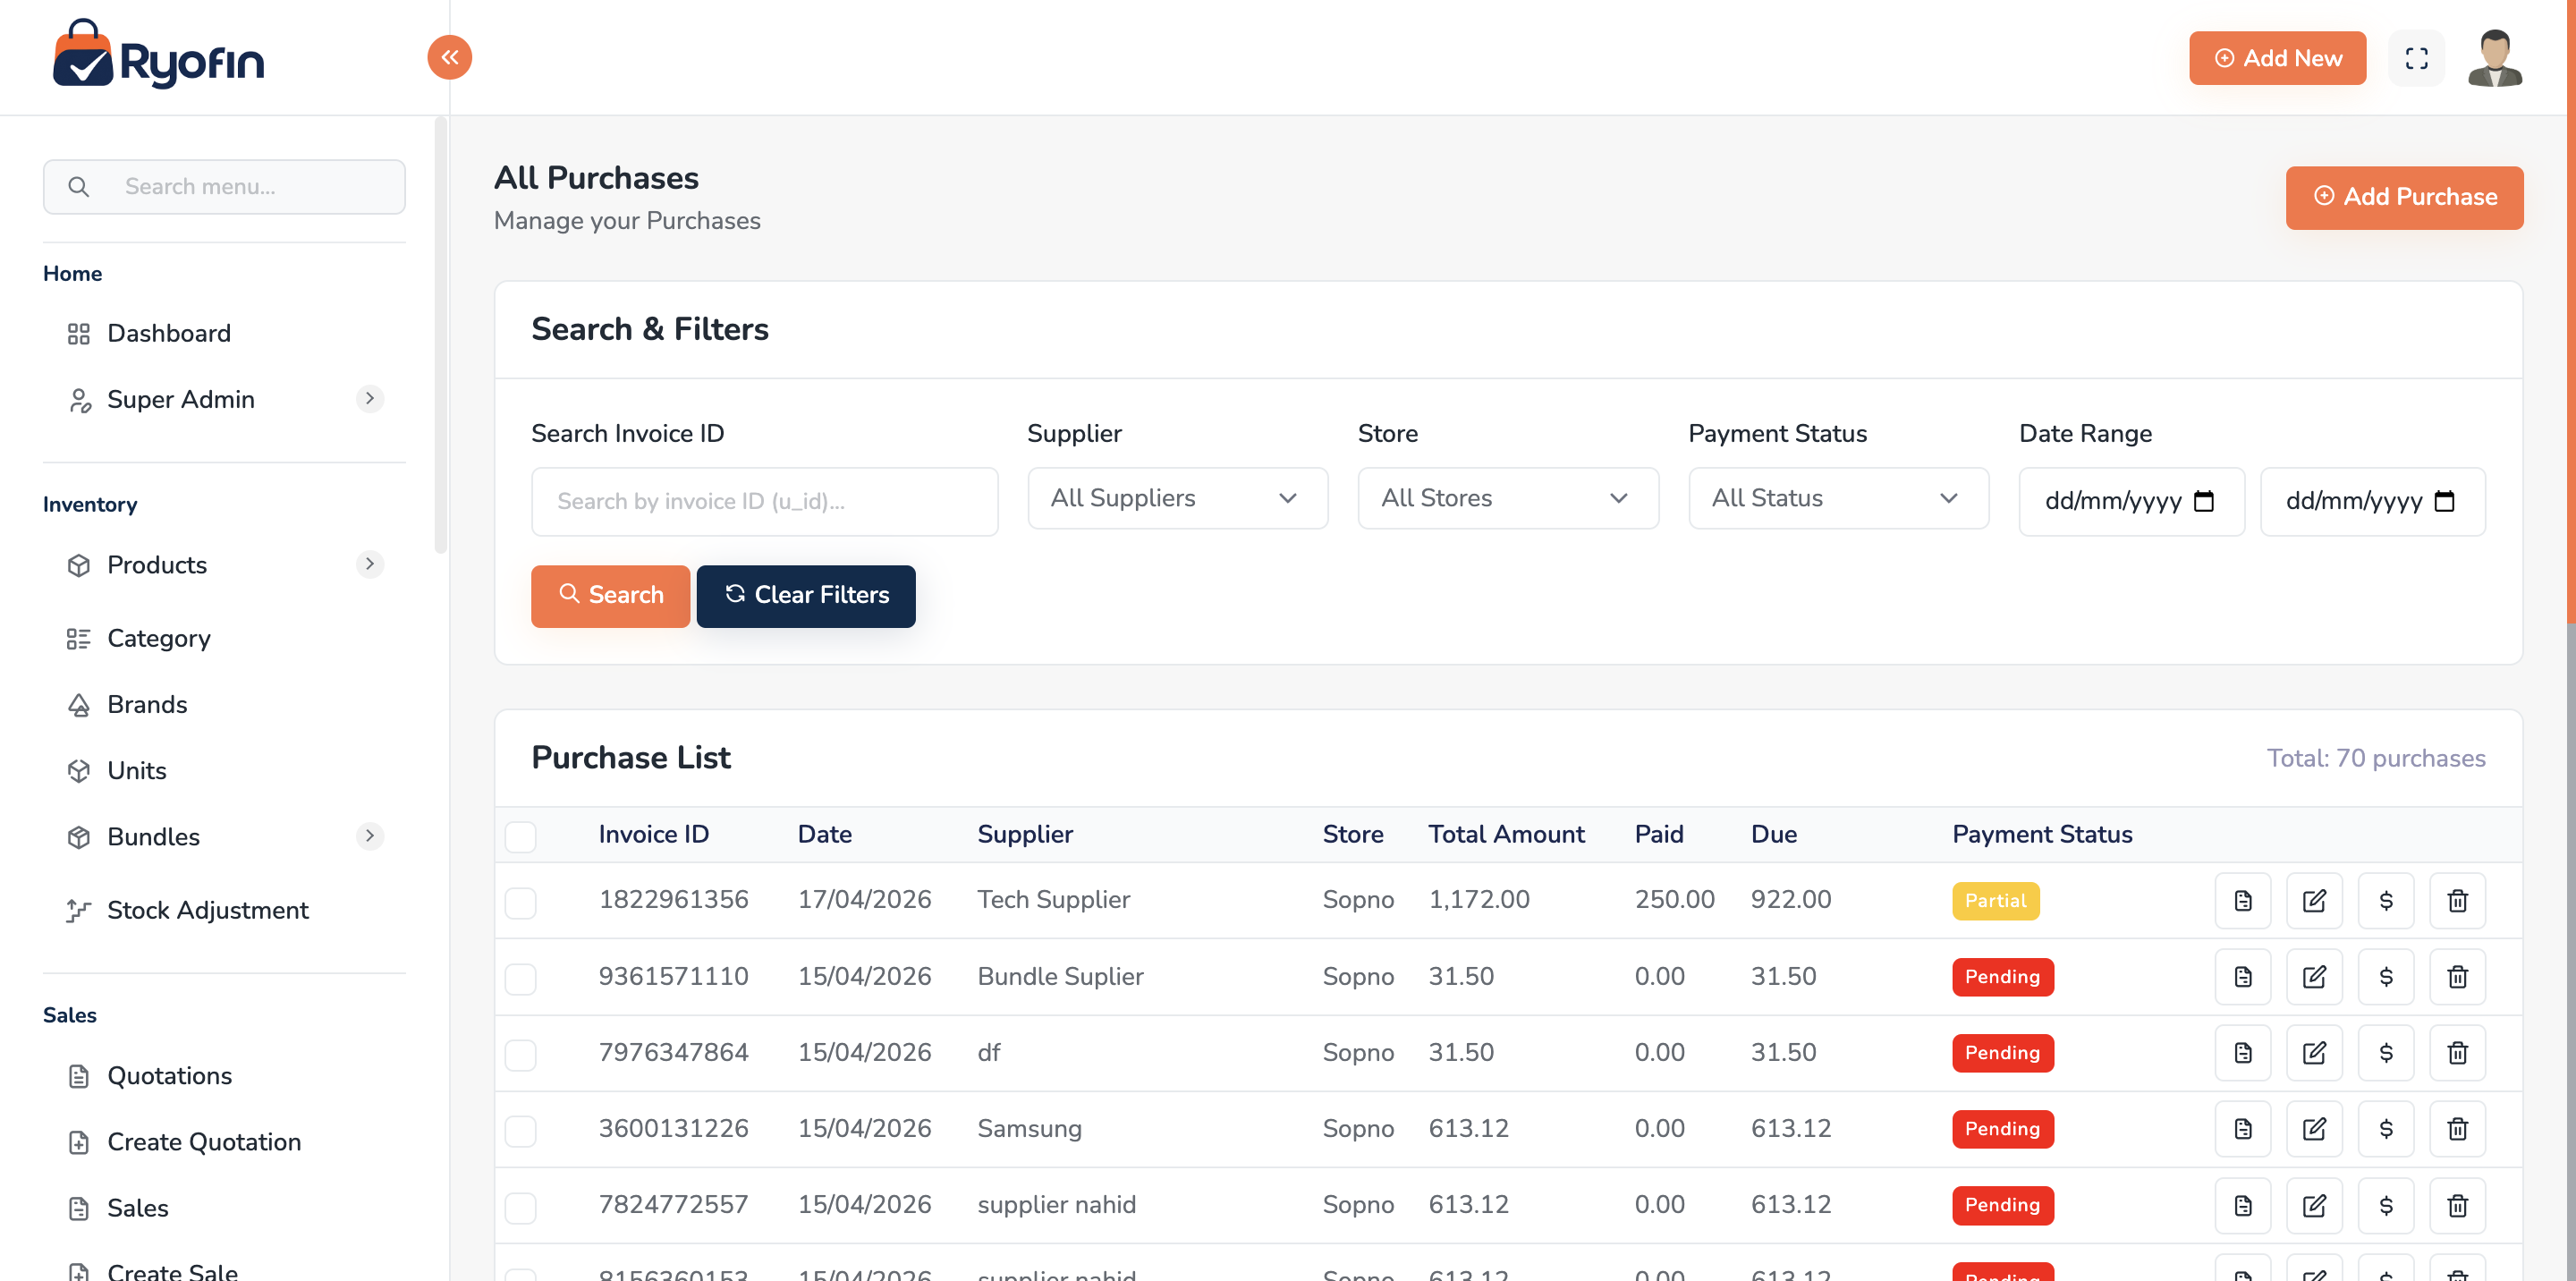
9. Purchases
Where: Sidebar → Purchases.
9.1 What is a Purchase?
A purchase is a transaction where you buy stock from a supplier. It increases your inventory and creates a payable to the supplier (unless you pay immediately).
9.2 Purchase List
Columns: Purchase #, date, supplier, store, total, paid, due, payment status, actions. Filters: date range, supplier, store, payment status. Actions: view, edit, delete, record payment, download PDF.
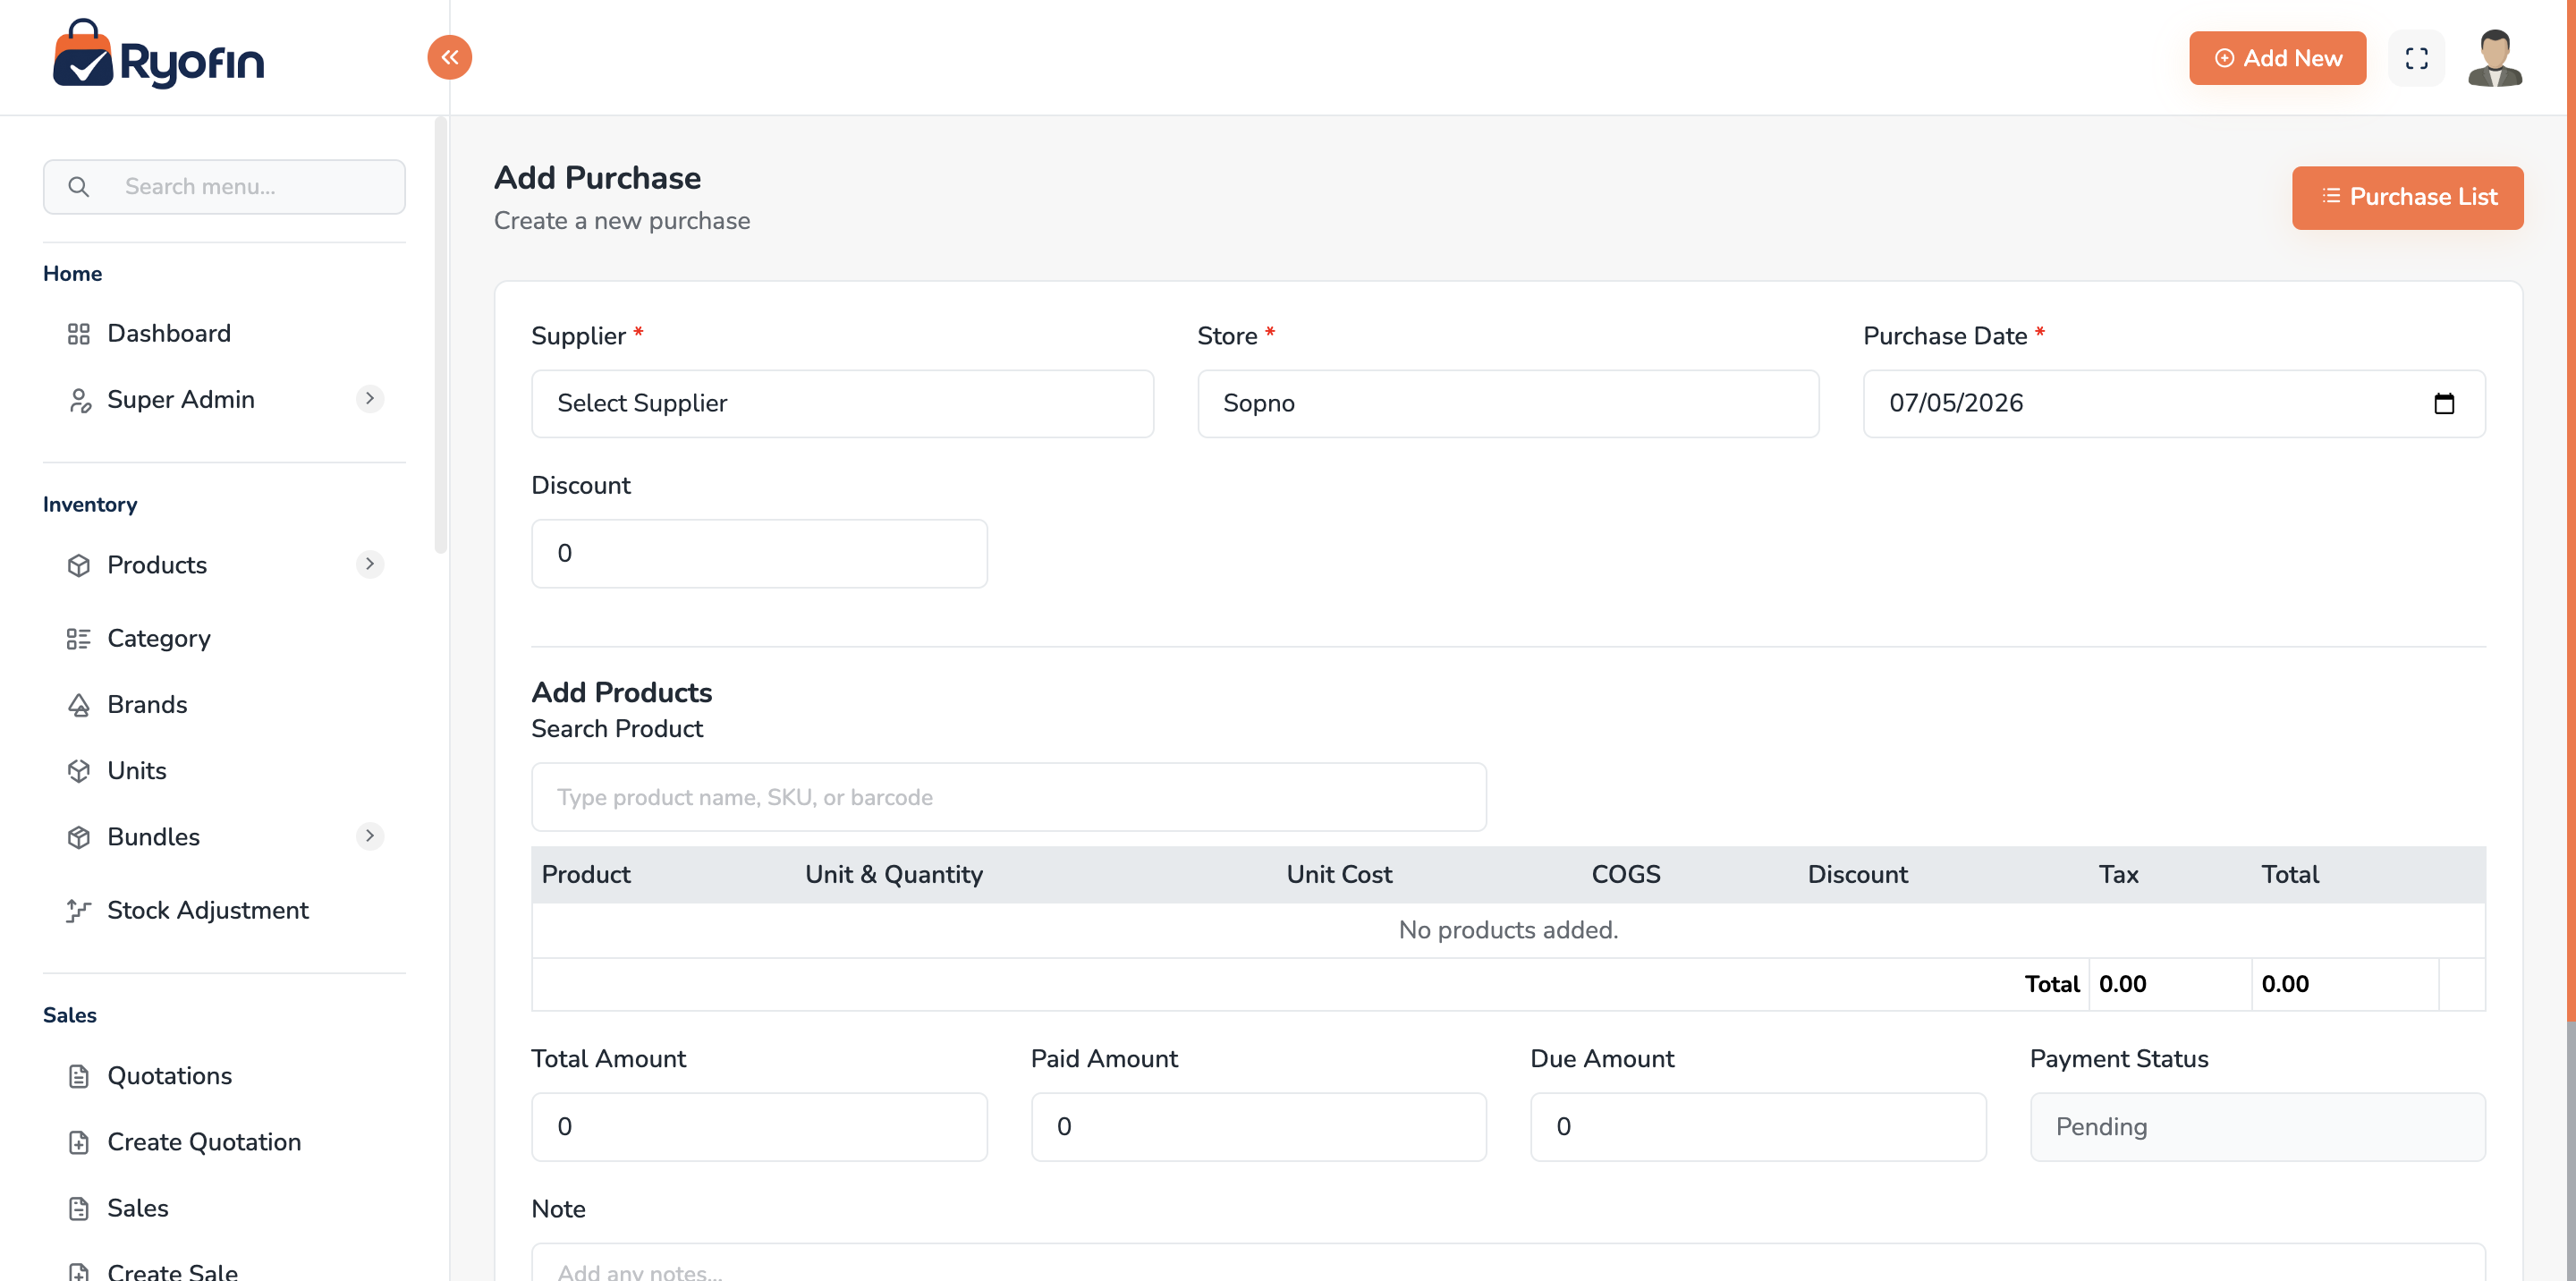
9.3 Create a Purchase
- Click Create Purchase.
- Header:
- Date (defaults to today)
- Supplier (search & pick or click "+ New Supplier")
- Store (where the stock is going)
- Reference / invoice number (optional)
- Tax method (inclusive / exclusive)
- Line items — for each product:
- Product (search by name, SKU, or barcode)
- Quantity (in purchase unit)
- Unit cost
- Tax (line-level)
- Discount (line-level) — select the type from the dropdown beside the value:
- Amount: fixed currency amount off this line (e.g., ৳50 off).
- Percentage: percentage off the line subtotal (e.g., 10%).
For batch-tracked products, three extra fields appear on each line item:
| Field | Notes |
|---|---|
| Lot / Batch # | The lot number from the packaging (e.g., LOT-2025-001). Required for batch-tracked products. |
| Manufacture Date | Optional. |
| Expiry Date | Required if the product has Require Expiry Date enabled. Auto-fills if a Default Shelf Life is configured. |
- Footer:
- Order discount (overall)
- Shipping cost
- Other charges
- Click Save Purchase.
What happens automatically:
- Stock increases in the chosen store (in base unit).
- Average COGS for each product is recalculated.
- Journal entries:
- Debit Inventory (asset)
- Credit Suppliers Payable (liability)
- If you also recorded an immediate payment: Debit Suppliers Payable, Credit Cash/Bank.
9.4 Recording a Payment to Supplier
- Open the purchase → Payments tab → Add Payment.
- Enter Amount, Date, Payment Account (Cash / Bank).
- (Optional) Reference, note.
- Click Save.
Journal:
- Debit Suppliers Payable
- Credit Cash / Bank
9.5 Edit a Purchase
- Open the purchase → Edit.
- Adjust items, quantities, prices.
- Click Save.
WARNING: Editing a purchase reverses the original journal entries and stock movement, then re-posts the new ones. Make sure your changes are correct before saving.
9.6 Delete a Purchase
- Soft-deletes the purchase.
- Reverses journal entries (Inventory, Payable, COGS).
- Reverses stock movement.
- Stays visible in audit/activity logs.
9.7 Permissions
view purchase,create purchase,edit purchase,delete purchaseview purchase payment,create purchase payment,delete purchase payment
10. Sales
Where: Sidebar → Sales.
10.1 What is a Sale?
A sale is a transaction where you sell stock to a customer. It decreases inventory, posts revenue, COGS, and creates a receivable (unless paid immediately).
10.2 Sales List
Columns: Sale #, date, customer, store, total, paid, due, payment status, actions. Filters: date range, customer, store, payment status. Actions: view, edit, delete, record payment, send email, download PDF, view invoice.
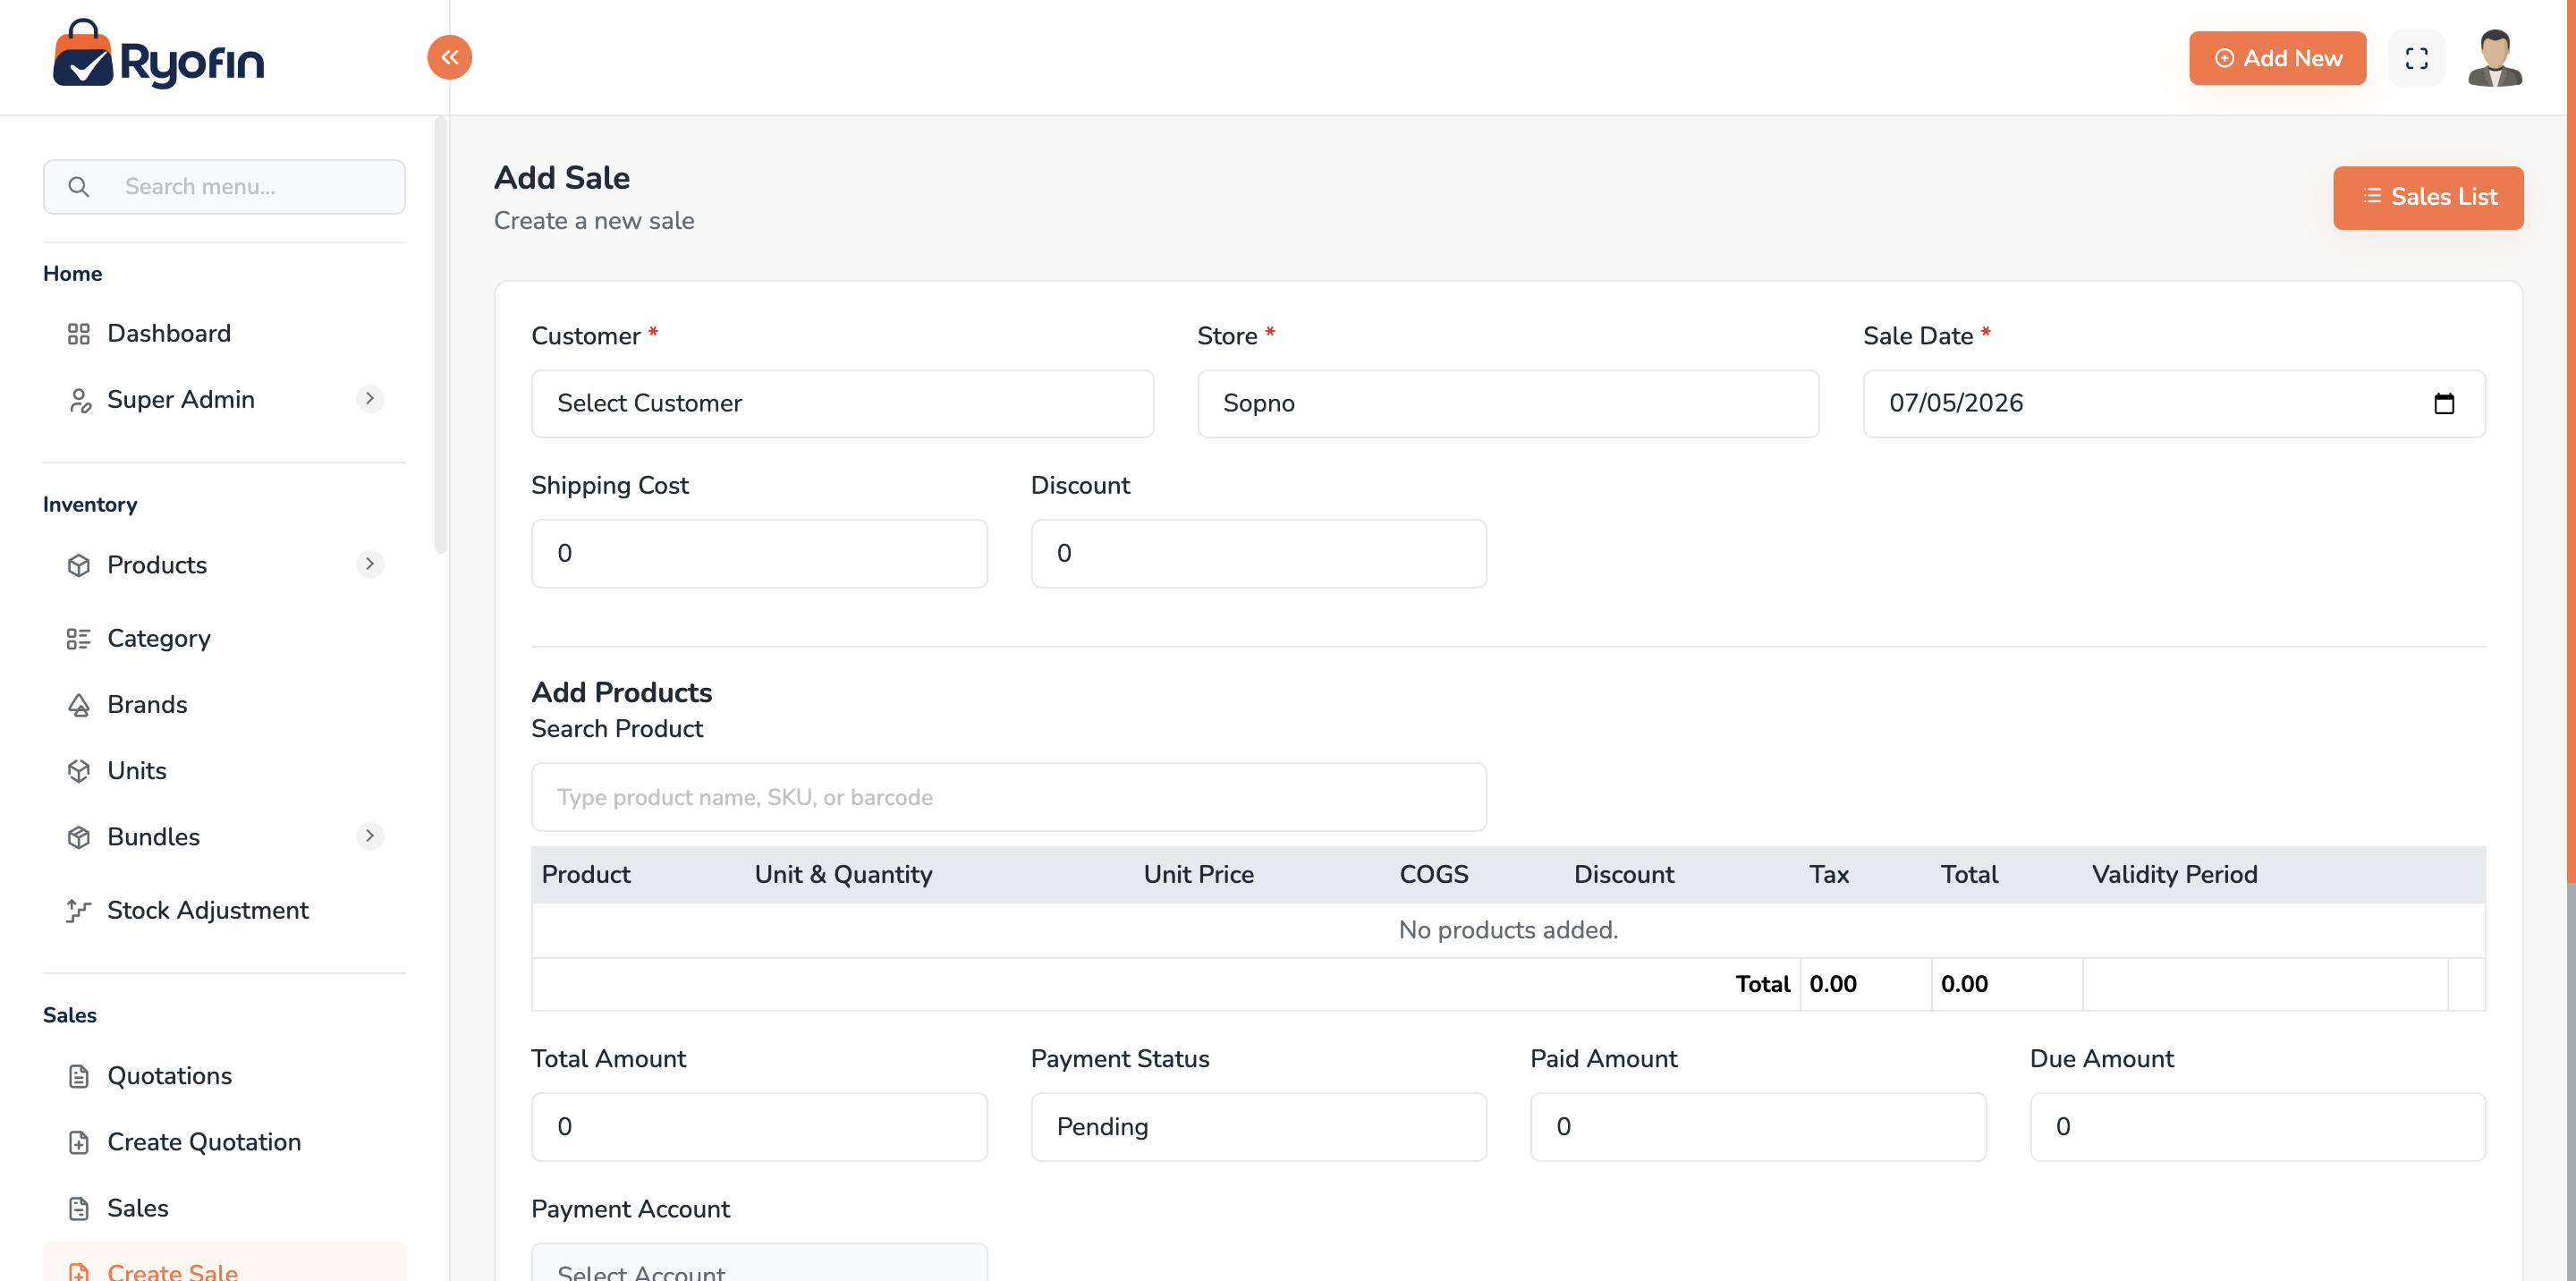
10.3 Create a Sale
-
Click Create Sale.
-
Header:
- Date
- Customer (or walk-in customer)
- Store
- Tax method (inclusive/exclusive)
-
Add line items the same way as purchases. Item-level discounts support two types (select from the dropdown):
- Amount — fixed currency amount off that line.
- Percentage — percentage off the line subtotal.
For Digital products with Validity Period enabled, two extra date fields appear per line item:
Field Purpose Validity Start Date When the customer's access / licence begins. Validity End Date When the customer's access / licence expires. -
Footer: order discount, shipping, other charges.
-
(Optional) Pay now: tick Add Payment, choose account and amount.
-
Click Save Sale.
What happens automatically:
- Stock decreases in that store.
- Journal entries:
- Debit Customer Receivable (or Cash/Bank if paid)
- Credit Sales Revenue
- Debit COGS (Cost of Goods Sold)
- Credit Inventory
- Tax accounts if applicable.
10.4 Recording a Customer Payment
- Open the sale → Payments → Add Payment.
- Amount, date, account, reference.
- Save.
Journal: Debit Cash/Bank, Credit Customer Receivable.
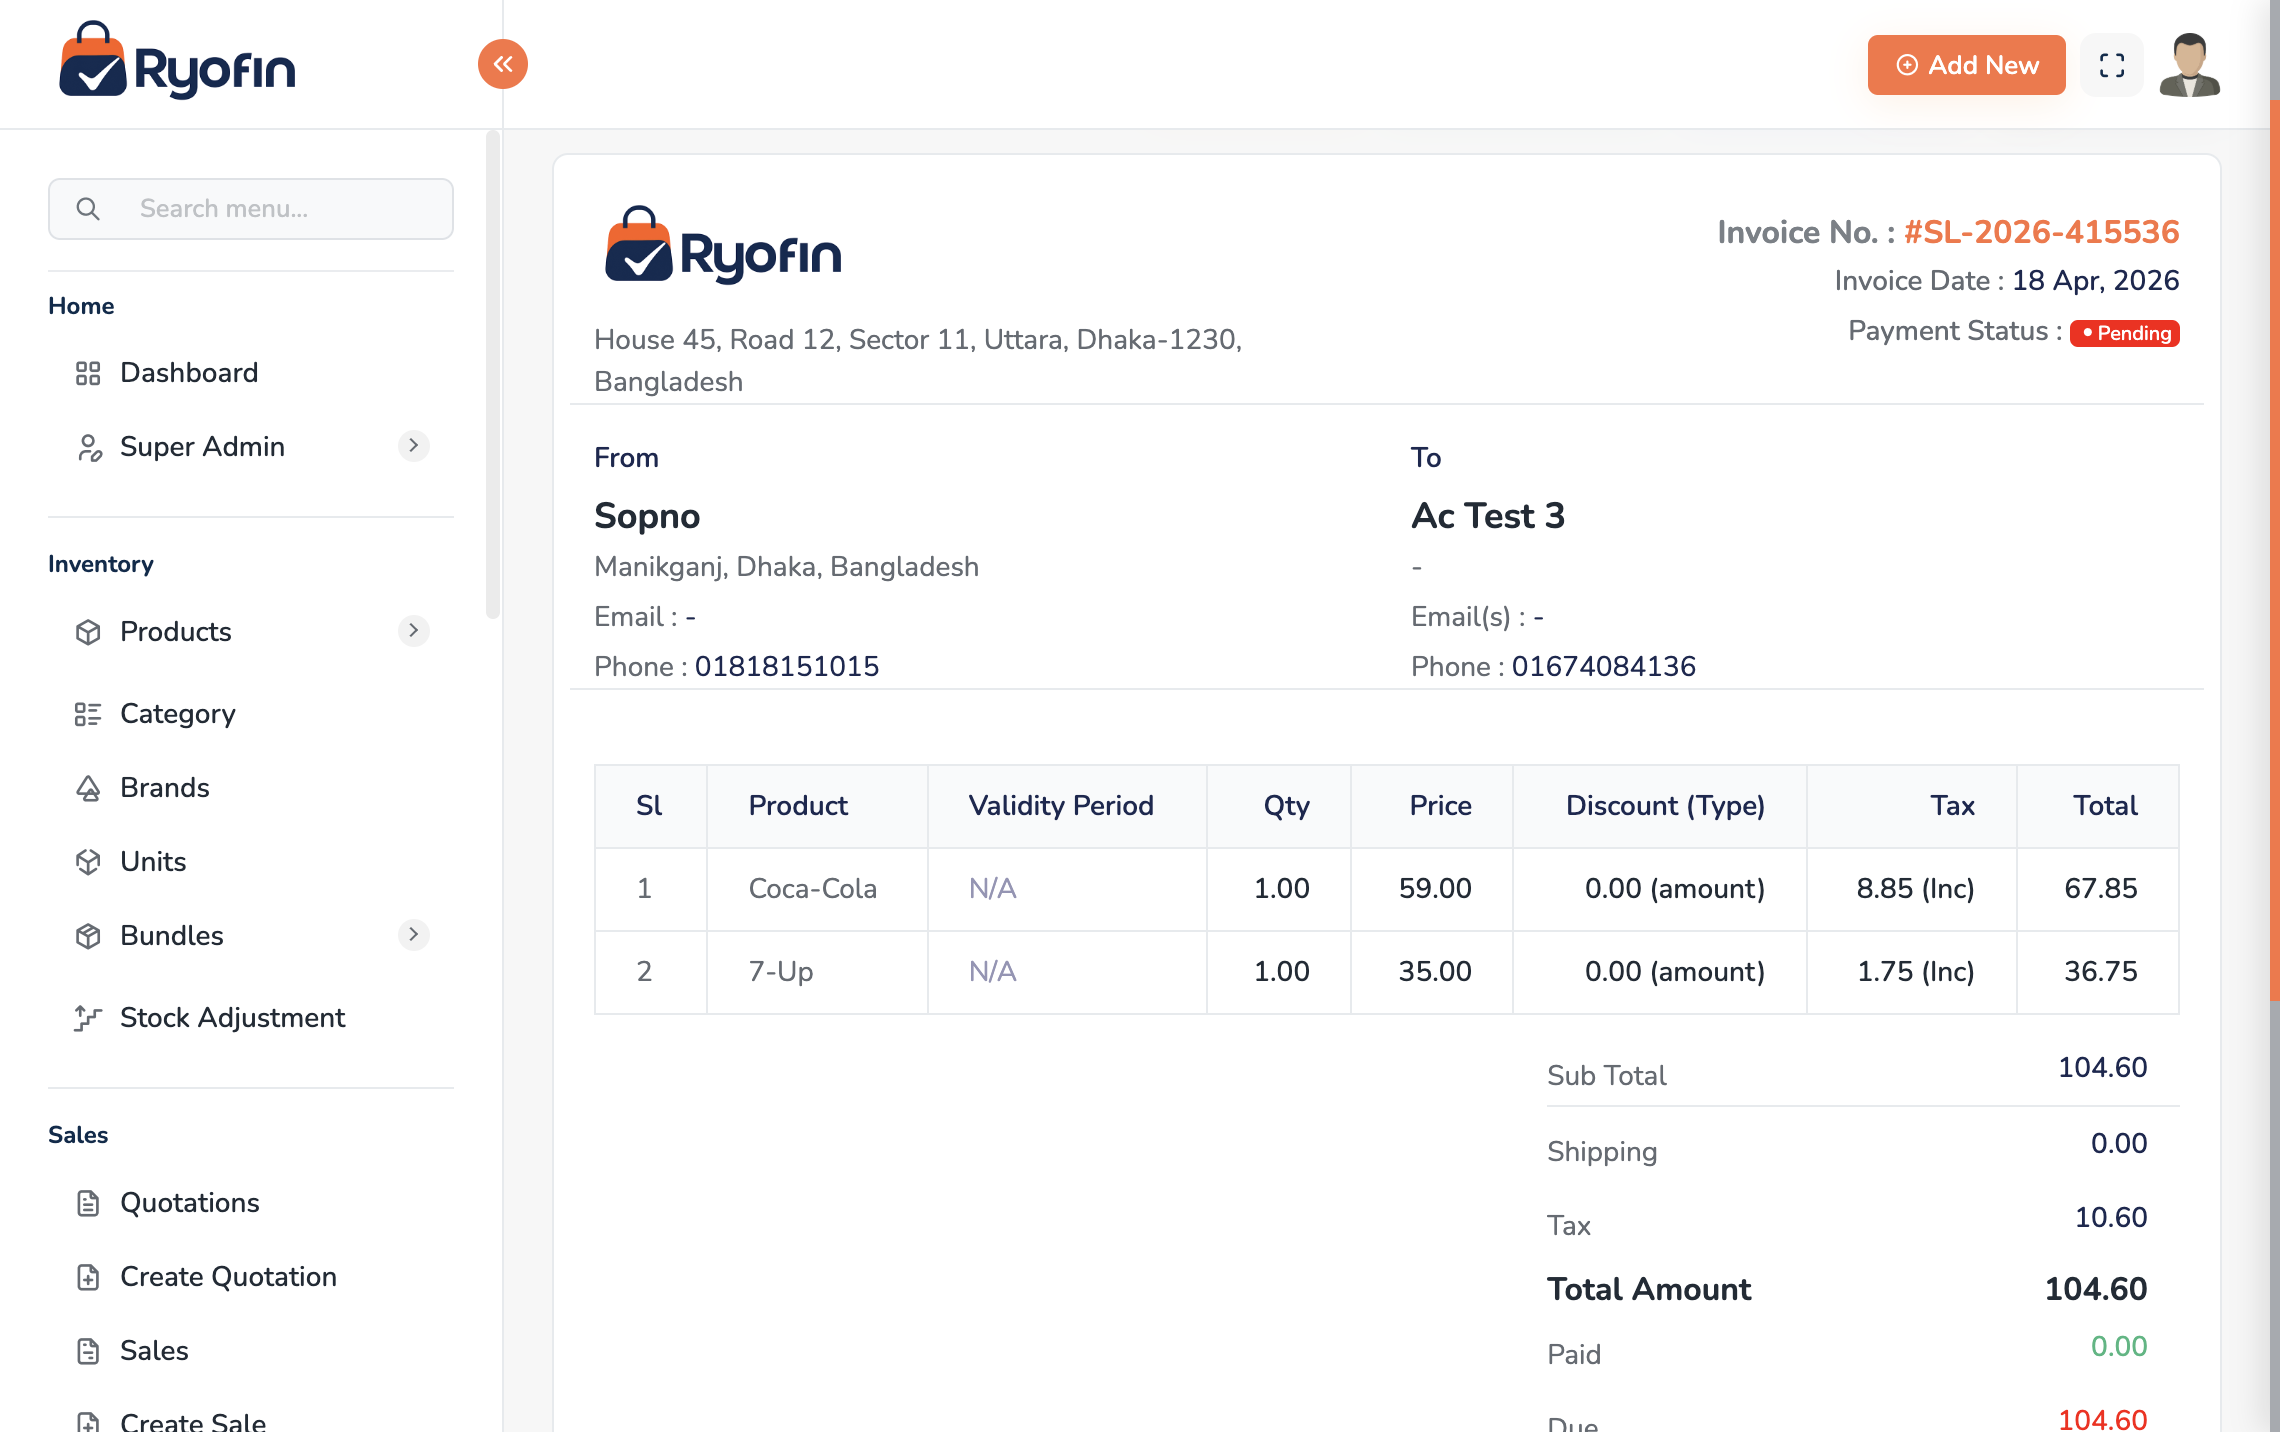
10.5 Sale Invoice (PDF & Email)
On a sale's detail page:
- Download PDF — generates a print-ready invoice.
- Send Email — emails the invoice with PDF attached to the customer's email on file.
10.6 Edit / Delete a Sale
- Same reversal-and-repost behavior as purchases.
- Soft delete reverses stock and journal entries; sale stays in audit history.
10.7 Permissions
view sale,create sale,edit sale,delete saleview sale payment,create sale payment,delete sale paymentsend sale email
11. Quotations
Where: Sidebar → Quotations.
11.1 What is a Quotation?
A formal price offer to a customer that has not yet become a sale. Quotations follow a status lifecycle and can be converted into a Sale once accepted.
11.2 Status Lifecycle
Draft  →  Sent  →  Accepted  →  Converted (to Sale)
              ↘  Rejected
              ↘  Expired (auto)
| Status | Meaning |
|---|---|
| Draft | Saved, not yet sent. Editable. |
| Sent | Delivered (manually marked or by email). Editable until customer responds. |
| Accepted | Customer agreed. Ready to convert. |
| Rejected | Customer declined. Reason saved. |
| Expired | Expiry date passed. Automatic. Cannot be accepted. |
| Converted | Linked to a Sale. Read-only. |
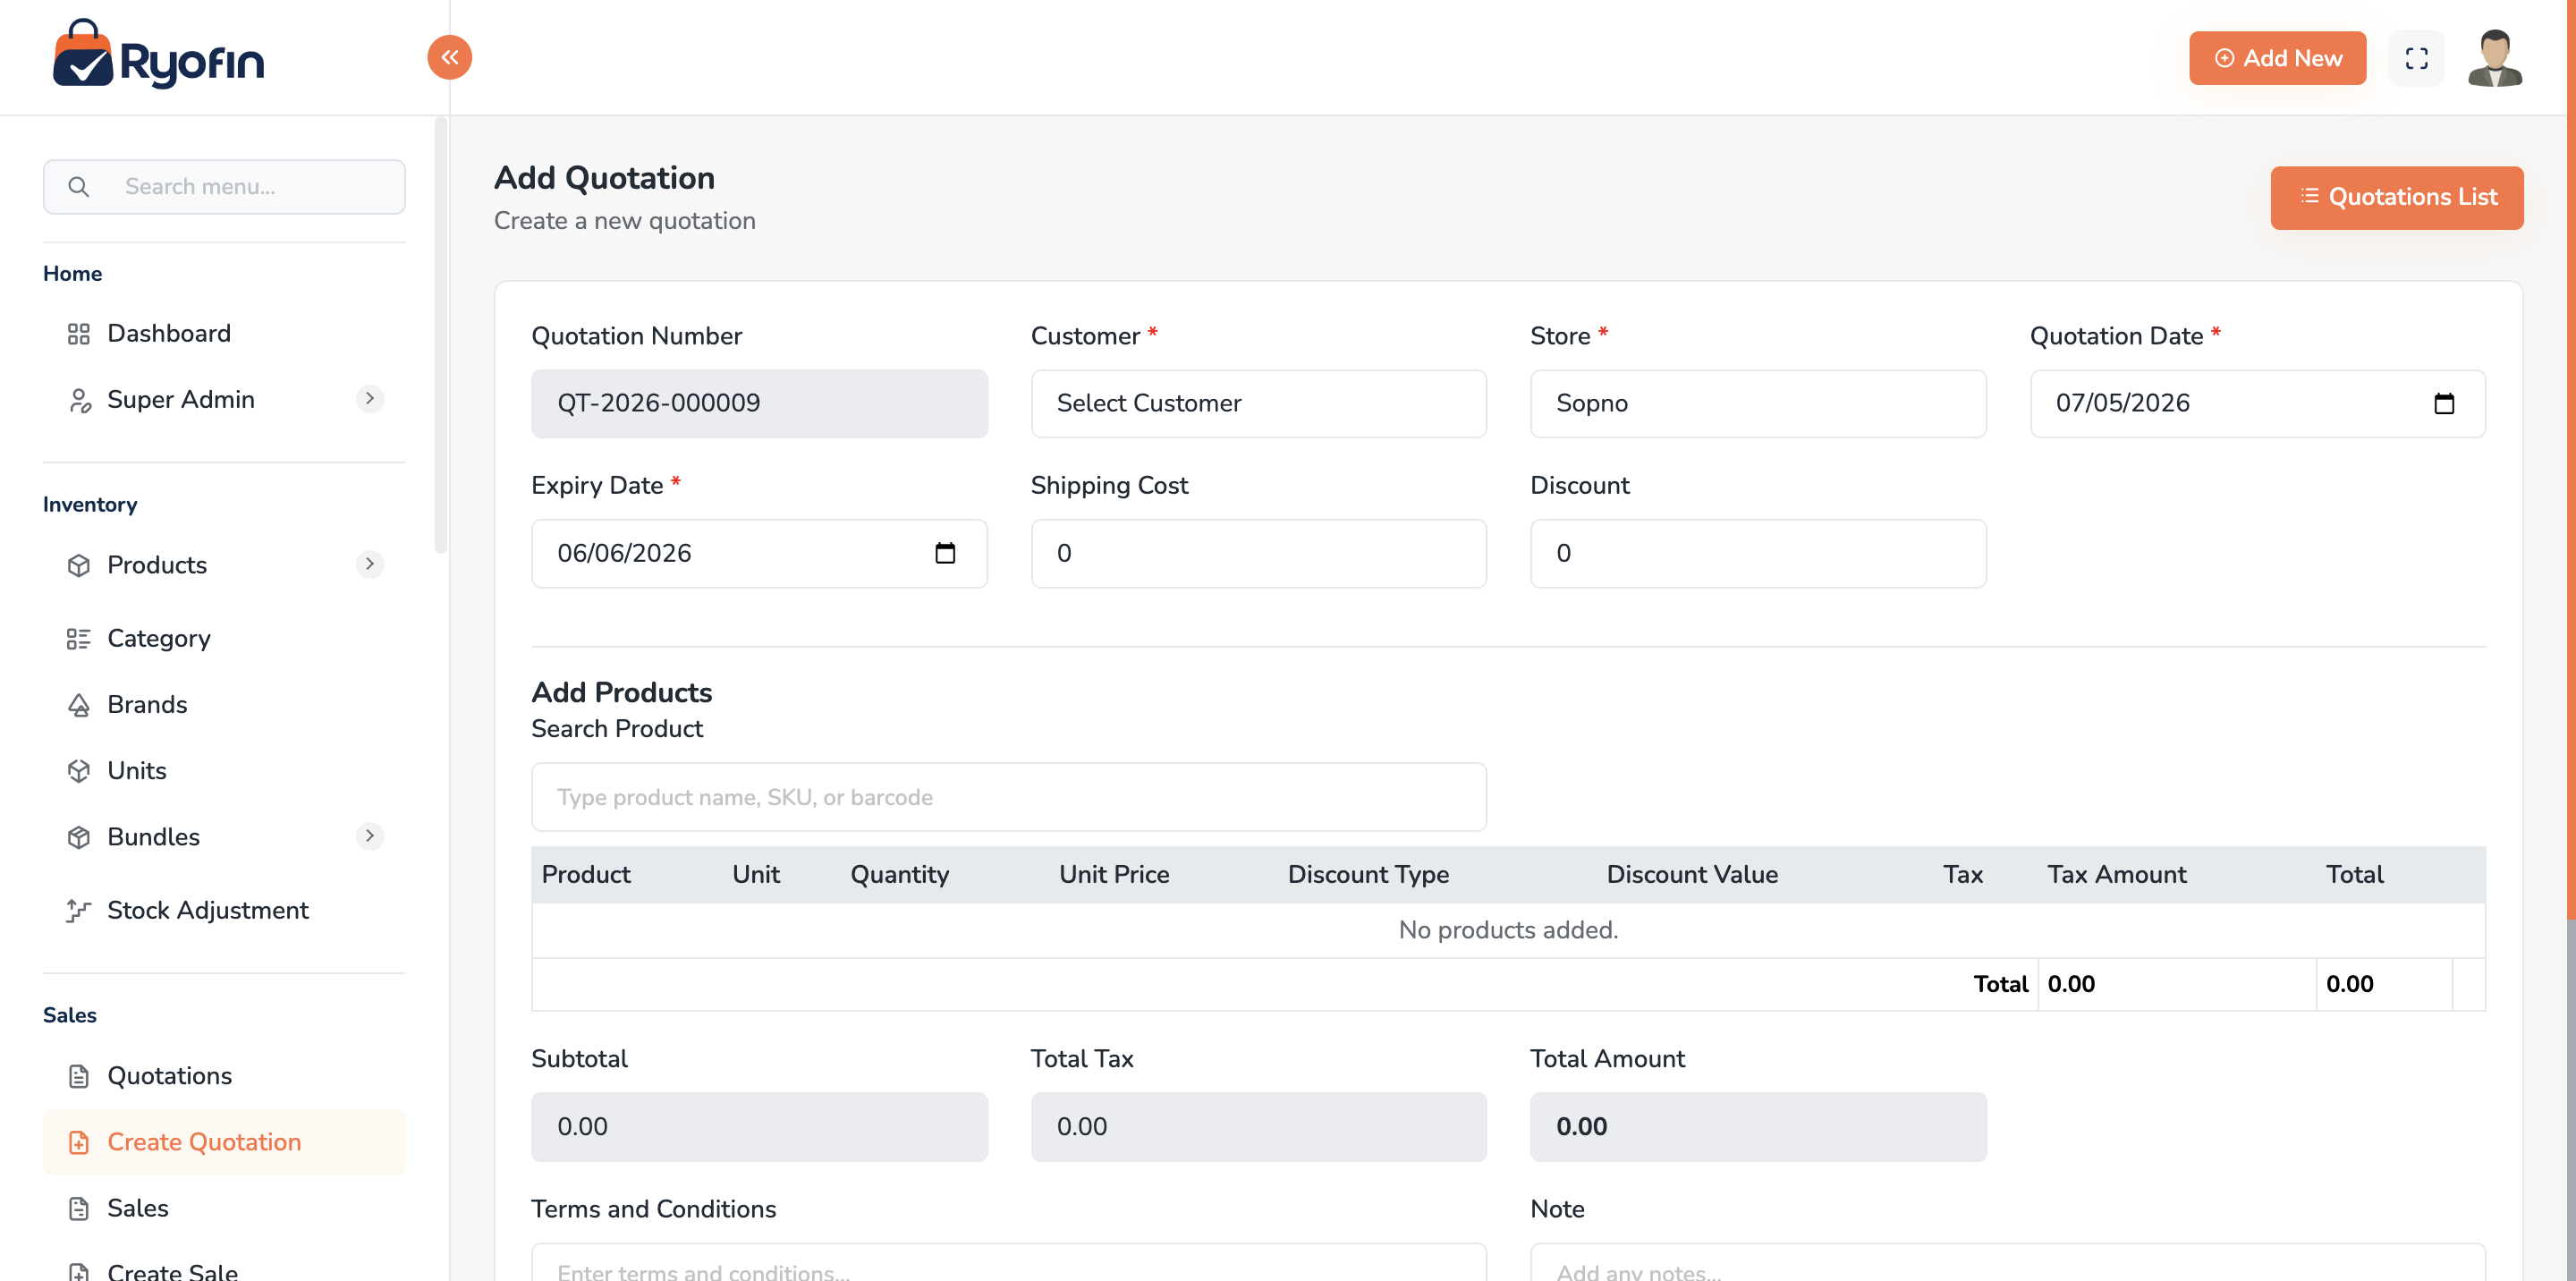
11.3 Create a Quotation
- Click Create Quotation.
- Header:
- Customer, Store
- Quotation date, Expiry date (default: +30 days)
- Tax method
- Line items: Product, qty, unit price, tax, line discount.
- Footer: order discount, shipping, terms & conditions, internal note.
- Click Save Quotation (status = Draft).
11.4 Send to Customer
Manual: Open quotation → Mark as Sent. Email: Open quotation → Send Email. The system attaches a PDF and (if status was Draft) automatically marks it as Sent.
11.5 Accept / Reject
- Accept — green button. Records the user and timestamp.
- Reject — red button. Requires a rejection reason.
11.6 Convert to Sale
- Open an Accepted quotation.
- Click Convert to Sale (orange button).
- Confirm.
- The system creates a new Sale with: same customer, store, items, quantities, prices, discounts, taxes, shipping. Payment status = Pending. Note = "Converted from Quotation: QT-...".
- The quotation becomes Converted and links to the new sale.
NOTE: Only Accepted quotations can be converted. Once converted, you cannot edit the quotation.
11.7 Auto-Expire
A scheduled job runs daily and marks any Draft or Sent quotation past its expiry date as Expired. Expired quotations cannot be accepted; you can copy them to a new quotation if the customer comes back later.
11.8 Edit & Delete Rules
| Status | Edit | Delete |
|---|---|---|
| Draft | Yes | Yes |
| Sent | Yes | Yes |
| Accepted | No | No |
| Rejected | No | No |
| Expired | No | No |
| Converted | No | No |
11.9 Permissions
view quotation,create quotation,edit quotation,delete quotationmark quotation sent,send quotation emailaccept quotation,reject quotation,convert quotation to sale
12. Bundle Products
Where: Sidebar → Products → Bundles (or Products list filtered by "Is Bundle").
12.1 What is a Bundle?
A bundle is a virtual product made of other products. Selling 1 "Office Set" might consume 1 Desk + 1 Chair + 1 Lamp from stock. Bundles let you price and sell combos without manually tracking each component on the invoice.
12.2 Key Rules
- A bundle's stock is always shown as 0 because bundles are not held in inventory — their components are.
- The cost of a bundle is computed from its components (sum of component COGS × quantity).
- When you sell a bundle, the system consumes component stock from the chosen store.
12.3 Create a Bundle
- Click Create Bundle.
- Enter Name, SKU, Brand, Category as for a normal product.
- In Bundle Items:
- Add each component product
- Set the quantity per bundle
- Click Save.
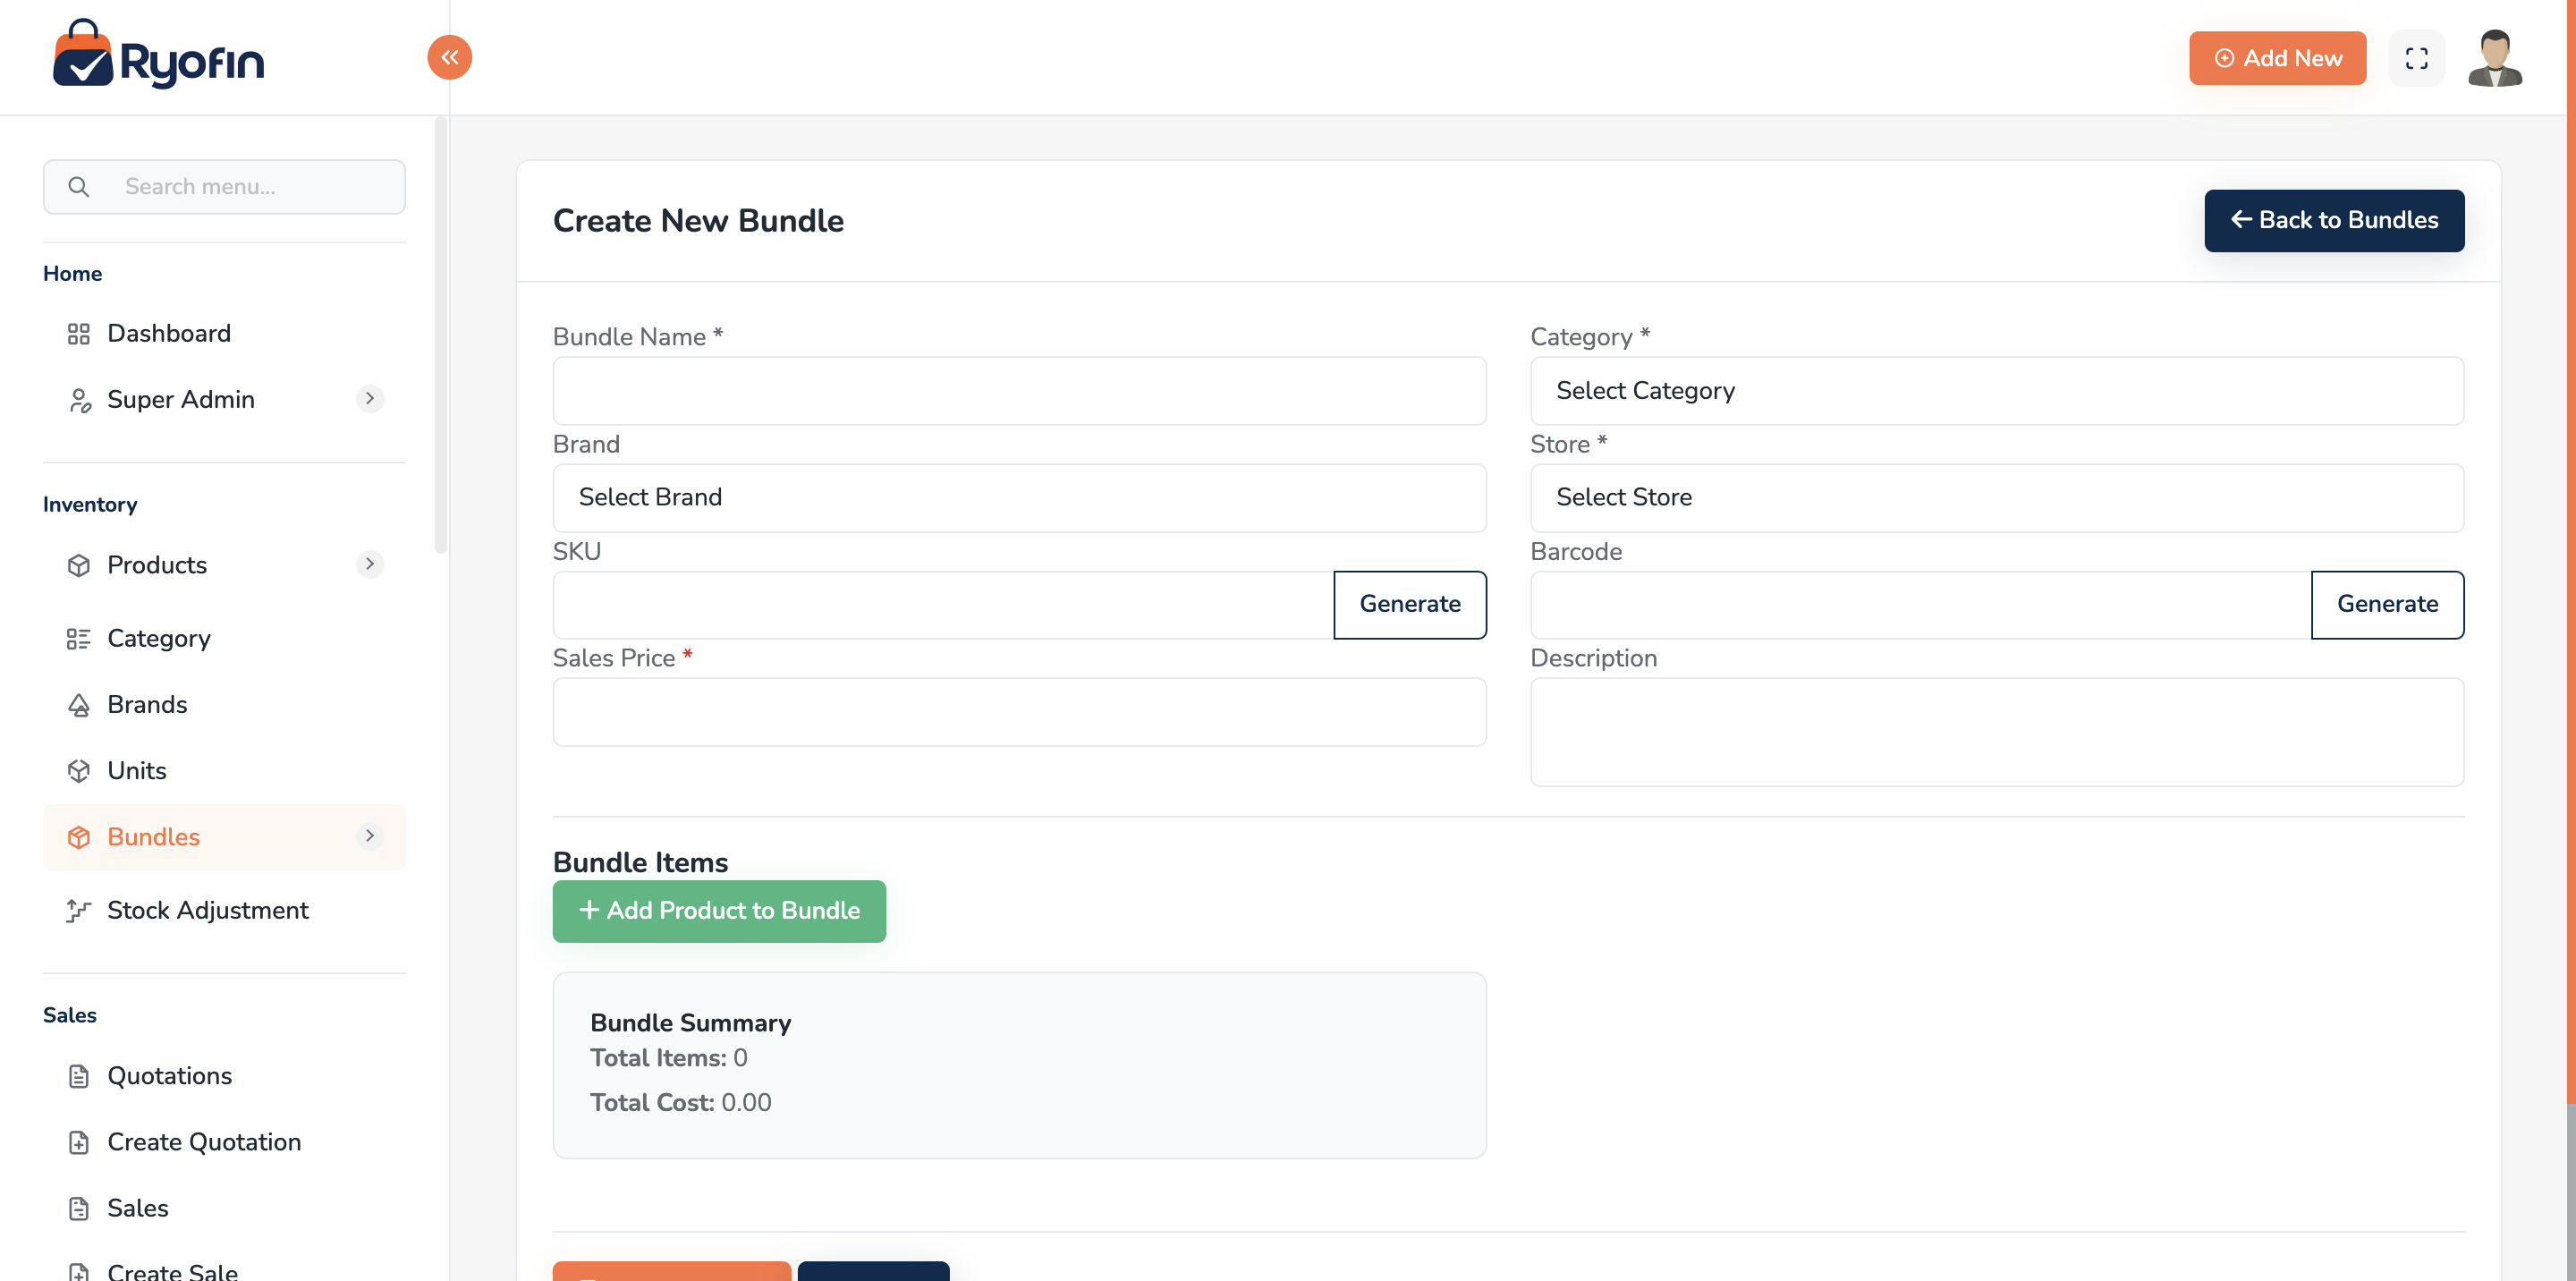
12.4 Bundle Operations
Bundle creation operation (assemble in stock) You can pre-assemble bundles into a store, which "reserves" components and shows the bundle as "created":
- Open bundle → Bundle Operations → Create Bundle.
- Choose store and quantity.
- Save. Component stock is consumed; a virtual bundle quantity is recorded for tracking.
Unbundle (full or partial)
- Open bundle → Bundle Operations → Unbundle.
- Choose store and quantity to unbundle (can be less than the assembled amount).
- Save. Components are returned to stock based on bundle ratios.
12.5 Bundle Sales & Purchases
- Selling a bundle in a Sale automatically consumes component stock and posts COGS based on the component's average cost.
- Purchasing a bundle is unusual but supported (treats components individually).
12.6 Bundle Transaction History
Each bundle has a history view: created, sold, purchased, unbundled. Useful for understanding cost movements.
12.7 Permissions
view bundle,create bundle,edit bundle,delete bundlebundle operations(create / unbundle)
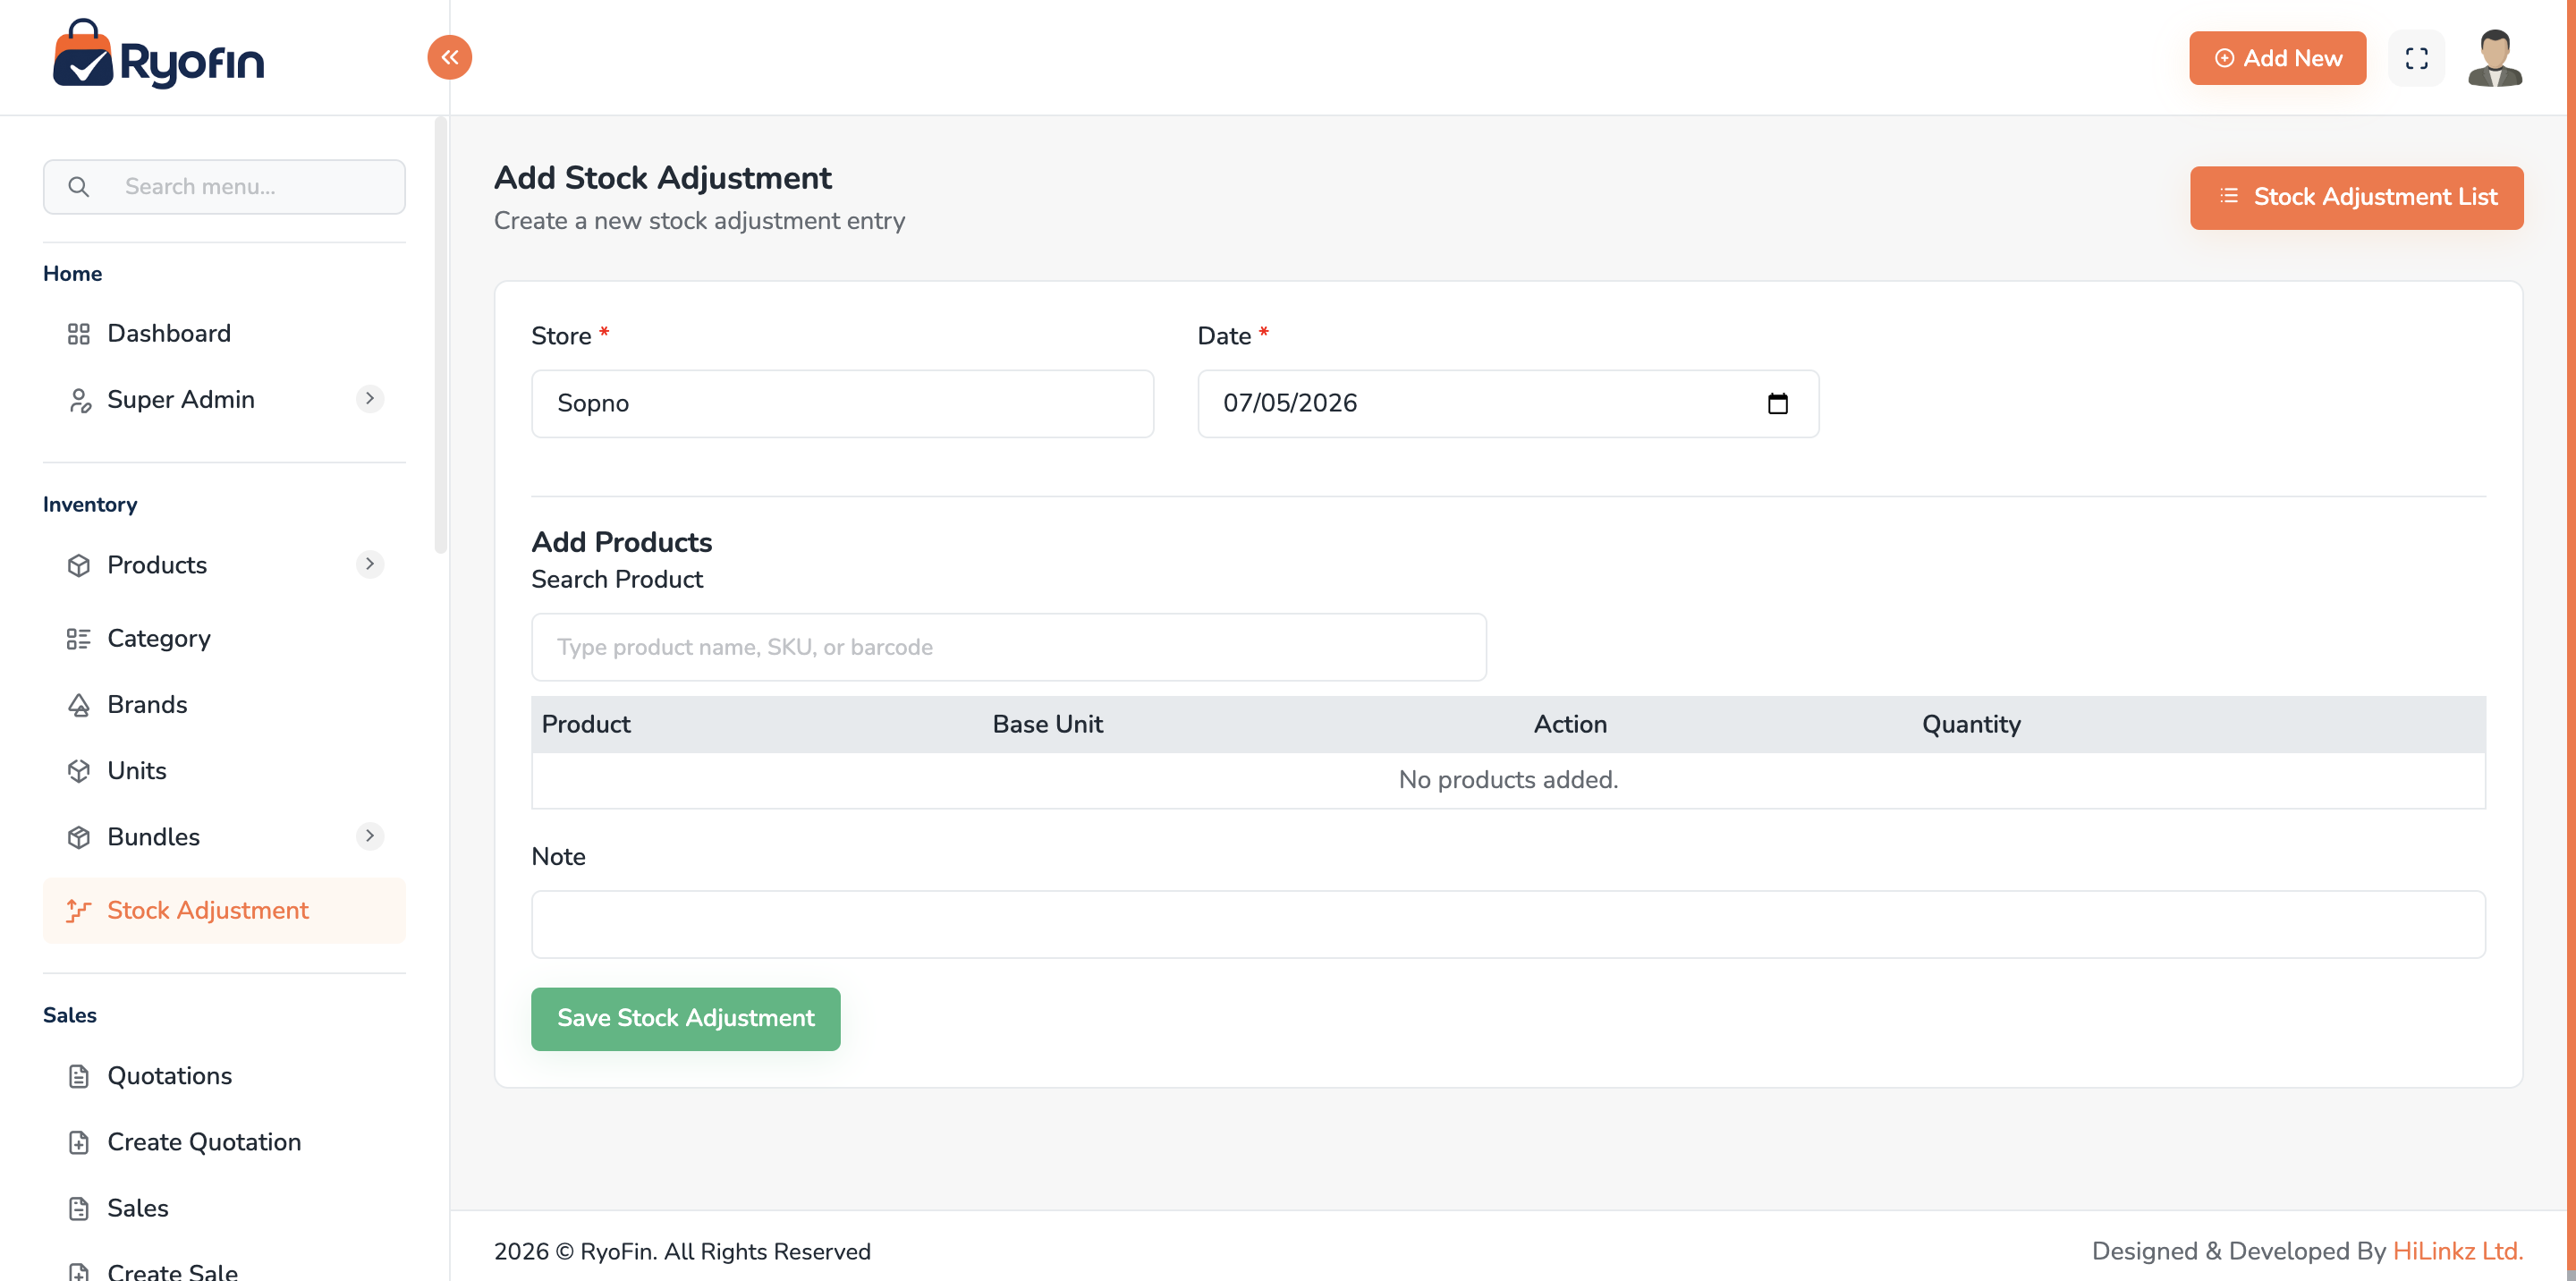
13. Stock Adjustments
Where: Sidebar → Stock → Stock Adjustments.
13.1 What is a Stock Adjustment?
A manual change to stock that is not a sale or a purchase. Use it for:
- Damaged or expired goods (decrease)
- Stock found during count (increase)
- Opening balance entry on initial setup
13.2 Create a Stock Adjustment
- Click Create Adjustment.
- Choose Store and Date.
- For each line:
- Product
- Type: Increase or Decrease
- Quantity (in base unit)
- Reason (Damage, Lost, Found, Initial, Other)
- Note
- Save.
Journal entries (auto):
- Increase → Debit Inventory, Credit Inventory Adjustment (gain).
- Decrease → Debit Inventory Adjustment (loss / expense), Credit Inventory.
13.3 View / Delete
- View shows the lines and impact.
- Delete reverses both the stock movement and the journal entries.
13.4 Permissions
view stock adjustment,create stock adjustment,delete stock adjustment
14. Batch / Lot Tracking
14.1 What is a Batch?
A batch (also called a lot) is a group of the same product received together, tracked individually. Each batch has:
- Lot / Batch Number — a label you assign when receiving stock (e.g., "LOT-2025-001").
- Manufacture Date — optional, when the product was made.
- Expiry Date — when the batch expires (optional or required depending on the product setting).
- Quantity — how many units of that lot remain on hand.
- Location — which store or warehouse holds this batch.
- Per-Unit Cost — the cost paid when this batch was received, used for COGS when sold.
Batch tracking is an opt-in setting per product (§7.7). Products without batch tracking work exactly as before — a single stock number per store.
14.2 Enabling Batch Tracking on a Product
In the product create/edit form, turn on Track Batches (Physical products only). See §7.7 for all related settings (Require Expiry Date, Default Shelf Life Days, Block Sale if Expired).
14.3 Receiving Batches via Purchases
When creating a purchase that includes a batch-tracked product, the line item shows Lot / Batch #, Manufacture Date, and Expiry Date fields (see §9.3). On save:
- A new batch record is created at the chosen store or warehouse.
- If the same lot number already exists at that location, the quantity is added to the existing batch.
- A movement record is saved for full traceability.
14.4 Opening Stock for Batch-Tracked Products
To enter existing batch stock when setting up for the first time, create a Stock Adjustment (§13) with reason Initial Stock. Batch-tracked products in a stock adjustment also show Lot #, Manufacture Date, and Expiry Date fields.
14.5 Automatic Allocation When Selling (FEFO)
When you sell a batch-tracked product, you do not manually pick which batch to use. The system allocates automatically using FEFO (First Expiry, First Out) — the batch with the nearest expiry date is consumed first.
- No extra steps for the cashier.
- Oldest-expiring stock is always sold first, minimising waste.
- If Block Sale if Expired is enabled on the product, the sale will be blocked when only expired batches remain.
14.6 Viewing Batch Stock and Traceability
Use the Batch / Lot Reports (§17.10) to see current stock by lot and location, batches nearing or past expiry, and full traceability history for any lot number.
14.7 Permissions
| Permission | Who needs it |
|---|---|
purchase-create |
Receive batch stock via purchases |
stock-adjustment-create |
Enter opening batch stock |
report-batch-view |
View batch stock, expiry, and traceability reports |
15. Warehouses & Stock Transfers
Where: Sidebar → Peoples → Warehouses / Stock Transfers.
NOTE: This feature is optional and must be enabled per company by a Super Admin before the menu items appear.
15.1 What is a Warehouse?
A Warehouse is a central storage or holding location — similar to a Store but used as a depot rather than a retail or selling point (e.g., a central supply room, a receiving bay, a wholesale depot).
Both Warehouses and Stores can hold batch-tracked stock and each has its own inventory GL account. The main difference is operational: Stores are selling/purchasing points; Warehouses are distribution and holding points.
15.2 Enabling the Warehouse Feature
A Super Admin enables warehouses in the Company settings (enable_warehouses flag). Once enabled, Warehouses and Stock Transfers appear in the sidebar under the Peoples section for users who have the relevant permissions.
15.3 Creating and Managing Warehouses
Navigate to: Peoples → Warehouses → Add Warehouse
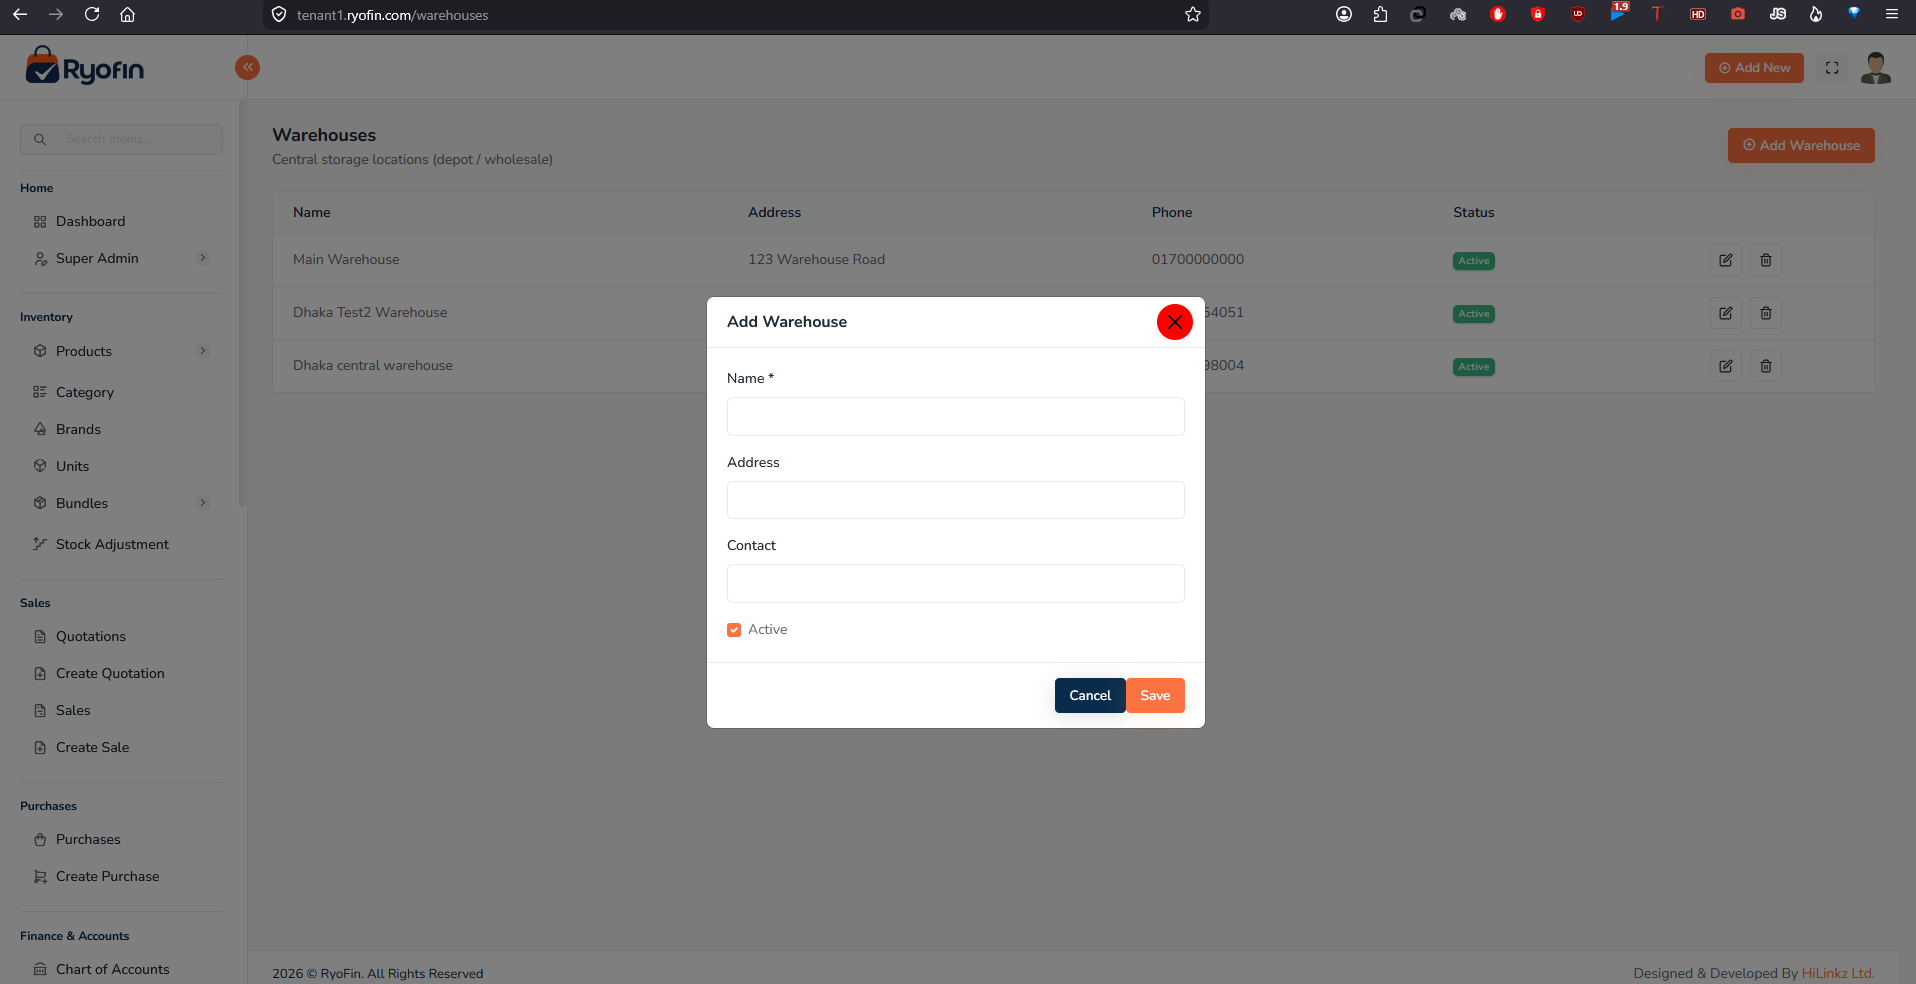
| Field | Required | Notes |
|---|---|---|
| Name | Yes | e.g., "Central Depot", "Receiving Bay" |
| Address | No | Physical location for reference |
| Contact | No | Phone number for reference |
| Active | Yes (default on) | Inactive warehouses do not appear in transfer dropdowns |
Edit: Pencil icon on the warehouse list row.
Delete: A warehouse with stock on hand cannot be deleted — it is set to Inactive instead. Once stock reaches zero it can be deleted.
15.4 Assigning Users to Warehouses
Open the warehouse record → Users tab → Add User. A user not assigned to any warehouse has access to all warehouses by default (backwards-compatible behaviour).
15.5 Stock Transfers Between Locations
A Stock Transfer moves batch-tracked stock from one location (Store or Warehouse) to another.
⚠️ Only products with batch tracking enabled can be transferred.
Steps:
- Go to Peoples → Stock Transfers → New Transfer.
- From Location — choose type (Warehouse / Store) and select the specific location.
- To Location — choose a different type and location. Source and destination cannot be the same.
- Transfer Date — defaults to today.
- Note — optional reference.
- Add line items:
- Search by product name or SKU (only batch-tracked products appear).
- Select the specific Batch / Lot from the dropdown (shows current qty and expiry date).
- Enter the quantity to transfer.
- Click Complete Transfer.
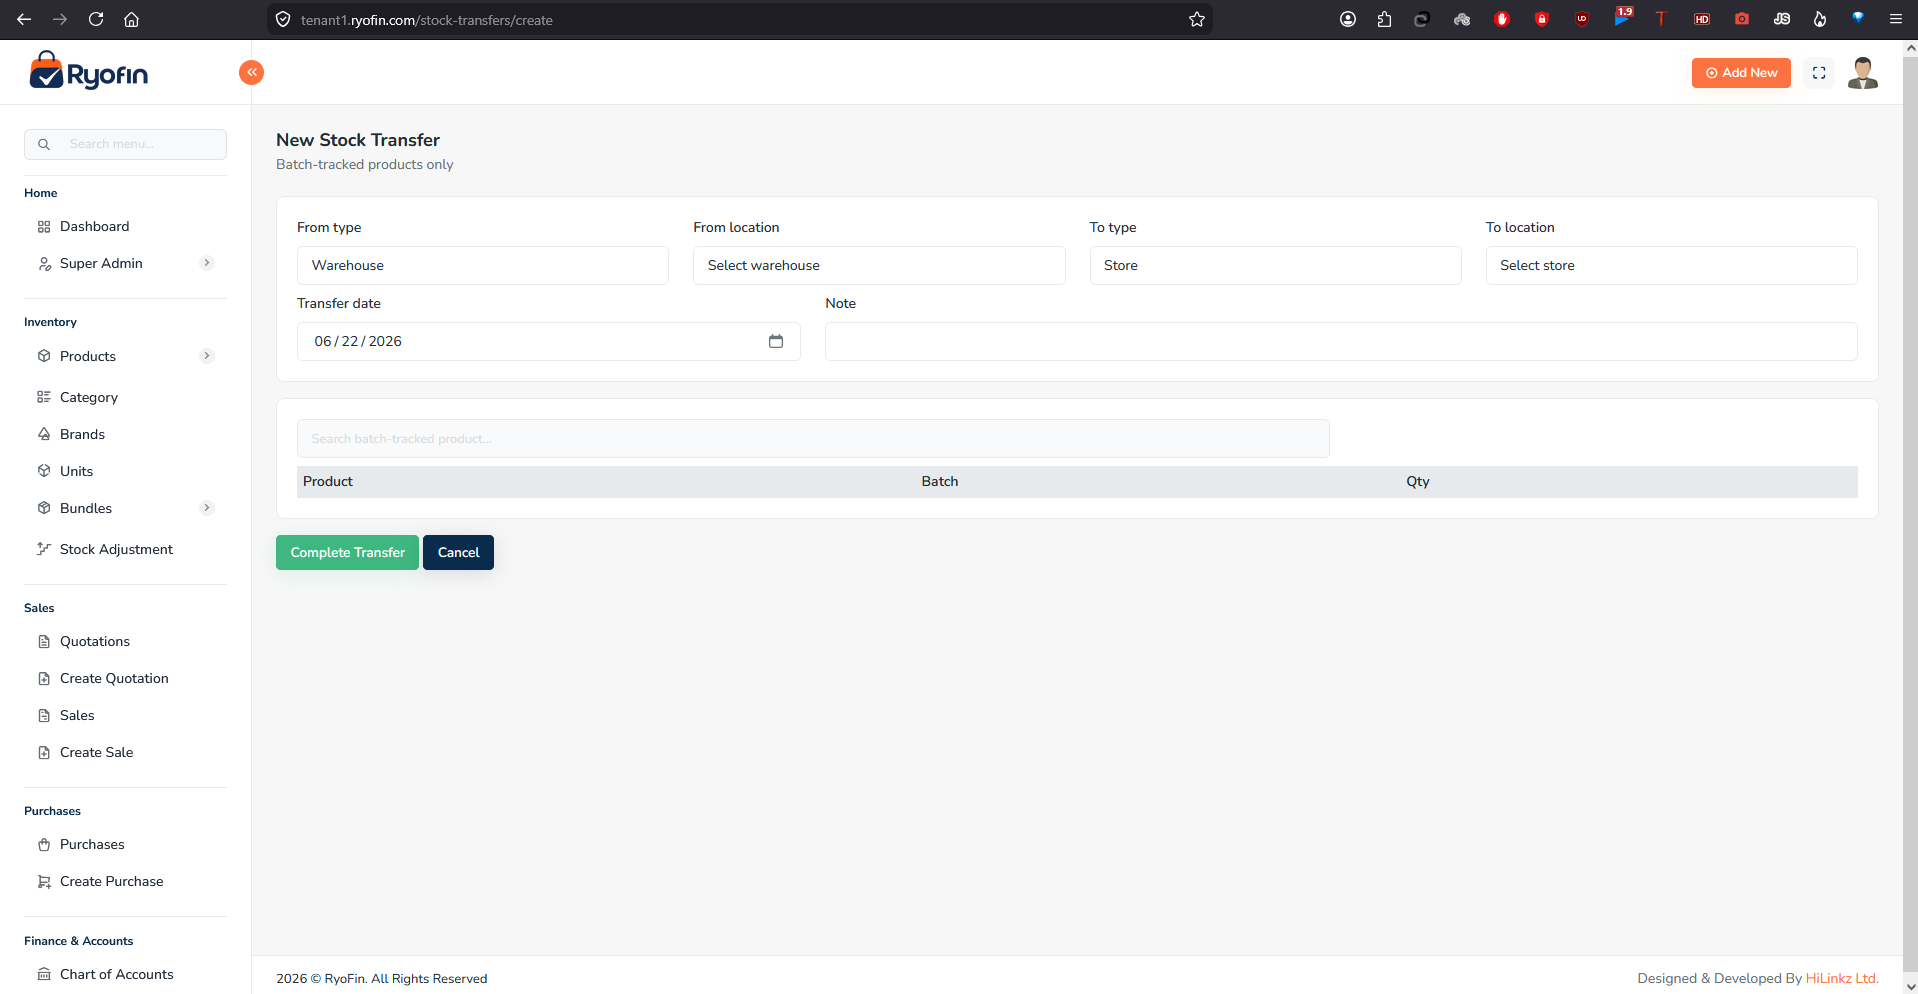
What happens:
- Stock is deducted from the source batch at the source location.
- The same lot is created or added to at the destination, preserving manufacture date, expiry date, and per-unit cost.
- A GL journal entry moves the inventory value: Debit destination Inventory, Credit source Inventory.
- All movements are recorded for batch traceability.
Transfer number: Auto-assigned in format ST-YYYY-000001.
15.6 Permissions
| Permission | Who needs it |
|---|---|
warehouse-view |
View warehouse list |
warehouse-create |
Create warehouses |
warehouse-edit |
Edit warehouses |
stock-transfer-view |
View stock transfers |
stock-transfer-create |
Create stock transfers |
16. Double-Entry Accounting
This is the heart of the accounting side of RyoFin. It is delivered as a built-in package and integrates with all transaction modules above.
TIP: If you are not the accountant, you usually only need this section to:
- Record a payment that does not belong to a sale or purchase (e.g. rent).
- Transfer money from one cash/bank account to another.
- View the company ledger and balance sheet.
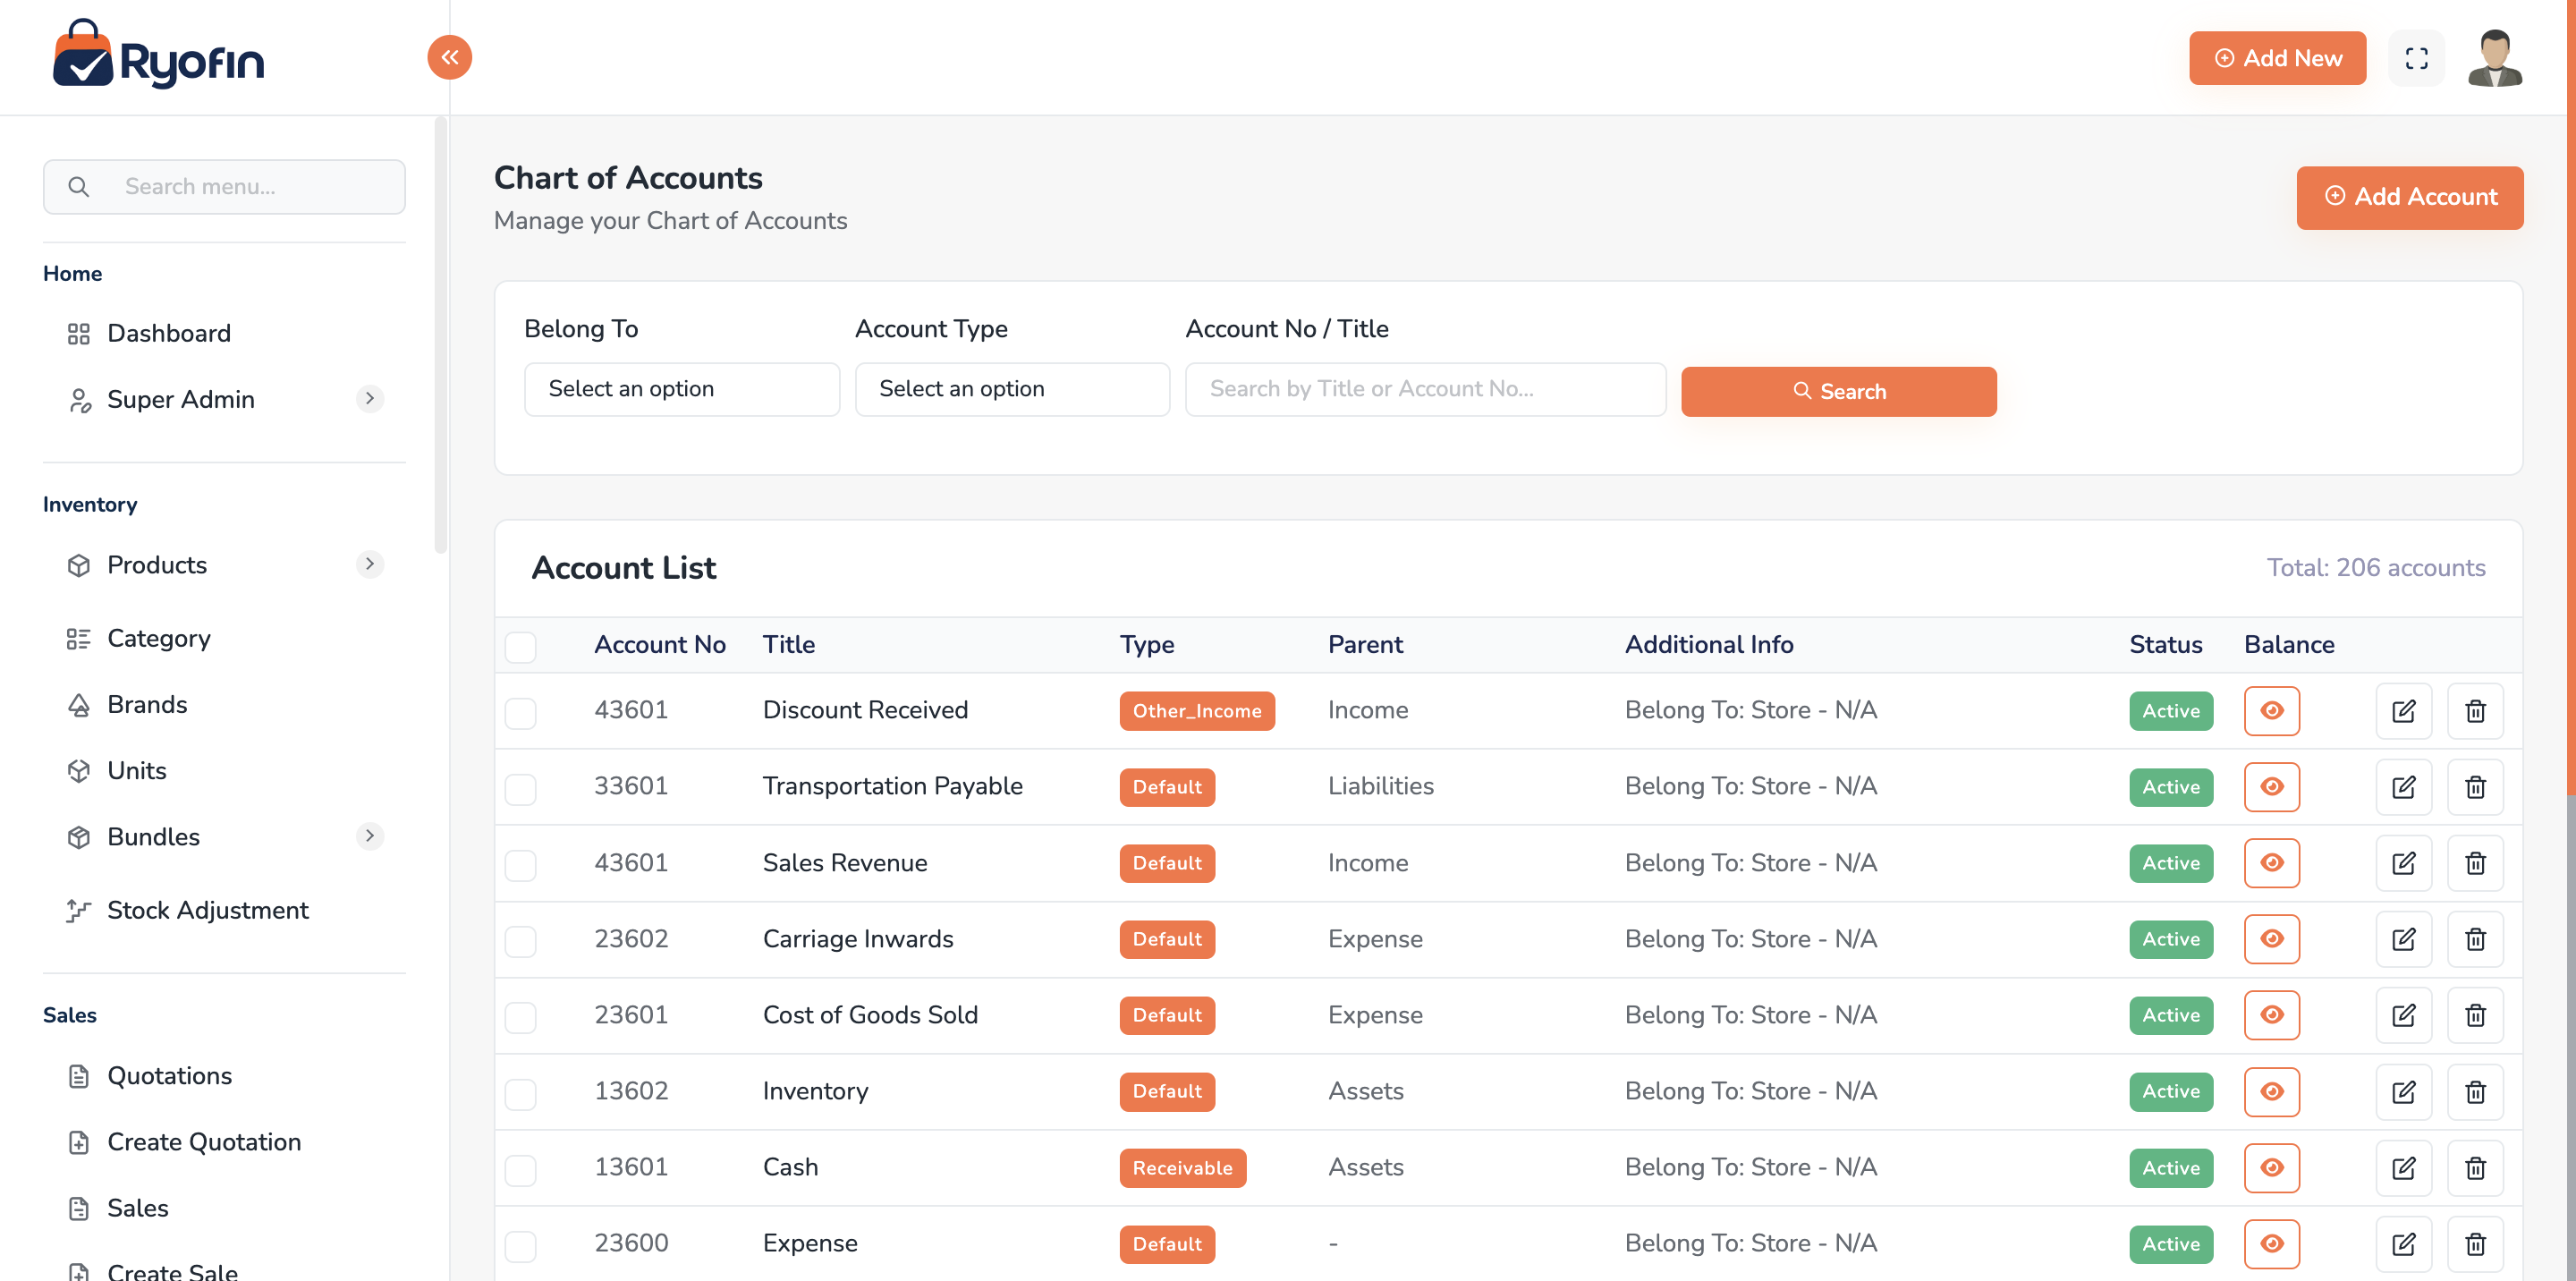
16.1 Chart of Accounts
Where: Sidebar → Accounts → Chart of Accounts.
The chart of accounts is a tree of accounts grouped by 5 root types:
- Assets (what the business owns: Cash, Bank, Inventory, Customers Receivable)
- Liabilities (what the business owes: Suppliers Payable, Loans, Taxes Payable)
- Equity (Owner's Capital, Retained Earnings)
- Income (Sales Revenue, Other Income)
- Expenses (COGS, Rent, Salaries, Utilities)
Default per-store sub-accounts are created automatically when you add a store:
Shop A (parent)
├── Assets
│   ├── Cash
│   ├── Bank
│   ├── Inventory
│   └── Customers Receivable
├── Liabilities
│   ├── Suppliers Payable
│   ├── Taxes Payable
│   └── Loans Payable
├── Equity
│   ├── Owner's Capital
│   └── Retained Earnings
├── Income
│   └── Sales Revenue
└── Expenses
    ├── COGS
    ├── Rent
    ├── Salaries
    └── Others
Create / Edit an account
- Open the parent account in the tree.
- Click Add Sub-Account.
- Enter:
- Account name
- Account type (Bank, Receivable, Payable, etc.)
- (Optional) Accountable entity — link to a Customer, Supplier, Store, etc., for ledger filtering.
- Status (Active / Deactive)
- Save.
Delete vs Deactivate
- Delete — only allowed if the account has zero transactions. Otherwise the system blocks delete.
- Deactivate — recommended; hides the account from new transactions but keeps history.
Reset balance (admin only)
A protected action that zeroes out an account's running balance. Used in rare correction scenarios. Requires admin permission and confirmation.
16.2 Fund Transfers
Where: Sidebar → Accounts → Fund Transfers.
Move money from one account to another (e.g. Cash → Bank).
Create
- Create Fund Transfer.
- Date, From Account, To Account, Amount, Note.
- (Optional) Attachment.
- Save.
Journal: Debit destination, Credit source.
Filters & PDF
Filter by date, accountable type, ID. Download PDF for a date range.
16.3 Payments
Where: Sidebar → Accounts → Payments.
Records a payment between accounts or entities outside of a specific sale/purchase. Used for general ledger payments. Sales and Purchase modules also create payments under the hood.
16.4 Income / Revenue
Where: Sidebar → Accounts → Income.
Record incoming money that is not a customer sale (e.g. interest received, scrap sale).
Create
- Click Add Income.
- Date, Income account (e.g. "Interest Income"), Receiving account (e.g. Bank), Amount, Note, Attachment.
- Save.
Journal: Debit Bank/Cash, Credit Income Account.
16.5 Expenses
Where: Sidebar → Accounts → Expenses.
Record outgoing money that is not a supplier purchase (e.g. rent, utilities).
Create
- Click Add Expense.
- Date, Expense account (e.g. "Rent"), Paid from account (Cash/Bank), Amount, Note, Attachment.
- Save.
Journal: Debit Expense Account, Credit Cash/Bank.
Filters & PDF
Filter by date, accountable type, ID. PDF export with date range.
16.6 Loans / Investments
Where: Sidebar → Accounts → Loans / Investments.
Record money you gave as a loan or invested in another entity. Track outstanding balance and repayments.
16.7 Loan / Investment Returns
Record repayments or returns received on the loans/investments above. Each return links back to the original entry.
16.8 Security Deposits
Record deposits given or received (e.g. shop rent deposit). Status changes when the deposit is refunded or adjusted.
16.9 Manual Journals
16.9.1 Single-Line Manual Journal
A simple 1-debit + 1-credit entry.
- Manual Journals → Create.
- Date, Debit account, Credit account, Amount, Note, Attachment.
- Save (system enforces debit = credit).
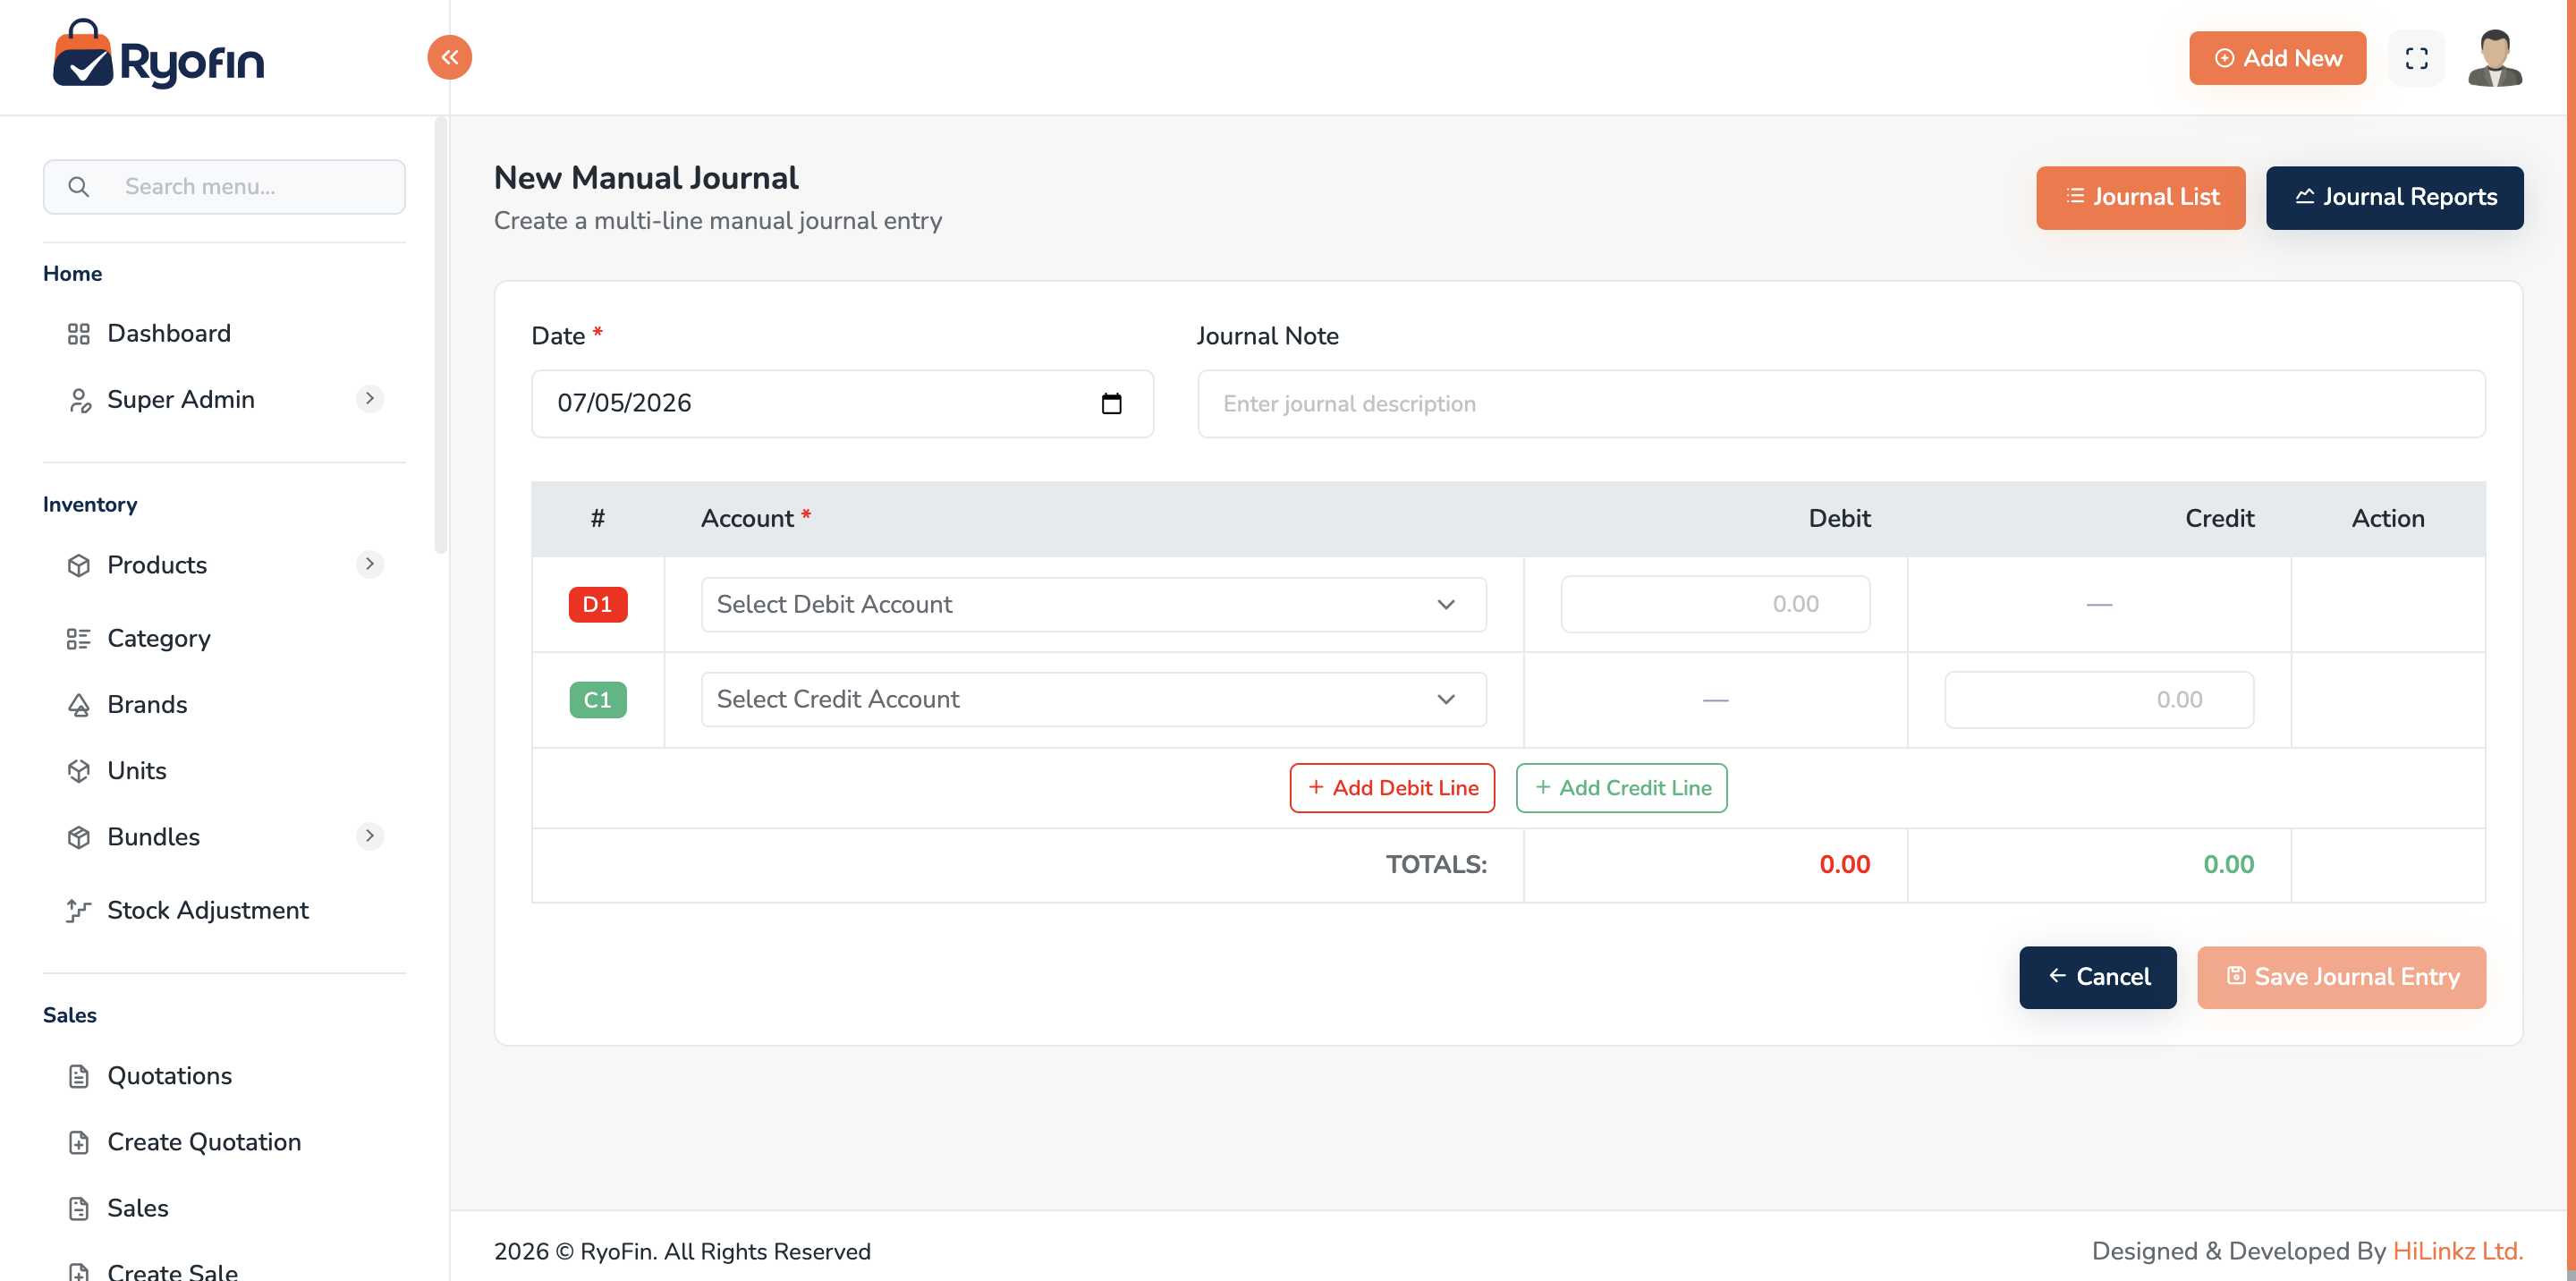
16.9.2 Batch / Multi-Line Manual Journal
Use when you need many debit lines and many credit lines in one voucher.
- Manual Journals → Create Batch.
- Add as many debit rows and credit rows as needed.
- The screen shows running totals; Total Debits must equal Total Credits.
- Save.
WARNING: A multi-line journal cannot save until debits and credits balance.
16.10 Journals (Transaction Journals)
Where: Sidebar → Accounts → Journals.
A read-only list of every journal entry the system has posted (from sales, purchases, payments, manual journals, etc.).
Filters: date range, transaction type. Detail view: shows all lines (debit/credit) with the involved accounts and source document. PDF: download the filtered set as a journal report.
16.11 Ledgers & Account Statements
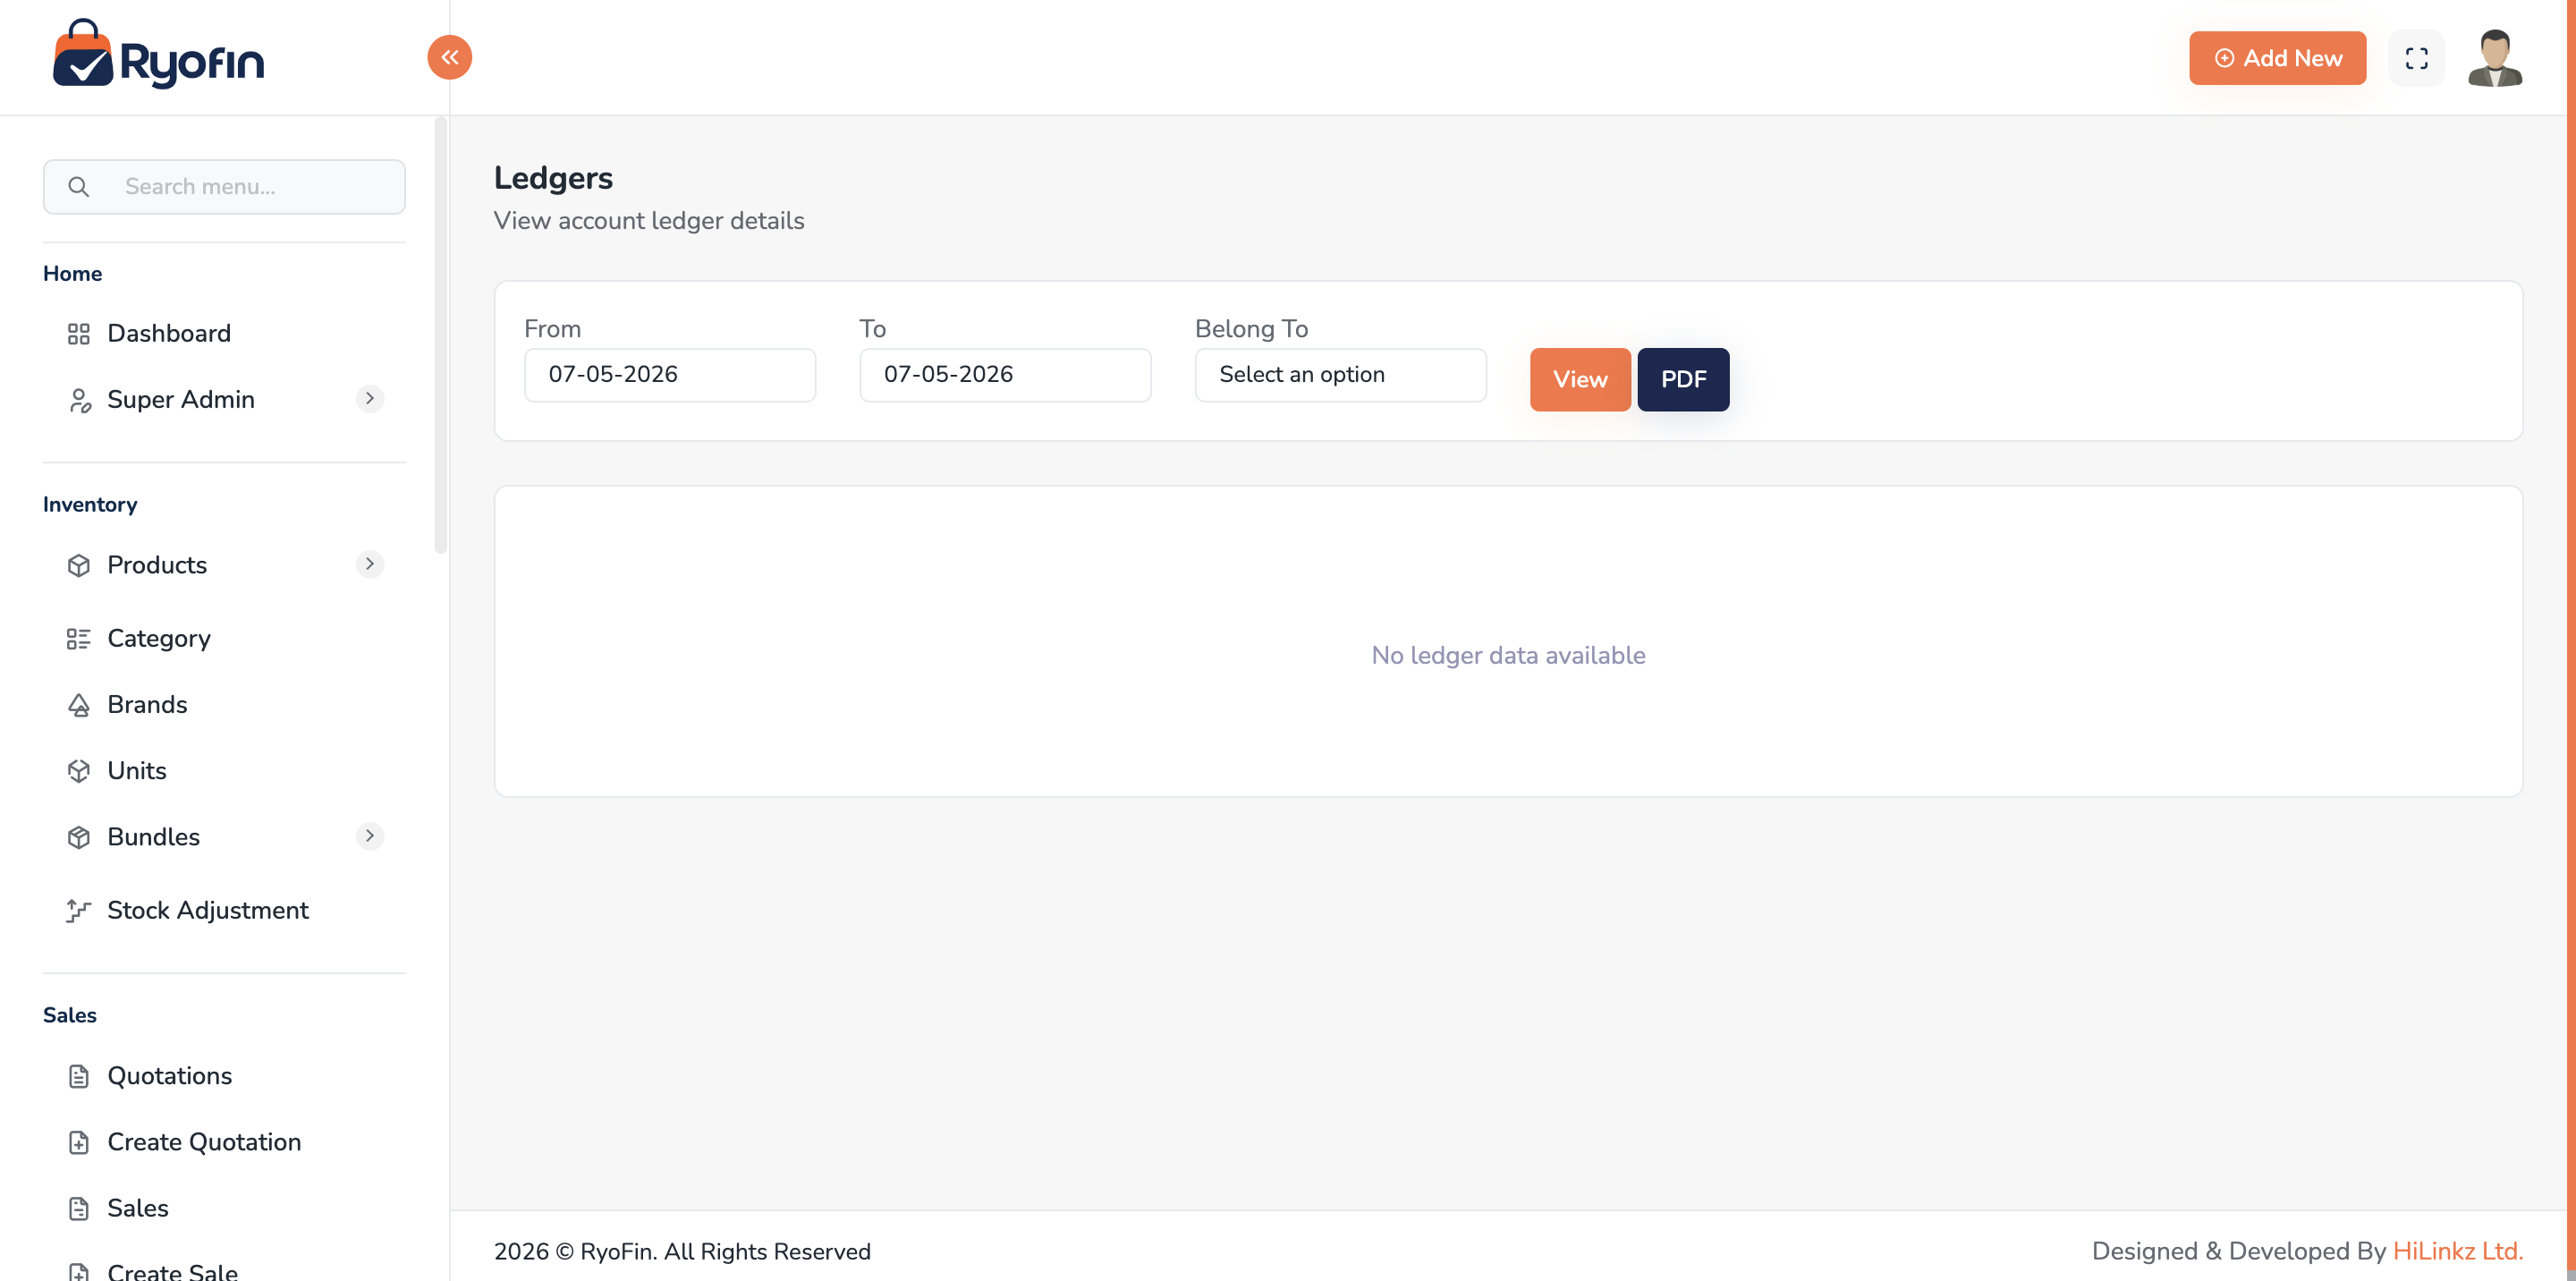
16.11.1 Single Account Ledger
- Ledgers → Single Account.
- Pick Account, optional Accountable entity (e.g. a specific customer), Date range.
- View opening balance, every transaction, running balance, closing balance.
- Download PDF.
16.11.2 All Accounts for an Entity
View every account that belongs to a specific entity (e.g. all accounts for Store "Sopno"):
- Ledgers → All Accounts.
- Pick Accountable type (Customer / Supplier / Store / Company / User) and ID.
- Date range.
- View list of accounts and their movements.
16.12 Tax Accounts
Tax rates configured in Section 6.4 — Taxes link to tax-payable accounts so VAT/GST collected on sales and paid on purchases lands in the right liability/asset accounts automatically.
16.13 File Attachments on Transactions
Most accounting transactions (Manual Journal, Expense, Income, Fund Transfer, Loan, Deposit) accept file attachments (PDF, image). Storage can be local or S3 depending on your installation.
- Upload — choose file when creating/editing.
- Download — open the transaction → click attachment.
- Delete — admin can remove attachments.
16.14 Accounting Permissions
view accounts,create account,edit account,deactivate account,delete account,reset account balanceview journal,create manual journal,delete manual journalview ledgerview fund transfer,create fund transfer,delete fund transferview income,create income,delete incomeview expense,create expense,delete expenseview loan,create loan,delete loanview loan return,create loan returnview deposit,create deposit,delete depositview payment,create payment,delete payment
17. Reports
Where: Sidebar → Reports.
All reports support:
- Date range filter (from / to)
- Store filter (where applicable)
- PDF export (print-optimized, paginated, with timestamps and company branding)
- Print preview
NOTE: A user only sees data from the stores they have access to. Reports are auto-scoped to that.
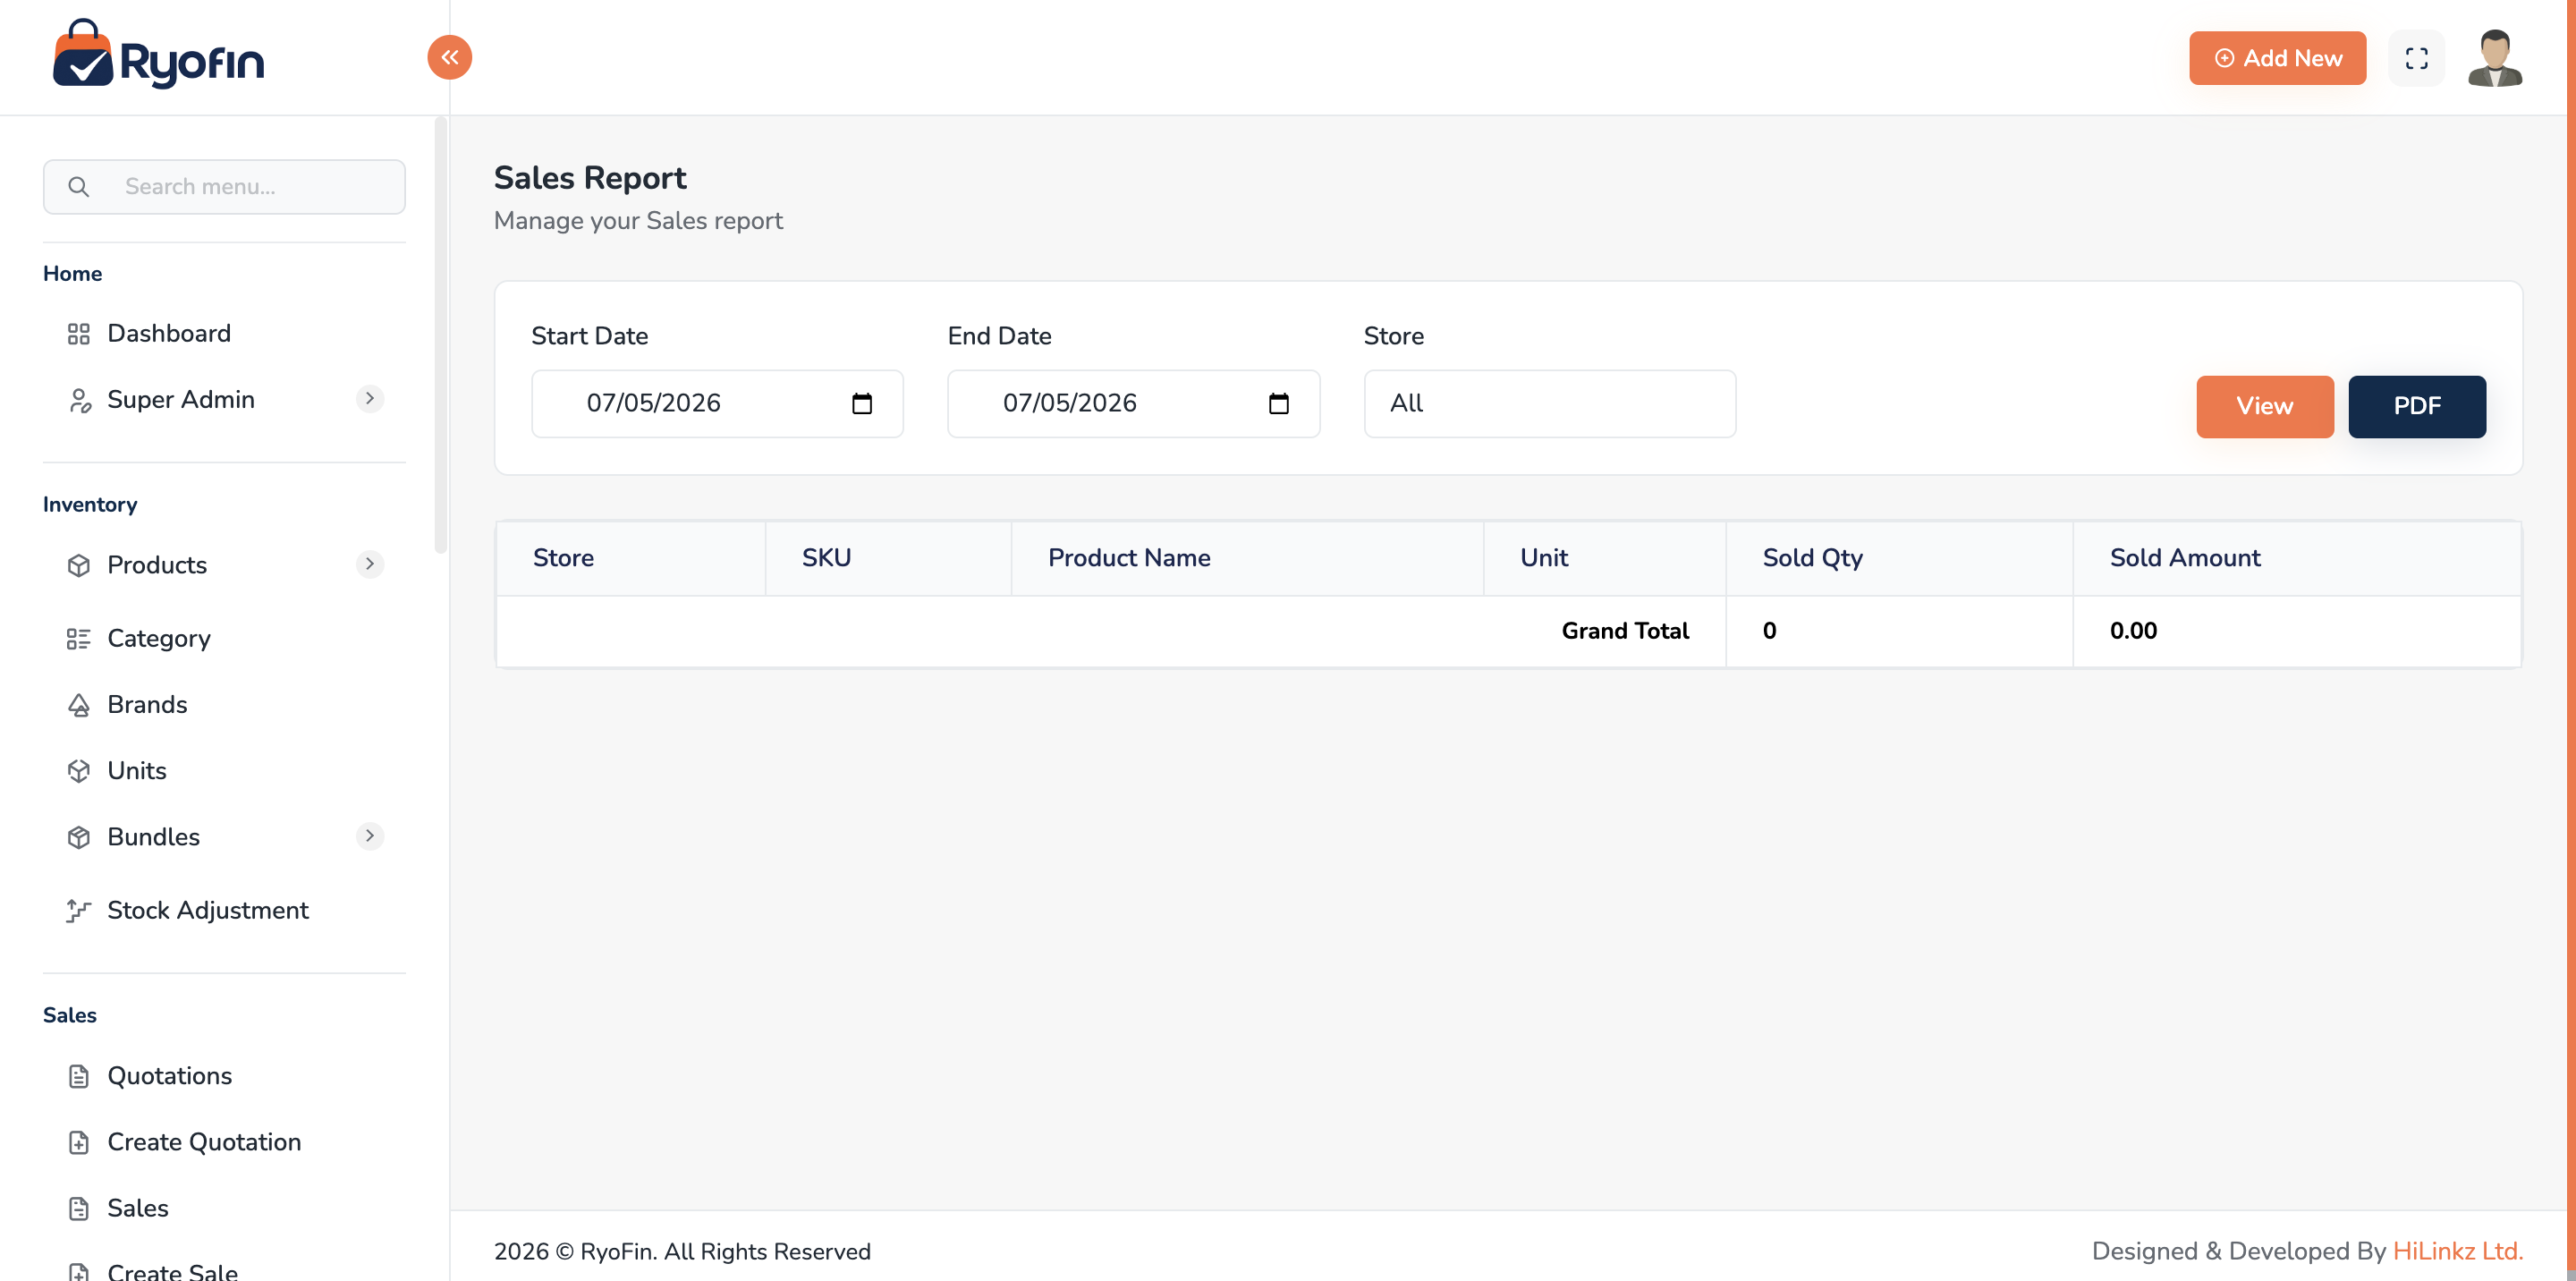
17.1 Sales Report
Lists sales in a date range with totals and payment status. Use it for: daily/weekly/monthly sales review.
17.2 Purchase Report
Mirror of Sales Report, for supplier purchases.
17.3 Stock Report (Inventory)
Snapshot of current stock per product per store, with average COGS and stock value.
17.4 Income Statement (Profit & Loss)
Revenue – COGS = Gross Profit. Less Expenses = Net Profit. For a chosen date range.
17.5 Balance Sheet
Assets, Liabilities, Equity at a chosen date.
- Summary — totals per group.
- Detail — breakdown by account.
17.6 Trial Balance
List of every account with debit and credit totals; debits should equal credits.
17.7 Account Statement (Account Transactions)
Per-account ledger with opening, transactions, closing balance. Same as 14.11.1 but reachable from Reports.
17.8 Customer Due Report
Outstanding receivables — who owes you what, sorted by oldest balance.
17.9 Supplier Due Report
Outstanding payables — who you owe and how much.
17.10 Batch / Lot Reports
Four reports for products that have batch tracking enabled. Access from the Reports menu.
a. Batch Stock by Location Current on-hand stock broken down by individual lot and location.
- Filters: Location Type (All / Store / Warehouse), specific location.
- Columns: Product, Location, Lot #, Qty, Expiry Date, Stock Value.
- Use to answer: "How much of each lot do we have, and where?"
b. Near-Expiry Batches Batches whose expiry date falls within a chosen window (30, 60, or 90 days).
- Use to identify stock to prioritise selling or disposing of before it expires.
c. Expired Batches On Hand Batches already past their expiry date that still have stock on hand.
- Use for compliance, waste tracking, and write-off decisions.
d. Batch Traceability Full lifecycle history of a single batch from purchase through to sale.
- Select a Product, then select a Lot / Batch number (list is populated by the chosen product).
- Click Trace.
- Shows every movement (purchase, sale, transfer, adjustment) with date and source document reference.
- Use to answer: "Where did this lot come from, and who bought it?"
17.11 Audit Trail Report
Field-level change log showing old → new values for every data change in the system.
- Filters: Date range, Store, Action (Created / Updated / Deleted), Module (Sales, Products, Users, etc.), User.
- Columns: Date/Time, User, Action, Module, Record, IP Address, Changes (old → new value per field).
- Summary at top: Total actions, Created count, Updated count, Deleted count.
- PDF export available.
Difference from Activity Log (§20): Activity Log shows what action was taken. Audit Trail shows which specific fields changed and from what value to what value — old and new values side by side.
17.12 Common Tasks
Export a report to PDF
- Apply your filters (date range, store).
- Click Download PDF.
- Save or print.
Print a report
Most reports have a Print button that opens the browser print dialog with a clean print stylesheet.
17.13 Permissions
view sales report,view purchase report,view stock reportview income statement,view balance sheet,view trial balanceview customer due report,view supplier due reportview account statement
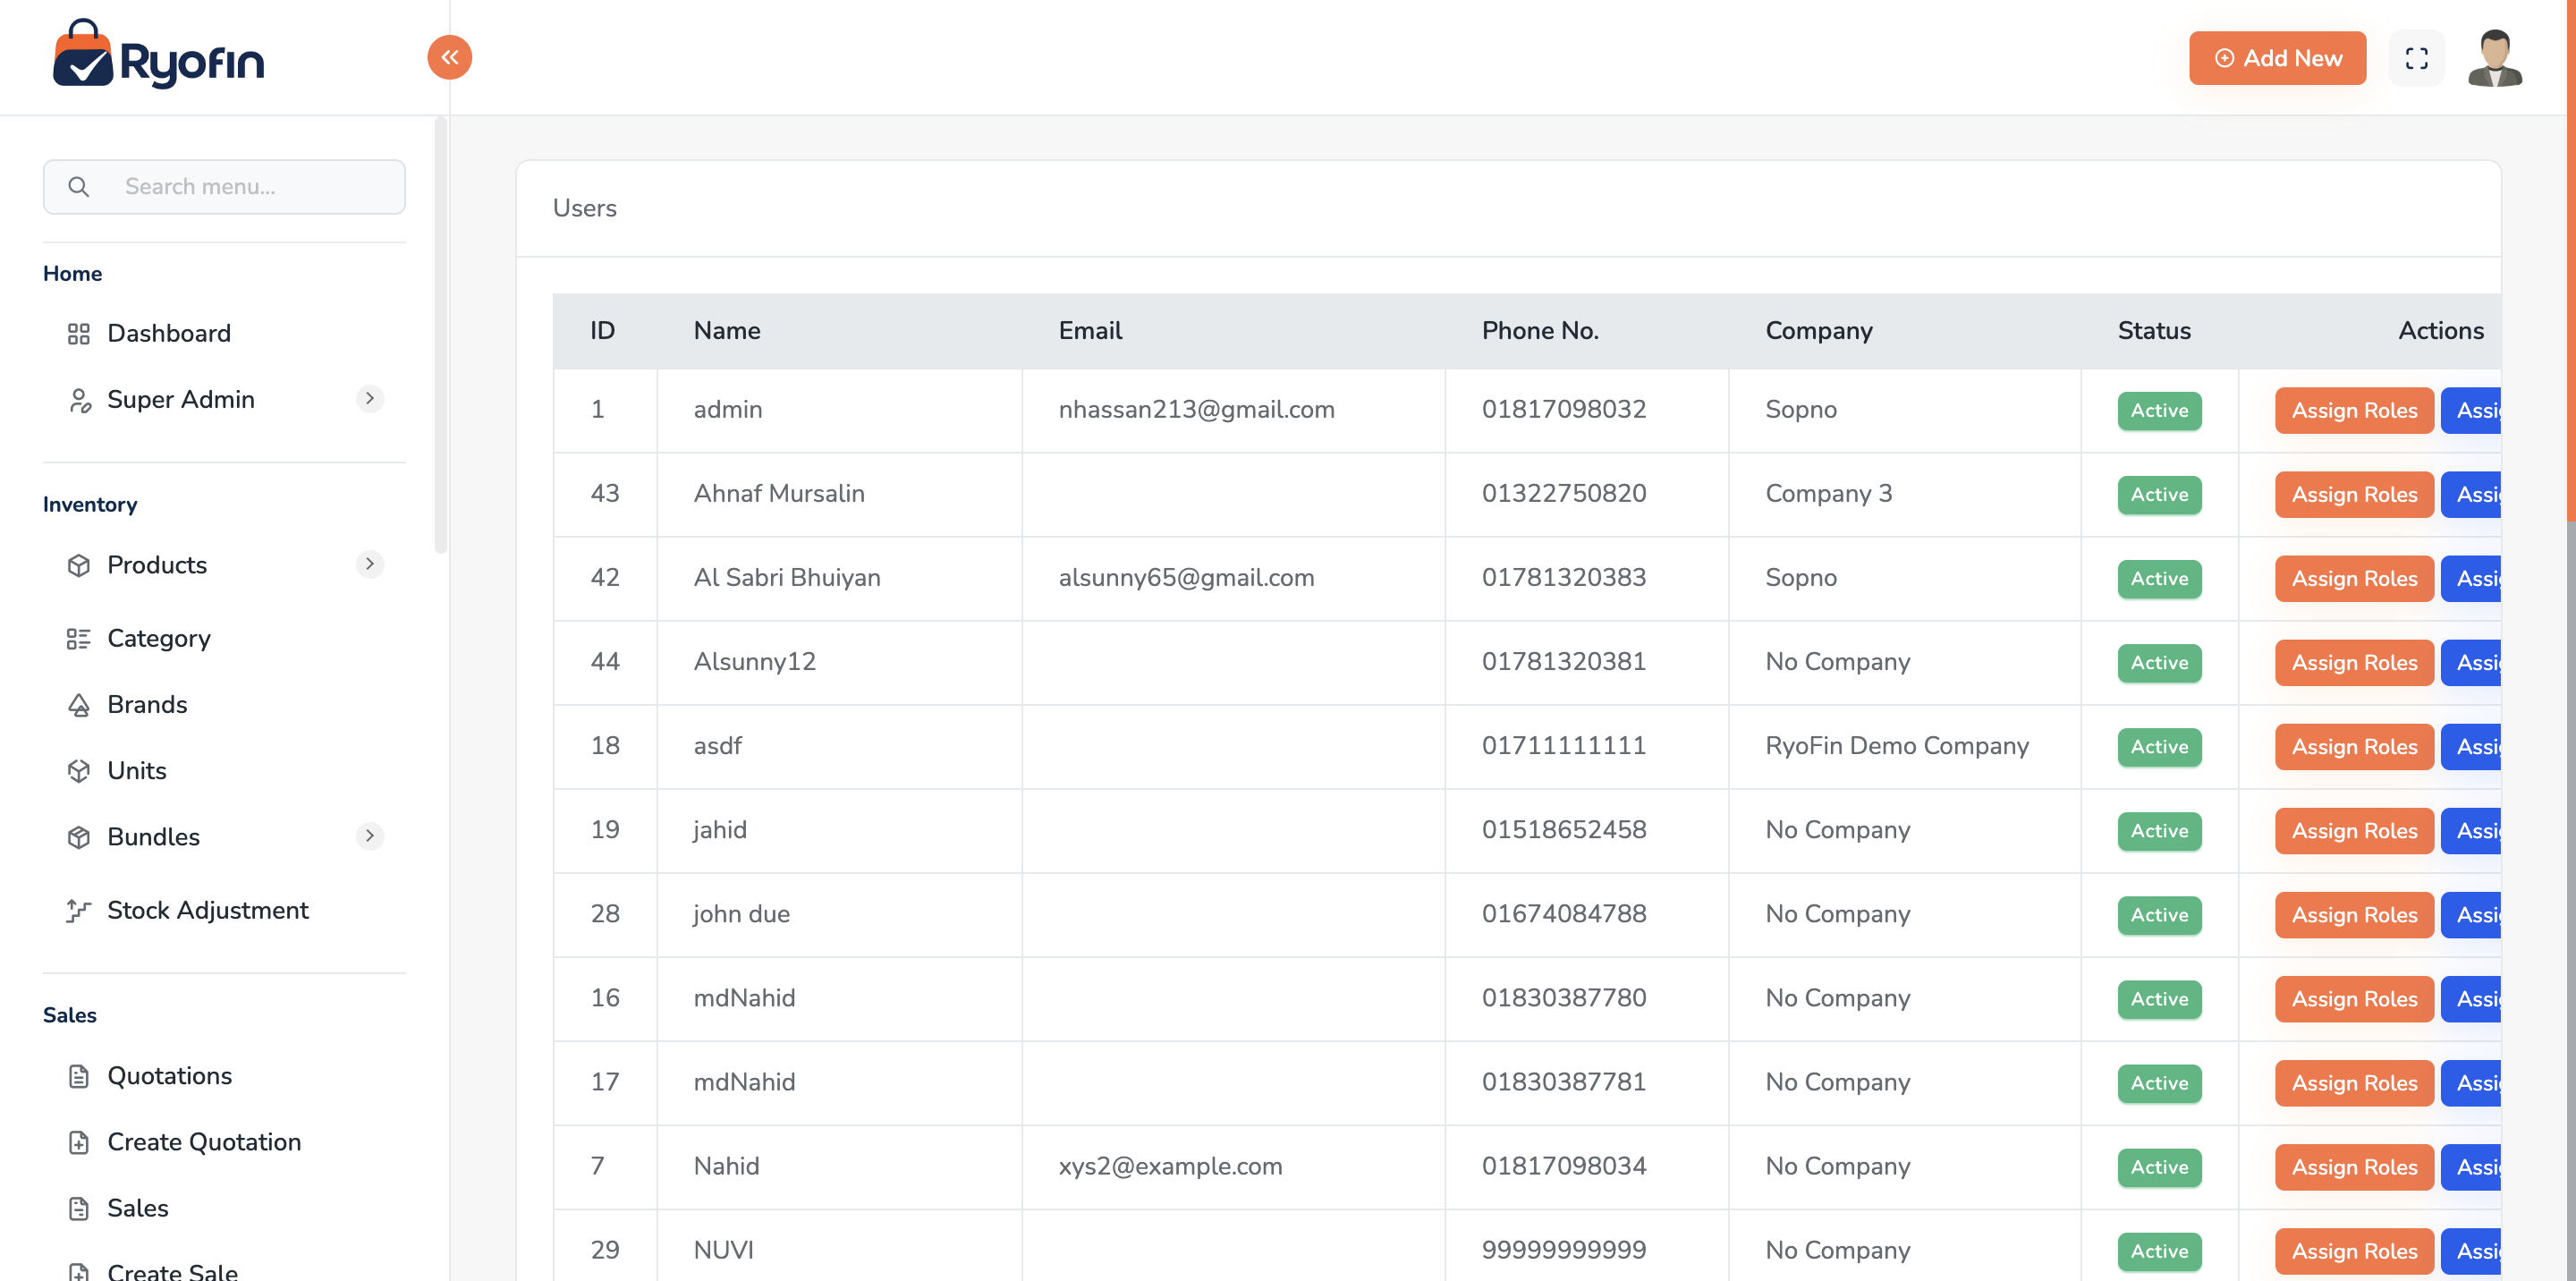
18. User Management
Where: Sidebar → Users.
18.1 User List
Columns: name, email, phone, company, roles, status. Filter by role and status.
18.2 Create / Invite a User
- Click Create User.
- Fill name, email, phone, password (or send invite email).
- Tick the roles to assign.
- (Optional) Assign stores.
- Save.
18.3 Edit a User
- Update name, email, phone, status (Active/Inactive).
- Re-assign roles or stores.
18.4 Roles
Where: Sidebar → Users → Roles.
Create a role
- Click Create Role.
- Name (e.g. "Cashier").
- Tick the permissions to grant.
- Save.
Edit a role
Update name and permissions; the change applies to every user with the role.
18.5 Permissions Catalog
Where: Sidebar → Users → Permissions. A read-only list (managed by developers/admin via a seeder). See: Appendix A — Permission Reference.
18.6 Reset a User's Password
- Admin → open user → Reset Password.
- User self-service → Forgot Password page (OTP via SMS).
18.7 Permissions
view user,create user,edit user,delete userview role,create role,edit role,delete roleview permission
19. Settings & Branding
Where: Sidebar → Settings.
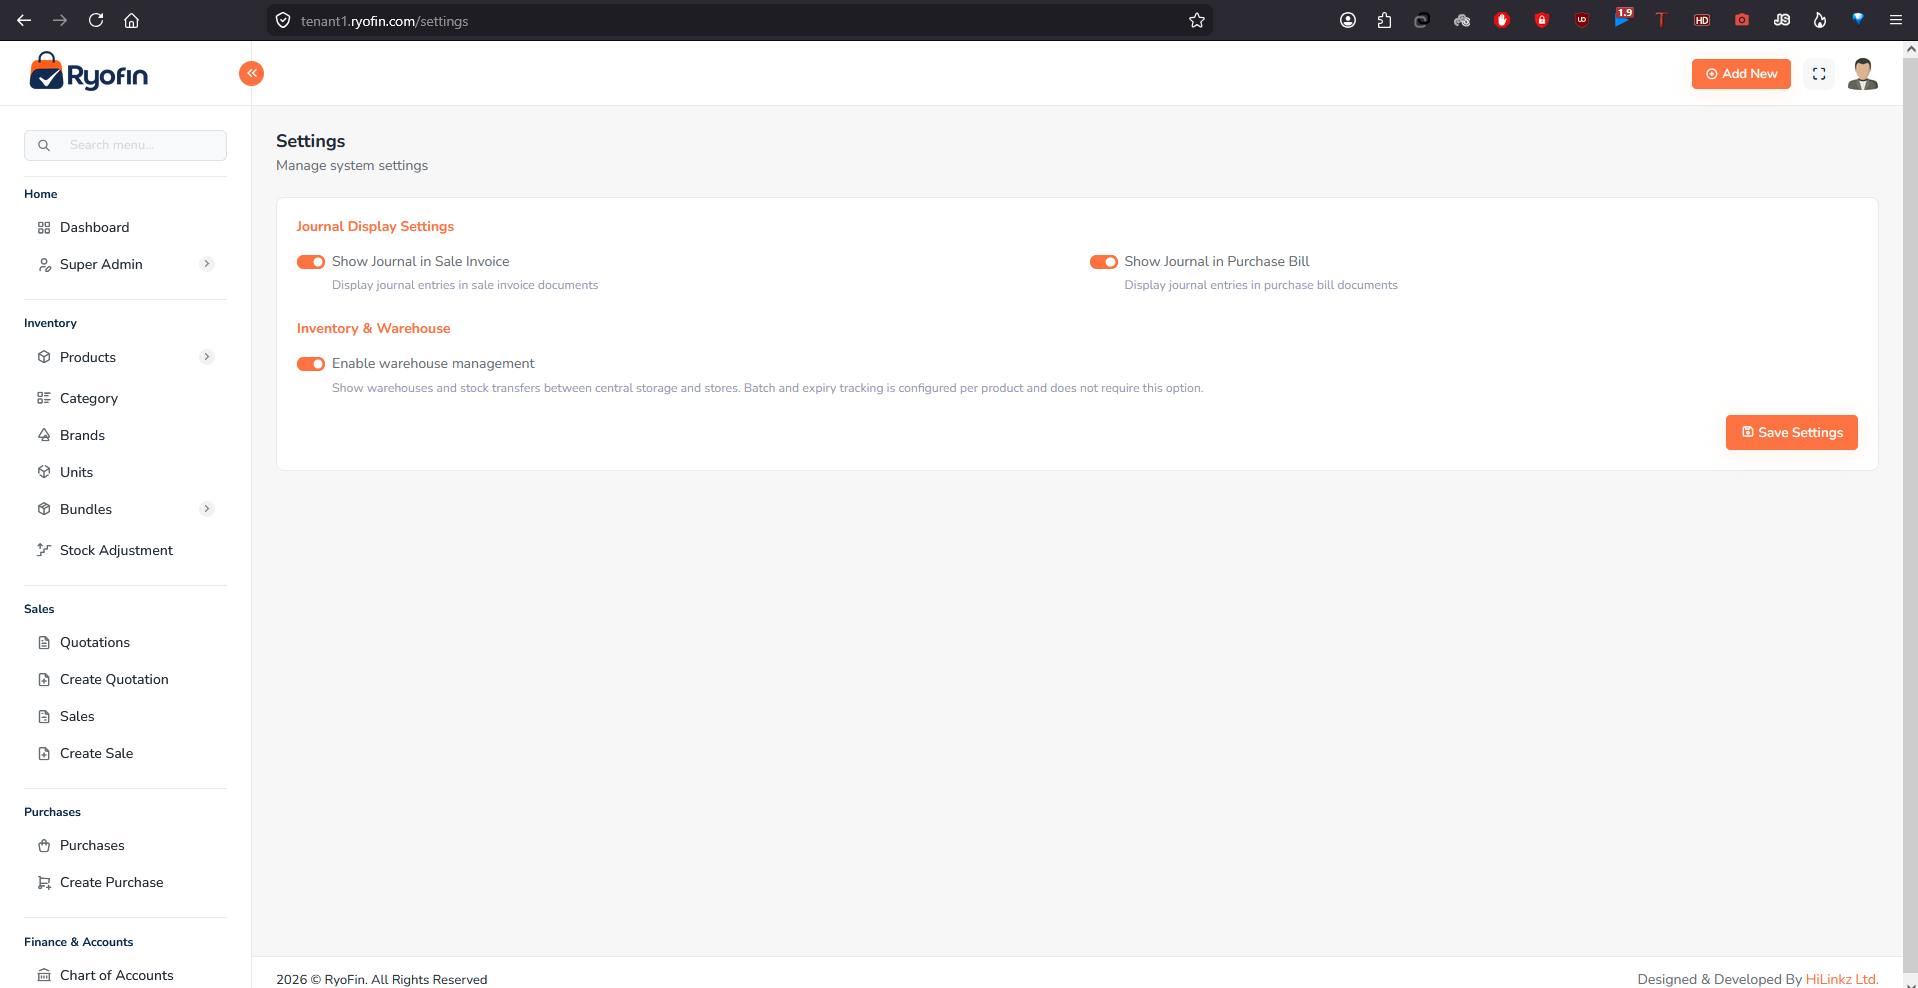
NOTE: The Settings page also contains:
- Journal Display Settings — toggle whether journal entries are printed on Sale Invoices and Purchase Bills.
- Inventory & Warehouse → Enable warehouse management — enables the Warehouses and Stock Transfers feature (see §15).
19.1 General Settings
- Application name
- Default currency & symbol
- Date format
- Time zone
19.2 Company Branding
- Logo (used on PDFs and login screen)
- Address & contact (printed on invoices)
- Theme color (PDF headers)
19.3 Invoice / PDF Templates
- Choose default invoice template style.
- Toggle showing/hiding fields like tax breakdown, notes, signature line.
19.4 Email & SMS Settings
Usually configured by IT during setup (SMTP for email, SMS gateway credentials). End users do not change these.
19.5 Permissions
view settings,update settings
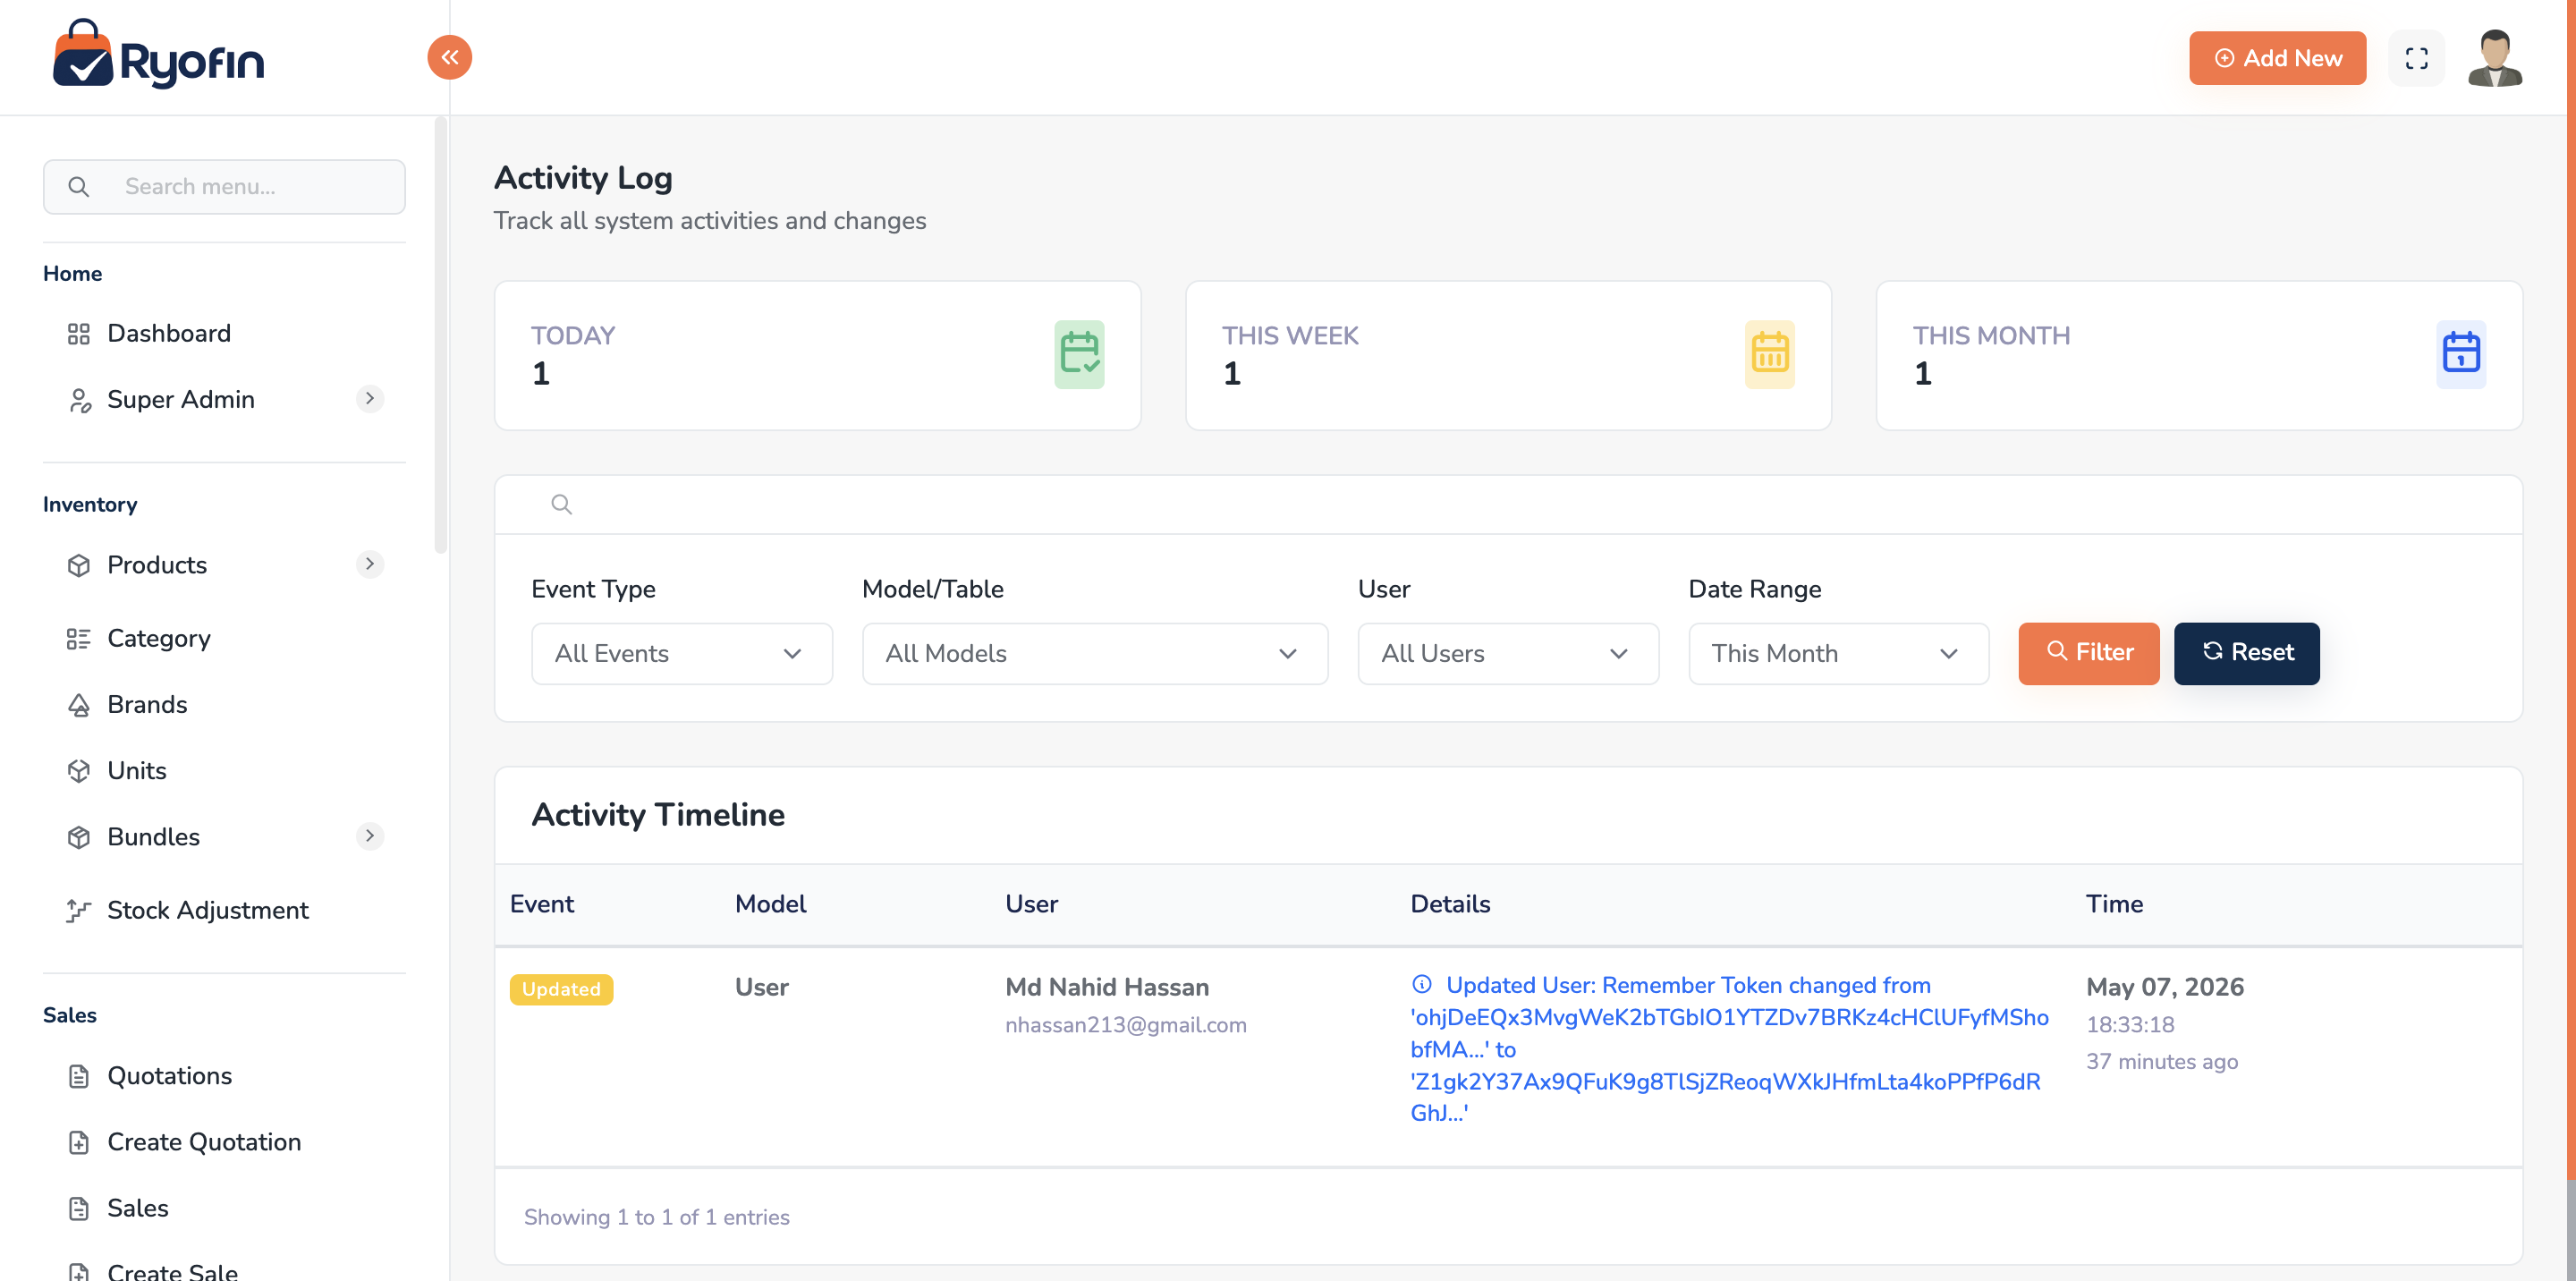
20. Activity Logs & Audit Trail
Where: Sidebar → Activity Logs.
20.1 What is logged?
- Login / logout
- Create, update, delete on key models (Sales, Purchases, Quotations, Products, Customers, Suppliers, Accounts, Manual Journals, Settings, Users, Roles)
- Field-level changes (before / after) where applicable
20.2 Filtering
- Date range
- User
- Module / model
- Action (created / updated / deleted)
20.3 What you see for each entry
- Who did it (user)
- When (timestamp)
- What (model + record id)
- Action
- Changes (old → new) for updates
TIP: Use Activity Logs to investigate "why did this number change?" before suspecting a bug.
20.4 Permissions
view activity log
21. Notifications (Email & SMS)
21.1 Email
Email is used for:
- New user welcome message
- Password reset link
- Quotation send-to-customer (with PDF)
- Sale invoice send-to-customer (with PDF)
The "from" address and signature come from your Settings.
21.2 SMS
SMS is used for:
- OTP-based password reset
- (Optional) sale or quotation confirmations, depending on your install
The system supports multiple SMS gateway providers (e.g. SMSHelperElite, SMSHelperSSL). Your IT/admin chooses one.
21.3 In-App Flash Messages
After every action you will see a green (success) or red (error) banner at the top of the page, e.g. "Sale created successfully" or "Cannot delete: account has transactions".
22. End-to-End Workflow Recipes
These are the most useful "real life" sequences. Each recipe lists the steps in order across multiple modules.
22.1 Recipe: Onboard a new shop
Goal: A brand-new business is starting on RyoFin.
- Super Admin creates the Company (5.1). Default chart of accounts is seeded.
- Tenant Owner creates one or more Stores (5.2).
- Tenant Owner creates Users and assigns Roles + Stores (16).
- Set up Brands, Categories, Units, Taxes (6).
- Set up any Custom Fields (6.5).
- Add Products (7).
- Enter Opening Stock via Stock Adjustments (13) or via initial Purchases.
- Add Customers and Suppliers (8).
- Optional: enter Opening Balances for receivables / payables / cash via Manual Journals (14.9).
- Train staff on Sales and Purchases.
22.2 Recipe: Quote → Sale → Payment
Goal: Sell to a customer who first asked for a quotation.
- Create Quotation (11.3).
- Send Email to the customer (11.4).
- Customer agrees → Accept quotation (11.5).
- Convert to Sale (11.6).
- On the new Sale, Add Payment (10.4).
- Done. Inventory and accounts are all updated.
22.3 Recipe: Receive new stock from a supplier on credit
- Create Purchase with the supplier (9.3).
- Stock and Suppliers Payable are updated automatically.
- Later, when you pay the supplier, open the purchase and Add Payment (9.4).
22.4 Recipe: Stock count adjustment after physical inventory
- Run Stock Report to see system stock per product.
- Compare with physical count.
- Create Stock Adjustment (13.2) for each variance:
- Increase if physical > system (reason: "Found").
- Decrease if physical < system (reason: "Damage" / "Lost").
- Save. Inventory account is corrected automatically.
22.5 Recipe: Pay rent / utility expense
- Accounts → Expenses → Add Expense (14.5).
- Pick "Rent" expense account, paid from "Bank".
- Save. Income Statement instantly reflects the cost.
22.6 Recipe: Transfer money between Cash and Bank
- Accounts → Fund Transfers → Create (14.2).
- From Cash, To Bank, Amount.
- Save.
22.7 Recipe: Month-end close
- Make sure all sales and purchases for the month are recorded.
- Reconcile Cash and Bank with physical/bank statement (use Account Statement report).
- Record Expenses for the month (rent, salaries, utilities).
- Run Trial Balance — debits must equal credits.
- Run Income Statement for the month → review profit.
- Run Balance Sheet as of month-end → archive PDF.
- Run Customer Due and Supplier Due reports → follow up.
22.8 Recipe: Sell a Bundle
- Create the bundle and items (12.3).
- Make sure component products have stock.
- Create Sale, pick the bundle as a line item.
- Save. Component stock is consumed automatically; COGS is computed from components.
22.9 Recipe: Refund / Reversal
RyoFin does not have a separate "refund" module today. Use the closest matching action:
- Wrong sale → Edit the sale (reverses & reposts) or Delete the sale (full reversal). The sale stays in audit history because of soft delete.
- Customer returned an item but rest of sale is fine → Edit the sale and lower the quantity. Then refund cash via a Manual Journal or via a Payment with a negative amount, depending on your install.
TIP: Talk to your administrator about the recommended refund procedure for your business.
23. Troubleshooting & FAQ
23.1 Login & Access
Q: I cannot log in — wrong credentials.
- Double-check phone number and password (caps lock?).
- Use Forgot Password to reset via OTP.
- If still blocked, contact your admin — your account may be inactive.
Q: I do not see the Stores dropdown in the top bar.
- You are assigned to only one store (or none). Ask your admin to assign you.
Q: I cannot see a button I expect (e.g. "Convert to Sale").
- Your role likely lacks the permission, or the record is in a status that hides the button (e.g. only Accepted quotations show "Convert to Sale"). See 11.2.
23.2 Data Issues
Q: Stock looks wrong on a product.
- Check the Stock Report for that store.
- Check Stock Adjustments and Activity Log for that product.
- Look for deleted/edited sales and purchases that may have reversed stock.
Q: My report numbers don't match what I expect.
- Confirm date range and store filter.
- Soft-deleted records are excluded — that may be why a number changed after a deletion.
- For accounting reports, run Trial Balance first; if it doesn't balance, the issue is likely a manual journal that was tampered with — check Activity Log.
Q: I cannot delete an account.
- An account with transactions cannot be deleted. Deactivate it instead.
Q: A bundle shows 0 stock.
- That is by design. Bundles are virtual. See 12.2.
23.3 Quotations
Q: My quotation expired before the customer responded.
- Create a new quotation (you can copy the items) or — for staff with permission — Edit to extend the expiry before it expires next time.
Q: "Convert to Sale" button is missing.
- The quotation is not in Accepted status, or has already been converted, or you do not have permission. See 11.6.
23.4 Email & SMS
Q: Customer did not receive the quotation email.
- Check the customer's email on file is correct.
- Ask them to look in the spam folder.
- Re-send via Send Email on the quotation.
Q: I never receive the OTP SMS.
- Confirm phone number on file.
- Wait 60 seconds before re-requesting (rate limit).
- If OTP still fails, contact your administrator.
23.5 Performance
Q: A list page is slow.
- Apply tighter filters (date range, single store).
- Reduce per-page size if available.
- Contact your admin if persistent.
24. Glossary
- Account — a bucket in the chart of accounts (e.g. "Cash", "Sales Revenue").
- Accountable entity — what an account "belongs to" — a Customer, Supplier, Store, Company, or User. Used for filtering ledgers.
- Audit Trail — automatic log of who changed what.
- Balance Sheet — snapshot of Assets, Liabilities, Equity at a point in time.
- Base unit — smallest unit of a product.
- Bundle — a virtual product made of other products.
- COGS — Cost of Goods Sold; what your inventory cost you.
- Credit / Debit — the two sides of every accounting entry.
- Income Statement (P&L) — revenue, costs, profit over a period.
- Inclusive / Exclusive Tax — whether listed price already includes tax or not.
- Inventory — value of stock you currently own.
- Journal — a record of one transaction (with debits and credits).
- Ledger — list of all transactions on one account, with running balance.
- Manual Journal — a journal entry you write yourself instead of one auto-generated by a sale or purchase.
- Multi-tenant — many isolated companies in the same software.
- Payable — money you owe (suppliers, loans).
- Receivable — money owed to you (customers).
- Soft delete — a record marked as deleted but kept for history; the matching journal is reversed.
- Store / Branch — a physical or logical shop location with its own stock.
- Tenant — same as Company.
- Trial Balance — list of all account balances, used to confirm the books are in balance.
- Unit conversion — relationship between two units of the same product (e.g. 1 carton = 12 pieces).
- Voucher — a multi-line manual journal grouped by a batch ID.
25. Appendix A — Permission Reference
This is a list of permission keys grouped by module. Use it to design custom roles.
NOTE: Exact permission names may vary slightly per installation. Treat this as a reference. The seeder is the authoritative source.
23.1 Users / Roles / Permissions
view user,create user,edit user,delete userview role,create role,edit role,delete roleview permission
23.2 Company / Store
view company,create company,edit company,delete companyview store,create store,edit store,delete storeassign user to store
23.3 Master Data
view brand,create brand,edit brand,delete brandview category,create category,edit category,delete categoryview unit,create unit,edit unit,delete unitview tax,create tax,edit tax,delete taxview additional field,create additional field,edit additional field,delete additional field
23.4 Products & Stock
view product,create product,edit product,delete productview bundle,create bundle,edit bundle,delete bundle,bundle operationsview stock adjustment,create stock adjustment,delete stock adjustment
23.5 Customers & Suppliers
view customer,create customer,edit customer,delete customerview supplier,create supplier,edit supplier,delete supplier
23.6 Sales / Purchases / Quotations
view sale,create sale,edit sale,delete sale,send sale emailview sale payment,create sale payment,delete sale paymentview purchase,create purchase,edit purchase,delete purchaseview purchase payment,create purchase payment,delete purchase paymentview quotation,create quotation,edit quotation,delete quotationmark quotation sent,send quotation emailaccept quotation,reject quotation,convert quotation to sale
23.7 Accounting
view account,create account,edit account,deactivate account,delete account,reset account balanceview journalview manual journal,create manual journal,delete manual journalview ledgerview fund transfer,create fund transfer,delete fund transferview payment,create payment,delete paymentview income,create income,delete incomeview expense,create expense,delete expenseview loan,create loan,delete loanview loan return,create loan returnview security deposit,create security deposit,delete security deposit
23.8 Reports
view sales reportview purchase reportview stock reportview income statementview balance sheetview trial balanceview account statementview customer due reportview supplier due report
23.9 System
view activity logview settings,update settings